Installing a 5 zone irrigation system transforms a medium to large property into an efficiently watered landscape by dividing your yard into five separate control areas, each delivering water precisely where and when it’s needed. The installation typically takes two to three weekends for a DIYer with moderate plumbing experience, and combines both sprinkler heads for lawns and drip lines for garden beds to create a water-smart solution that can cut your outdoor water use by 30 to 50 percent compared to manual watering.
The secret to a successful multi-zone system lies in matching your water pressure and flow rate to the specific needs of different areas. Your sun-baked front lawn requires different coverage than shaded flower beds or that vegetable garden tucked along the fence line. By grouping plants with similar water requirements into dedicated zones, you avoid the all-too-common problem of overwatering shade lovers while underwatering thirsty turf.
Most homeowners choose a 5 zone configuration because it strikes the perfect balance between precise control and manageable complexity. You get enough separation to address the distinct microclimates across your property without the overwhelming valve count and wiring nightmares of an 8 or 10 zone commercial setup. One zone might serve your front lawn, another your backyard grass, a third for perimeter shrubs, a fourth for vegetable beds, and a fifth for that problem area that always seems too dry or too soggy.
This guide walks you through the entire process, from calculating your available water flow and sketching zone boundaries to trenching lines, installing valves, and programming your controller for maximum efficiency. You’ll learn which areas benefit most from rotating sprinklers versus drip emitters, and how to create a system that adapts to seasonal changes while keeping your water bills reasonable and your landscape thriving year-round.
Understanding Your 5 Zone System Before You Begin
Before you dig the first trench or connect a single pipe, you need to understand what makes a five-zone system tick. This isn’t just about dividing your property into random sections, it’s about creating targeted watering areas that deliver the right amount of water to plants with similar needs while avoiding waste.
An irrigation zone is essentially a group of sprinklers or drip emitters controlled by a single valve, all operating together on the same schedule. Each zone should serve plants with comparable water requirements, sun exposure, and soil conditions. For example, your sunny front lawn needs different watering than your shaded flower beds or your thirsty vegetable garden. By creating five separate zones, you gain precise control over when, how long, and how much each area gets watered.
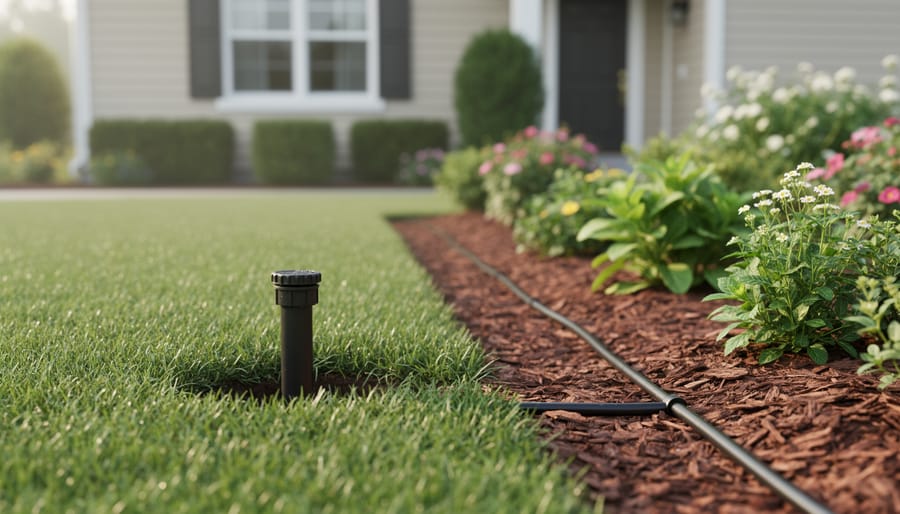
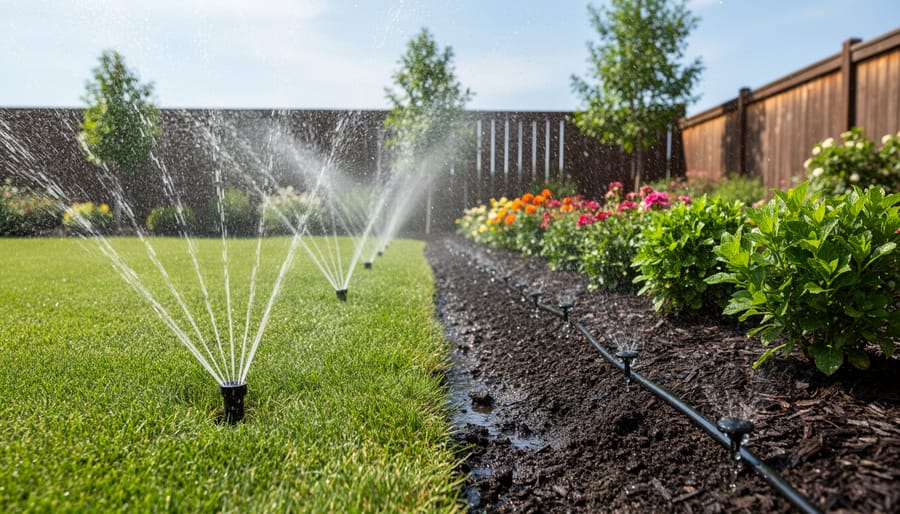
The power of a multi-zone setup becomes clear when you combine sprinkler and drip irrigation methods. Sprinklers work best for open lawn areas where you need broad, uniform coverage. They deliver water from above, mimicking rainfall and reaching every blade of grass in their pattern. Drip irrigation, on the other hand, excels in garden beds, around trees and shrubs, and in vegetable gardens where you want slow, steady moisture delivered directly to root zones without wetting foliage.
Most five-zone residential systems dedicate two or three zones to lawn sprinklers and the remaining zones to drip lines for gardens and landscaped beds. This hybrid approach maximizes efficiency because you’re not over-watering deep-rooted shrubs to keep grass green, or under-watering turf because your drip lines run too infrequently. Each zone operates independently, so your controller can run lawn sprinklers for 20 minutes three times weekly while garden drip zones go for 45 minutes twice weekly.
Water pressure also factors into zone design. Grouping too many sprinkler heads on one valve creates weak, uneven spray patterns. Proper zone division ensures each valve controls a manageable number of outlets, maintaining strong performance across your entire property.
Tools, Materials, and Equipment You’ll Need
Before you start digging trenches or connecting pipes, gather everything you’ll need for the job. Having all your materials and tools on hand eliminates frustrating mid-project trips to the hardware store and keeps your installation moving smoothly. For a 5 zone system covering a typical medium-to-large property, you’re looking at a substantial materials list, but organizing it by system component makes shopping and staging much easier.
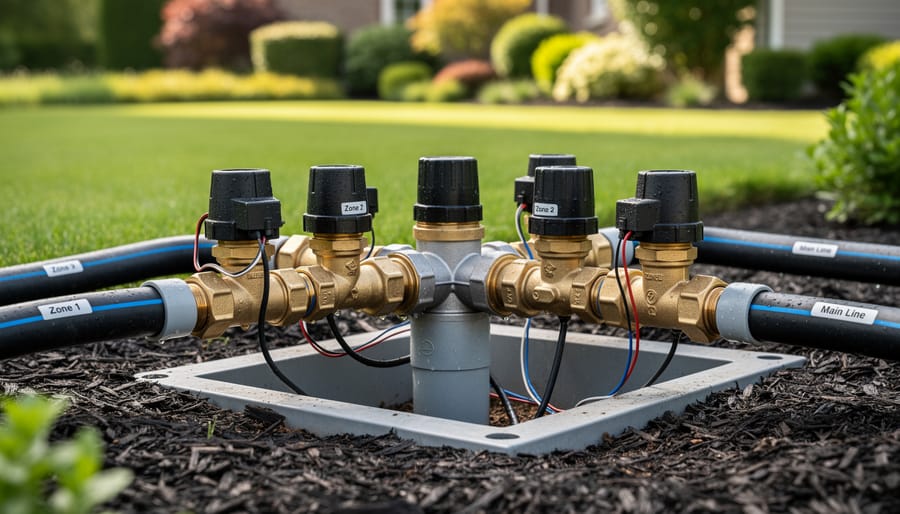
Start with your control equipment: a programmable irrigation controller capable of managing at least five stations, a valve manifold assembly (which houses your five zone valves in one compact unit), five 24-volt zone valves with flow control, and a backflow preventer appropriate for your local code requirements. Choose a controller with rain sensor compatibility and smart scheduling features to maximize water efficiency throughout 2026’s varying weather patterns.
For the piping infrastructure, plan on enough 1-inch PVC mainline pipe to reach from your water source to the manifold location, plus 3/4-inch PVC lateral pipes for each zone’s supply lines. Stock up on PVC fittings including elbows, tees, couplers, and adapters in both sizes, along with PVC primer and cement, Teflon tape for threaded connections, and five valve boxes to protect your zone valves underground. Buy 10-15 percent more pipe and fittings than your measurements suggest; you’ll use it.
Your sprinkler zones need appropriate heads based on coverage area: typically a mix of spray heads for smaller zones and rotor heads for larger lawn areas. Figure roughly one head per 100-200 square feet depending on head type and water pressure. For drip zones, get 1/2-inch or 5/8-inch drip tubing (enough to run through all garden beds), adjustable drip emitters or inline emitters spaced for your plants’ needs, micro-sprayers for ground cover areas, tubing stakes to secure lines, and pressure regulators to keep drip systems running at their optimal 25-30 PSI.
Essential installation tools and supplies include:
- Trenching shovel or rental trencher for digging mainline and lateral trenches
- PVC pipe cutter or hacksaw for clean, square cuts
- Measuring tape (100-foot recommended) and marking flags for layout
- 18-gauge waterproof wire for connecting valves to controller, plus wire connectors and electrical tape
- Adjustable wrench and screwdrivers (flathead and Phillips) for valve and head installation
- Hole punch tool for installing emitters in drip tubing
- Utility knife for cutting drip lines and removing pipe burrs
- Marker or spray paint for marking trench routes on the ground
Consider sustainable choices where possible: look for controllers with EPA WaterSense certification, choose drip irrigation components made from recycled materials, and select sprinkler heads with pressure-regulating features that prevent misting and waste. Quality components cost more upfront but reduce water waste and last years longer than cheaper alternatives, making them both environmentally and economically smarter investments for your 5 zone system.
Safety Precautions and Pre-Installation Checks
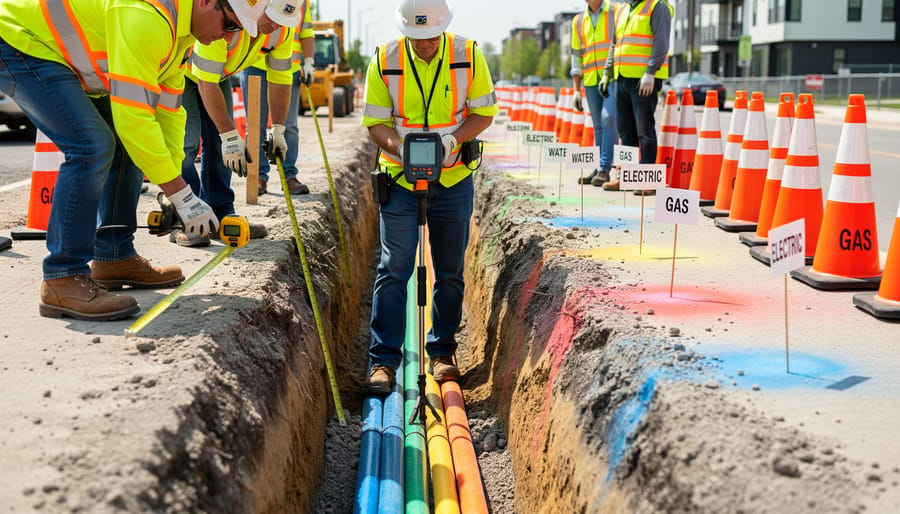
Before you touch a shovel or connect a single pipe, you need to protect yourself and your property. A five-zone irrigation system involves digging, working with chemicals, handling electrical components, and tapping into your water supply, each step carries specific risks that proper preparation eliminates.
This free service maps out what’s buried under your property, including lines you might not know exist. Wait for the utility markers to arrive and flag everything before you start trenching. The few days of patience could save your life.
Turn off your main water supply at the meter or house shutoff before you begin any connections. Working on live water lines creates flooding, water damage, and difficulty achieving proper connections. Keep the supply off until you’ve completed all pipe assembly and you’re ready for testing.
PVC primer and cement release strong fumes that cause dizziness and headaches in enclosed spaces. Work outdoors or in well-ventilated areas, wear safety glasses to protect your eyes from splashes, and keep these chemicals away from open flames. The purple primer stains skin and clothing permanently, so disposable gloves are smart.
When trenching, watch your footing and take breaks if you’re hand-digging. Rental trenchers have moving blades that demand full attention and closed-toe boots. Never reach into a trench to adjust anything while someone else operates machinery.
For controller wiring, shut off power at the breaker before making any connections. Even low-voltage irrigation wire can shock you if the transformer is energized. Mount the controller where it stays dry and protected from direct weather.
Check with your local building department about permit requirements. Many jurisdictions require permits for irrigation systems, especially when you’re connecting to municipal water or installing backflow preventers. Inspections ensure your system meets code and protects the public water supply from contamination.
Planning and Mapping Your 5 Irrigation Zones
Before you start digging trenches or buying pipes, spend time mapping your property to create five irrigation zones that make actual sense for your landscape. Walk your yard at different times of day, noticing which areas bake in full sun and which stay shaded, where water pools after rain, and what types of plants grow where.
Think about grouping areas with similar watering needs rather than just dividing your property into five equal sections. Your sun-drenched front lawn has completely different requirements than the shaded hostas along your north-facing fence. Mixing them in the same zone forces you to either underwater the grass or drown the shade plants. A typical five-zone layout might include three sprinkler zones (front lawn, side yard, back lawn) and two drip zones (perennial beds and vegetable garden), but your property’s unique characteristics should drive the final design.
Several factors will shape where you draw zone boundaries:
– Water pressureGroup zones so each has adequate pressure for its irrigation type without overloading your supply
– Plant typesSeparate thirsty lawns from drought-tolerant shrubs and water-hungry vegetables
– Sun/shade patternsFull-sun zones need more frequent watering than shaded areas
– Slope and drainageSteep slopes or clay soil may need slower application rates to prevent runoff
– Maintenance accessKeep zones accessible for adjustments without trampling other plantings
The irrigation method matters as much as the zone boundaries themselves. Sprinklers work beautifully for lawns where you need broad, even coverage, but they waste water on mulched beds where drip lines deliver moisture directly to roots. Your vegetable garden thrives with drip irrigation that keeps foliage dry and reduces disease, while your foundation plantings along the house might need a mix of drip emitters and micro-sprayers depending on plant density.
Sketch your zones on paper or use your phone to mark areas with photos. Note which zones will use sprinklers, which get drip lines, and where transitions happen. This planning prevents expensive mistakes and creates a system that actually matches how your landscape grows.
Step-by-Step Installation Process
Step 1: Install the Irrigation Controller and Valve Manifold
Start with the controller location. Mount it in a protected spot, garage wall, covered porch, or weatherproof outdoor box, within six feet of a grounded electrical outlet and where you can easily access it for programming. The controller manages all five zones from this central point, so choose wisely. Most models come with mounting screws and a template. Level it on the wall and secure it firmly.
Next, tackle the valve manifold assembly near your main water supply. This is where your five zone valves cluster together, typically in an underground valve box for protection. Install the manifold after your backflow preventer (required by most codes) and before any zone lines branch off. Leave 18-24 inches of workspace above the valves for future maintenance. Assemble the manifold by connecting your zone valves to a common PVC manifold pipe using threaded adapters and Teflon tape. Each valve corresponds to one zone.
Now run the control wires. Use direct burial irrigation wire, 18-gauge works for most residential setups. Run one wire from each zone valve terminal back to the controller location, plus one common wire shared by all valves. Bundle the wires together with zip ties every few feet, and bury them in the same trench as your mainline where possible. Leave six inches of extra wire at both ends for easy connections and future adjustments.
Step 2: Trench Your Mainline and Zone Lines
Start by marking your trench routes with spray paint or flour, following the layout you mapped earlier. This visual guide keeps you on track and helps you spot potential obstacles before you dig.
For most residential installations, trenches need to be 8-12 inches deep. Check your local frost line requirements, if you live in a cold climate, you might need to go deeper to prevent winter pipe damage. The mainline running from your manifold to the point where your zones branch off should be widest and straightest possible to maintain good water pressure.
A manual trenching shovel works fine for smaller properties, but consider renting a walk-behind trencher or sod cutter for larger jobs. These power tools save hours of backbreaking work and create cleaner, more uniform trenches. If you’re keeping your sod intact for replanting, cut strips carefully and roll them up like carpet, grass-side in. Store these rolls in shade and keep them moist while you work.
When trenching across lawn areas, work methodically from the manifold outward toward each zone. Keep your trenches as narrow as possible while still allowing room to work with the pipe, typically 4-6 inches wide is sufficient.
Step 3: Install PVC Mainline and Zone Valve Connections
Now you’re ready to connect the plumbing that forms the skeleton of your irrigation system. Start by measuring and cutting your PVC mainline pipe to run from your water source to the valve manifold location. Use a PVC pipe cutter or hacksaw for clean cuts, then deburr the edges with sandpaper to ensure proper seating.
Before assembling any connections, lay out all pipes and fittings in their approximate positions. This dry-fit approach helps you spot measurement errors before committing to glue. When you’re satisfied with the layout, grab your purple PVC primer and clear cement.
Apply primer generously to both the inside of each fitting and the outside of the pipe you’re inserting. The primer softens the PVC surface for a chemical bond. Immediately follow with cement on both surfaces, working quickly since you have only 5 to 10 seconds before it begins setting. Push the pipe fully into the fitting with a slight twisting motion, then hold it for 15 seconds.
Connect each of the five zone valves to the manifold using appropriate tees or elbows. The valve outlet becomes the starting point for that zone’s lateral line. Run these lateral lines toward their respective zones, using long sweeping bends rather than sharp 90-degree elbows where possible to maintain better water pressure.
Work systematically through one zone at a time, and allow joints to cure for at least 15 minutes before moving assembled sections.
Step 4: Set Up Sprinkler Heads for Lawn Zones
With your lateral lines laid and trenches in place, you’re ready to install sprinkler heads in your lawn zones. Most 5 zone systems dedicate two or three zones to turf areas, and proper head placement makes the difference between patchy brown spots and lush, evenly watered grass.
Start by attaching risers to your lateral pipes at the locations you marked during planning. For standard residential lawns, space rotary heads 15 to 30 feet apart depending on your water pressure and head type. Pop-up spray heads work better for smaller lawn zones and should sit 8 to 15 feet apart. The goal is overlapping coverage, often called head-to-head spacing, where each sprinkler’s spray reaches the next sprinkler. This overlap prevents dry gaps.
Thread each sprinkler head onto its riser using Teflon tape on the threads to prevent leaks. Make sure heads sit flush with or slightly below the soil surface so mowers won’t damage them. Before backfilling, turn on each zone briefly to check the spray pattern. Adjust the arc and radius using the screws or dials on top of each head until you achieve uniform coverage with minimal overspray onto hardscapes. Fine-tuning now saves water and hassle later.
Step 5: Install Drip Irrigation Lines for Garden Zones
Drip irrigation delivers water directly to plant roots with minimal waste, making it perfect for garden beds, vegetable patches, and shrub zones. Start by laying your ½-inch mainline tubing along the primary path through each drip zone, securing it with landscape staples every 3 to 4 feet to prevent shifting.
From the mainline, run ¼-inch distribution tubing to individual plants or rows. For established shrubs and perennials, install emitters (typically 1-2 GPH) directly into the mainline about 6 to 12 inches from each plant’s base, depending on mature size. Larger shrubs benefit from multiple emitters spaced evenly around their drip line.
In vegetable gardens, lay drip tape or tubing along rows with emitters spaced 12 to 18 inches apart for consistent moisture. For container gardens or dense plantings, micro-sprayers offer better coverage than individual emitters.
Always install a pressure regulator (typically 25 PSI for drip systems) and filter at the zone valve to protect emitters from clogging. Flush the lines before installing end caps by running water through open tube ends for 30 seconds. This simple step removes debris that could block emitters and ensures reliable, efficient watering from day one.
Step 6: Wire the Controller to Zone Valves
With the physical irrigation components in place, you’re ready to bring your system to life by connecting the controller to each zone valve. This electrical work is straightforward since irrigation controllers use safe, low-voltage wiring (typically 24 volts).
Start by running a wire bundle from your controller location to the valve manifold. You’ll need one wire for each zone plus one common wire, so that’s six wires total for a 5 zone system. Many irrigation supply stores sell pre-bundled wire in 7-strand configurations, giving you an extra wire for future expansion.
Strip about half an inch of insulation from each wire end. At the controller, connect one wire from each zone valve to its numbered terminal (Zone 1, Zone 2, and so on). All five zone valves share the common wire, which connects to the “C” or “COM” terminal on your controller. Tighten the terminal screws firmly to ensure solid contact.
At the valve manifold end, connect each colored wire to its corresponding zone valve’s two terminals. One terminal gets the dedicated zone wire, the other gets the shared common wire. Use waterproof wire connectors (not standard wire nuts) and wrap connections with self-fusing silicone tape for double protection against moisture. Coil any excess wire neatly in the valve box rather than cutting it short, you’ll appreciate the slack during future maintenance.
Testing, Adjusting, and Verifying Your System Works

With your system physically installed, testing and fine-tuning separates a functional irrigation setup from an optimized one. Start by turning on your main water supply slowly to gradually pressurize the system, then test each zone individually to catch issues before they become problems.
Begin at the controller and manually activate Zone 1. Walk the entire zone while it runs, watching for leaks at connections, geysers from cracked pipes, or sprinkler heads that won’t pop up. Let it run for five minutes to observe coverage patterns. Repeat this process for all five zones, taking notes on any adjustments needed. You’ll likely spot heads shooting over sidewalks, dry patches between sprinklers, or drip emitters that aren’t flowing.
For sprinkler zones, adjust each head while it’s running. Most pop-up heads have a small screw on top that controls spray distance and an adjustment collar that sets the arc. Turn heads to eliminate overspray onto hardscapes and increase radius where you see dry spots. Proper overlap is key: each sprinkler should reach the next head with its spray for even coverage. If you see donut-shaped dry patches around heads, they’re spaced too far apart.
In drip zones, check that every emitter is flowing water. Clogged emitters are common right after installation due to debris in new lines. Flush the end of each drip line by removing the end cap and running the zone for 30 seconds, then replace the cap and verify flow at each plant. Move emitters closer to root zones if needed, and add extra emitters where plants seem to be getting insufficient water.
Follow this systematic verification checklist:
- Run a full pressure test by operating all zones sequentially and checking static pressure at the controller gauge.
- Inspect every connection point, valve, and fitting for leaks or seepage while zones are active.
- Perform a coverage test by placing empty tuna cans throughout lawn zones to measure water distribution after 15 minutes.
- Adjust flow rates at each emitter and sprinkler head based on observed patterns and plant needs.
- Program the controller with zone-specific schedules, setting different run times for sprinkler versus drip zones.
- Monitor the system during its first 24-hour cycle to catch any issues that appear during automated operation.
Success looks like uniform green-up across lawn zones within two weeks, no standing water or runoff, and garden plants showing vigorous growth without wilting. If one zone finishes its cycle with pooling water, reduce its run time. If another leaves dry patches, increase duration or add heads.
Common issues include low pressure causing weak spray patterns (usually a mainline sizing problem), zones that won’t shut off (likely a stuck valve diaphragm), or uneven coverage (typically head spacing or adjustment issues). Address these now rather than waiting for brown spots to appear in July heat.
Backfilling, Cleanup, and Final Touches
Once your system passes testing and you’ve confirmed everything works properly, it’s time to restore your property to its pre-installation condition. Start by removing any debris, unused materials, or packaging from the work area. Set aside spare parts like extra sprinkler heads, fittings, and wire for future repairs.
Begin backfilling trenches gradually, starting from the furthest point and working back toward the mainline. Add soil in 2-3 inch layers rather than dumping it all at once, which can leave air pockets that cause settling later. Gently tamp down each layer with your foot or a hand tamper to prevent future dips and depressions in your lawn.
For turf areas, if you saved the sod strips from trenching, replace them now and press firmly into place. Water these restored sections daily for the first week to help roots reestablish. If you removed chunks of sod, fill the trench, then overseed and cover with a thin layer of straw mulch. You should see new grass emerging within 10-14 days during the 2026 growing season.
In garden beds and landscaped areas, restore mulch to its original depth of 2-3 inches around plants. This helps retain moisture while hiding any disturbed soil.
Before you consider the project complete, take photos of your system layout and create a simple sketch showing valve locations, zone boundaries, and the path of underground lines. Store this documentation with your controller manual. This reference proves invaluable when you need to troubleshoot issues, add features, or perform seasonal maintenance in the years ahead.
Setting Up Efficient Watering Schedules for Each Zone
Now that your five zones are wired and tested, smart scheduling transforms your system from functional to genuinely efficient. Each zone should run on its own schedule because a sunny lawn drinks far more water than shaded shrubs under drip lines.
Start with your lawn zones, those with sprinkler heads typically need 1 to 1.5 inches of water weekly during the growing season. Run these early morning (5-7 AM) when evaporation is minimal and winds are calm. Split the weekly total across two or three sessions rather than one long run; this prevents runoff on clay soils and encourages deeper root growth. A front lawn in full sun might need three 20-minute cycles per week in summer, while a partially shaded back lawn could thrive on two.
Garden zones with drip irrigation require different math. Drip systems deliver water slowly and precisely, so they run longer but less frequently. Vegetable gardens often benefit from 30-45 minute sessions three times weekly, adjusted for rainfall. Established shrub zones might need only two deep waterings per week, each running 45-60 minutes to saturate root zones without waste.
Match timing to each zone’s conditions. Morning watering suits almost everything, but if your controller can’t run all five zones before 9 AM, prioritize lawn zones early and schedule drip garden zones for late afternoon when foliage can dry before evening.
Adjust seasonally, reduce all zones by 30-40% in spring and fall when temperatures drop and rainfall increases. Summer 2026 heat waves might demand temporary increases, but always verify soil moisture before adding time. Most systems overwater by default; your plants will tell you when they actually need more.
Common Questions About 5 Zone Irrigation Installation
Is installing a 5 zone system really a DIY-friendly project?
Yes, if you’re comfortable with basic plumbing and electrical tasks. The installation requires patience and physical work, but the steps are straightforward once you understand the process. Most homeowners with moderate DIY experience can complete the project over a long weekend. If trenching feels overwhelming or you have concerns about electrical connections, consider hiring help just for those specific phases while handling the rest yourself.
How much should I budget for materials?
Expect to spend between $800 and $1,500 for a complete 5 zone system, depending on property size and component quality. The controller runs $100-250, zone valves cost $30-60 each, and PVC pipe, fittings, sprinkler heads, and drip components make up the bulk of remaining costs. You’ll save 50-70% compared to professional installation, which typically runs $2,500-4,000 for a similar setup. Higher-quality components cost more upfront but reduce maintenance headaches and replacement frequency.
Do I need to winterize my 5 zone system?
Yes, if you live where temperatures drop below freezing. You’ll need to blow out all water from pipes, valves, and sprinkler heads using compressed air before the first hard freeze. Set aside $150-300 if hiring a professional, or invest in a compressor rental if doing it yourself.
Can I add a sixth zone later without starting over?
Absolutely, as long as your controller has spare terminals and your water pressure can handle another zone. You’ll simply run a new lateral line from the manifold, add another valve, and wire it to an unused controller terminal.
What water pressure do I need for a 5 zone system?
Most residential systems need 40-65 PSI to function properly. If your pressure falls below 40 PSI with multiple zones running, you’ll experience weak spray patterns and poor coverage, which is precisely why multiple zones help by running one at a time.
When should I hire a professional instead of DIY?
Consider professional help if you have challenging terrain, extremely hard soil or rocky conditions, complex landscaping with mature trees, or if local codes require licensed installation. Also consider it if you’re uncomfortable with electrical work or your property has known utility congestion underground.
How difficult is ongoing maintenance after installation?
Routine maintenance is minimal. Plan on checking sprinkler head alignment and drip emitter function monthly during the growing season, cleaning clogged emitters as needed, and adjusting your controller seasonally. Spring startup involves checking for winter damage and testing each zone, while fall requires winterization in cold climates. Most homeowners spend about an hour per month on basic upkeep once the system is running smoothly.
Will a 5 zone system actually save water compared to manual watering?
Yes, when programmed correctly. You’ll eliminate overwatering from forgetting to move hoses and reduce runoff from applying too much water too quickly. The ability to customize schedules for different plant needs means your lawn gets appropriate moisture without drowning your vegetable garden or vice versa. Most homeowners see 30-50% water savings compared to uncontrolled hose watering, with the added benefit of healthier plants from consistent moisture delivery.
Installing a five zone irrigation system transforms how you manage water across your property. You have created a setup that delivers the right amount of water to each area based on its specific needs, which means healthier plants, a lusher lawn, and significantly lower water bills. The convenience of automated watering frees up your time while ensuring consistency that manual watering simply cannot match.
This project demands careful planning and attention to detail, but it is absolutely achievable as a DIY undertaking. The satisfaction of watching your system run smoothly, knowing you built it yourself, makes the effort worthwhile. You have invested in both your property’s health and its long-term sustainability.
Regular maintenance keeps your system running efficiently for years. Check for leaks, adjust heads seasonally, and winterize properly in cold climates. Consider exploring smart controller upgrades that adjust watering based on weather data, pushing your water savings even further.
Your irrigation system is the foundation of a thriving landscape. Pair it with sustainable lawn care practices like proper mowing height, organic fertilization, and native plant selection to maximize both environmental benefits and curb appeal. The groundwork you have laid today will pay dividends every growing season ahead.