A retaining wall without proper drainage is a disaster waiting to happen. Water pressure building up behind your wall creates hydrostatic force that can crack, bulge, or completely topple even the sturdiest structure within just a few seasons. Understanding drainage design isn’t just about preventing expensive failures—it’s about building something that lasts decades while protecting your landscape investment.
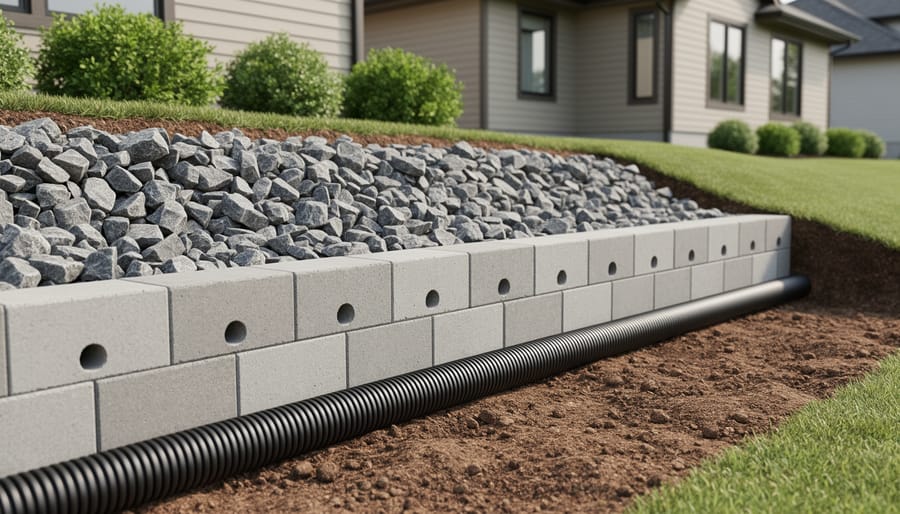
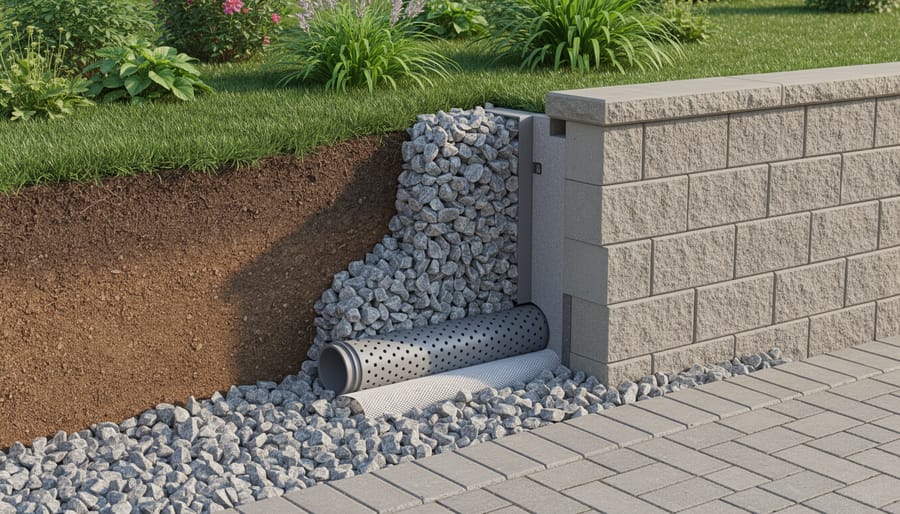
Install a gravel backfill layer at least 12 inches wide directly behind your wall, extending from the foundation to within 6 inches of the surface. This drainage aggregate creates a pathway for water to flow downward instead of pushing against your wall, dramatically reducing hydrostatic pressure. Choose crushed stone ranging from 3/4 to 1-1/2 inches in diameter rather than round river rock, as angular edges prevent the material from compacting and maintain drainage capacity over time.
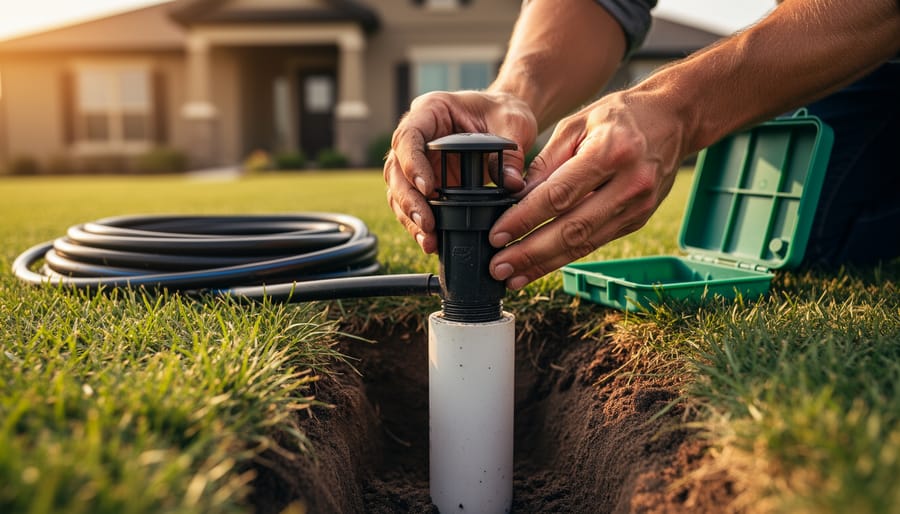
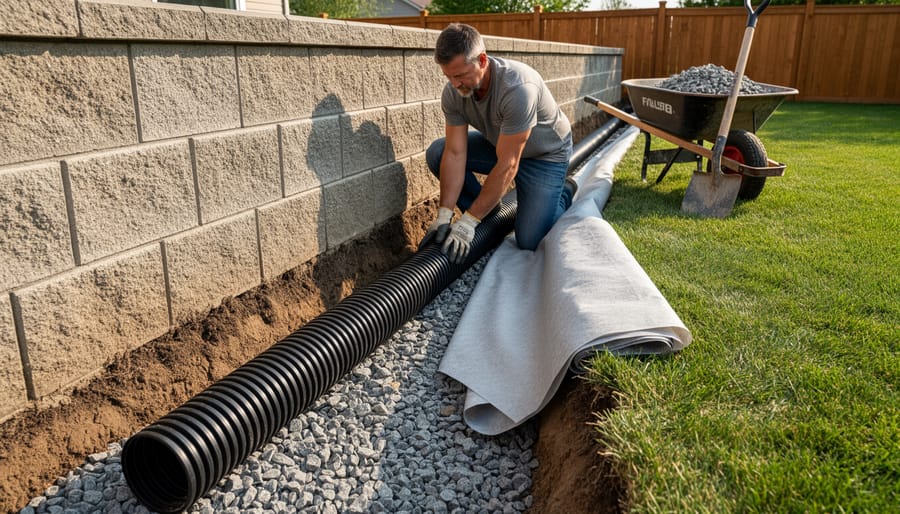
Position perforated drainage pipe at the base of your wall, with holes facing downward, running along the entire length and sloping at least 1/4 inch per foot toward a suitable outlet. Wrap this pipe in drainage fabric to prevent soil particles from clogging the perforations while allowing water to enter freely.
Add weep holes every 4 to 6 feet along the wall face, particularly for solid concrete or masonry structures. These openings, typically 3 inches in diameter, provide secondary drainage routes and visible confirmation that your system is working. This combination approach—backfill drainage, footer pipe, and weep holes—creates redundancy that protects your investment regardless of soil conditions or rainfall intensity.
Understanding Why Drainage Makes or Breaks Your Retaining Wall
The Hidden Enemy: Hydrostatic Pressure Explained
Imagine filling a bucket with water and holding your hand against one side. You’d feel the water pushing outward, right? That same force, called hydrostatic pressure, happens behind your retaining wall when water accumulates in the soil. Think of it like this: every rainstorm turns the earth behind your wall into a giant, sodden sponge that’s constantly pushing, pushing, pushing.
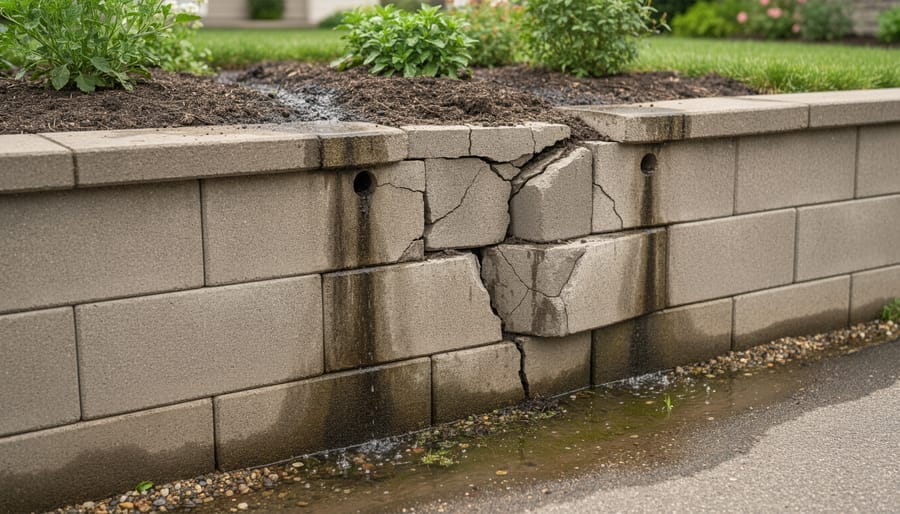
Here’s what makes this pressure so sneaky. While your beautiful retaining wall might look sturdy enough to hold back soil, adding water into the equation changes everything. Saturated soil can weigh nearly twice as much as dry soil, and all that extra weight wants to go somewhere. Without proper drainage, this relentless force builds up gradually, creating cracks, causing the wall to lean forward, or in worst cases, leading to complete collapse.
The good news? Understanding this invisible enemy is your first step toward defeating it. Just as you wouldn’t leave your garden beds constantly waterlogged (your plants would drown!), your retaining wall needs a way to release excess moisture. By incorporating drainage solutions from the start, you’re working with nature rather than fighting against it, creating a sustainable structure that’ll protect your terraced garden beds for years to come.
Signs Your Wall Has Drainage Problems
Catching drainage problems early can save you from costly repairs and protect your garden investment. Here’s what to watch for in your retaining wall:
Keep an eye out for visible bulging or bowing in the wall structure. When water pressure builds up behind your wall without proper drainage, the soil becomes saturated and heavy, pushing the wall outward. You might notice the wall leaning forward slightly or sections that appear to curve outward unnaturally.
Cracking is another telltale sign that drainage isn’t working effectively. Look for horizontal cracks, stepped cracks following the mortar joints in stone or brick walls, or vertical splits in the material. These often indicate excessive pressure from waterlogged soil.
Water stains, moss growth, or consistently damp patches on the wall face suggest water is seeping through rather than draining away properly. This not only weakens the structure but can damage your plants and create unhealthy growing conditions.
Check if your wall is tilting noticeably or if individual blocks have shifted from their original position. A properly designed drainage system prevents the soil movement that causes this instability.
Finally, observe your garden beds after rainfall. Persistent pooling water near the wall base or soggy soil that doesn’t drain within a day or two signals inadequate drainage that needs immediate attention.
Essential Drainage Components for Retaining Wall Design
Gravel Backfill: Your First Line of Defense
Think of gravel backfill as your retaining wall’s best friend—it’s the unsung hero that keeps water from building up and putting pressure on your structure. Here’s what you need to know to get it right.
First, let’s talk about the right type of gravel. You’ll want clean, crushed stone, typically three-quarter inch angular rock. Why crushed instead of those smooth river rocks you might have lying around? Those angular edges lock together and create better drainage channels. River rock, despite looking nice, tends to shift and doesn’t drain as efficiently. Think of it like building with Lego blocks versus marbles—one stays put and works better.
For depth, plan on at least 12 inches of gravel directly behind your wall, though 18 inches is even better for taller structures. This creates a generous buffer zone where water can flow freely downward instead of pushing against your wall.
When placing the gravel, work in layers and compact lightly as you go. You want it settled but not so compressed that it loses its drainage capacity. This simple step makes all the difference in protecting your investment and keeping your yard’s landscape healthy and stable for years to come.
Perforated Drain Pipe (Weep Hole Alternative)
For a more robust and long-lasting drainage solution, installing perforated drain pipe at the base of your retaining wall is like giving your garden a dependable underground highway for water. This method works beautifully alongside or instead of weep holes, especially for taller walls or areas with heavy rainfall.
Start by laying your perforated pipe in a trench at the base of your wall, right at footing level. The key here is positioning the holes facing downward, which might seem counterintuitive at first. This orientation actually prevents the pipe from clogging with gravel while still allowing water to enter through capillary action. Wrap the pipe in landscape fabric to keep soil and debris out while letting water flow freely.
Slope is crucial for success. Aim for a minimum grade of one-quarter inch per foot, directing water away from your wall toward a suitable outlet point like a drainage ditch, dry well, or rain garden. This gentle slope ensures gravity does the work for you without requiring pumps or electricity.
Connect your pipe to an outlet that won’t cause erosion or flooding issues. A sustainable approach is directing the water to areas where it can naturally percolate back into the ground, supporting your garden’s ecosystem rather than simply pushing the problem elsewhere. Secure all connections properly, and cover everything with clean gravel before backfilling to complete your eco-friendly drainage system.
Geotextile Fabric: Preventing Soil Migration
Think of geotextile fabric as the unsung hero behind your retaining wall’s drainage system. This specialized landscape fabric creates a critical barrier between your backfill soil and the drainage gravel, and trust me, you don’t want to skip this step.
Here’s what happens without it: over time, soil particles migrate through water movement and settle into the spaces between your drainage stones. Eventually, this clogs your carefully planned drainage system, turning your gravel into something more like concrete. I’ve seen walls fail because homeowners thought they could save a few dollars by skipping the fabric—don’t make that mistake.
The fabric works by allowing water to pass through freely while blocking soil particles. When choosing your material, proper geotextile fabric selection matters. Look for non-woven geotextile fabric specifically designed for drainage applications, typically rated at 4 to 6 ounces per square yard for most residential retaining walls.
Installation is straightforward: lay the fabric against the back of your wall and over the excavated area before adding gravel. Overlap seams by at least 12 inches, and wrap the fabric over the top of your drainage gravel before backfilling with soil. This creates a complete filter envelope that protects your drainage system for decades, ensuring your wall stands strong through countless rainstorms.
Weep Holes: When and How to Use Them
Weep holes are your solid retaining wall’s breathing system, and getting them right makes all the difference between a wall that lasts decades and one that fails prematurely. Think of them as small drainage outlets that allow trapped water to escape before it builds up dangerous pressure behind your wall.
For proper spacing, place weep holes every 4 to 6 feet horizontally along your wall’s base, about 6 inches above ground level. Each hole should be 2 to 3 inches in diameter—large enough to drain effectively but not so large that they compromise structural integrity. I recommend using PVC pipes angled slightly downward to ensure water flows freely outward.
Here’s a practical tip: Cover each weep hole opening with landscaping fabric or a filter screen on the inside before backfilling. This prevents soil from clogging the drainage path while still allowing water through—a simple step that saves headaches later.
Maintenance is refreshingly straightforward. Check your weep holes seasonally, especially after heavy rains. If you notice water staining above a weep hole or soggy soil below it, that’s actually good news—your drainage is working! However, if you spot no drainage during wet periods, gently clear any blockages with a stiff wire or flush with a garden hose to restore proper function.
Step-by-Step Drainage Design for Different Wall Types
Timber and Wooden Retaining Walls
When building timber retaining walls, proper drainage is your secret weapon against rot and premature failure. Even pressure-treated lumber needs help staying dry, so always install a gravel backfill layer at least 12 inches wide behind your wall. This creates a pathway for water to escape rather than soaking into the wood.
Here’s a practical tip from my own garden: wrap landscape fabric around your gravel backfill to keep soil from clogging the drainage pathway. It’s like giving your wall a raincoat! Install weep holes every 4-6 feet by drilling 3/8-inch holes through the timbers at the base, angled slightly downward to encourage water flow.
For those interested in sustainability, consider naturally rot-resistant alternatives like black locust, cedar, or recycled plastic lumber. These options often outlast treated wood while being gentler on the environment. Black locust, in particular, can last 50+ years without chemical treatment.
Whatever material you choose, never skimp on that drainage layer. I’ve seen too many beautiful timber walls fail within five years simply because water had nowhere to go. The extra hour spent creating proper drainage will give you decades of reliable performance.
Stone and Block Retaining Walls
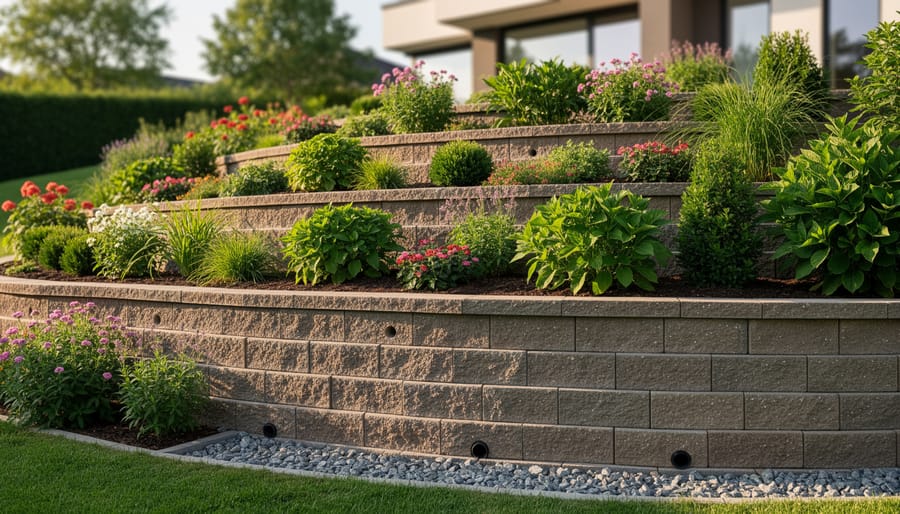
Stacked stone, concrete blocks, and interlocking block systems are fantastic choices for garden terracing because they’re attractive, durable, and surprisingly DIY-friendly. The good news? Building in proper drainage is straightforward with these systems.
For any block or stone wall, your first line of defense is a gravel drainage layer behind the wall. As you stack your blocks or stones, backfill with 12 inches of crushed gravel directly against the wall face. This creates a drainage zone that catches water before it can build pressure. Think of it as giving water an easy escape route rather than forcing it to push against your beautiful wall.
Many interlocking block systems have built-in drainage features like hollow cores or grooves that channel water downward. Take advantage of these by ensuring blocks align properly during installation. For solid stone or concrete blocks, consider leaving small weep holes every 4-6 feet along the base course by skipping mortar in vertical joints or placing short pieces of PVC pipe through the wall.
Here’s a sustainable tip: Layer landscape fabric between your native soil and gravel backfill to prevent soil from clogging your drainage system while still allowing water through. Choose non-woven geotextile fabric, which filters better than woven alternatives.
For walls taller than three feet, adding a perforated drain pipe at the base of your gravel layer provides extra insurance. Position it slightly above the wall’s footing, with holes facing down, and route it to daylight at the wall’s lowest point. This simple addition can dramatically extend your wall’s lifespan while protecting your investment.
Poured Concrete Walls
Poured concrete walls are wonderfully sturdy for your garden, but they need extra attention when it comes to drainage since they’re completely solid. Think of it this way: you’re essentially building a dam in your yard, and water has nowhere to go unless you plan for it. Without proper drainage, all that water pressure building up behind your wall will eventually cause cracks, tilting, or even complete failure—definitely not what you want after all that hard work!
The key to success with concrete walls is installing weep holes during construction. These are small openings, typically 3 to 4 inches in diameter, spaced every 4 to 8 feet along the base of your wall. I like to think of them as little escape routes for water. You can create weep holes by inserting PVC pipe sections into the forms before pouring, leaving them slightly angled downward toward the front of the wall so water flows out naturally.
But weep holes alone aren’t enough. You’ll want to install a comprehensive drainage system behind the wall, starting with a layer of gravel at least 12 inches wide. This gravel backfill acts like a highway for water to travel down to your weep holes. For even better protection, add a perforated drain pipe at the base, wrapped in landscape fabric to prevent soil from clogging it—a sustainable solution that works with nature rather than against it. The pipe should slope gently and daylight away from the wall, giving water a clear exit path and keeping your garden healthy and your wall standing strong for decades.
Calculating Drainage Needs for Your Specific Site
Soil Type and Drainage Capacity
Understanding your soil drainage capacity is absolutely essential before designing your retaining wall. The good news? Testing your soil doesn’t require fancy equipment or a degree in geology.
Start with a simple percolation test: dig a hole about 12 inches deep, fill it with water, and time how long it takes to drain. If water disappears in less than 4 hours, you’ve got sandy soil with excellent drainage. Taking 8-12 hours suggests loam, which balances drainage and retention nicely. Still sitting there after 24 hours? That’s clay, and it’s going to need extra attention in your wall design.
Clay soil is the trickiest customer. It holds moisture like a sponge, creating tremendous pressure behind retaining walls. You’ll need more robust drainage features like perforated pipes and thicker gravel backfill. Sandy soil drains quickly but can shift, requiring proper compaction. Loam is your Goldilocks option, offering moderate drainage with good stability.
Here’s a handy field test: grab a handful of moist soil and squeeze it. Clay forms a tight ball, sand crumbles apart immediately, and loam holds together loosely. This quick assessment helps you make smarter, more sustainable drainage decisions that’ll keep your wall standing strong for years.
Climate and Rainfall Considerations
Before you break ground on your retaining wall, take a good look at your local weather patterns and how water behaves in your yard throughout the year. Trust me, understanding your climate will save you headaches down the road.
Start by researching your area’s average annual rainfall and how it’s distributed across the seasons. If you live somewhere with heavy spring rains or sudden downpours, your drainage system needs to handle those peak flows without becoming overwhelmed. Similarly, regions with wet winters followed by dry summers experience dramatic water table fluctuations that put extra pressure on retaining walls during certain months.
Pay attention to how water moves through your specific yard. Walk around after a good rainstorm and notice where puddles form or where water naturally flows. This real-world observation is just as valuable as rainfall statistics. Your soil’s drainage capacity matters too – clay soils hold water much longer than sandy soils, creating different challenges.
For sustainable drainage design, consider incorporating rain gardens or permeable landscaping at the base of your wall to naturally manage excess water. These eco-friendly solutions work with nature rather than fighting against it, reducing the burden on your drainage system while supporting healthy plant growth and beneficial soil organisms.
Common Drainage Design Mistakes to Avoid
We’ve all been there—excited to tackle a backyard project, only to discover we’ve made a few missteps along the way. When it comes to drainage retaining walls, certain mistakes pop up time and again, but the good news is they’re all completely fixable and preventable once you know what to watch for.
The most common oversight? Skipping the weep holes or spacing them too far apart. I’ve seen enthusiastic DIYers install just two or three weep holes in a 20-foot wall, thinking that’s plenty. In reality, you’ll want them every 4 to 6 feet along the base of your wall. Think of it this way: water needs multiple escape routes, just like your garden needs multiple watering points to thrive evenly.
Another frequent stumble is using the wrong backfill material. Garden soil might seem like the logical choice since you’ve got it on hand, but it’s actually your wall’s worst enemy. Clay-heavy soils retain water like a sponge, creating exactly the pressure you’re trying to avoid. Instead, opt for crushed gravel or coarse sand—materials that let water flow through freely. This sustainable approach also means you’re working with natural drainage rather than fighting against it.
Many folks also forget to install a drainage pipe at the wall’s base, or they position it incorrectly. The perforated pipe should sit at the lowest point of your gravel backfill, with holes facing down (counterintuitive, I know!). This catches water before it can build up behind your wall.
Finally, neglecting to slope the area behind your wall slightly away from structures is a missed opportunity. Even a gentle 2-3% grade helps direct water toward your drainage system rather than pooling behind the wall, making your whole setup work more efficiently.
Sustainable and Eco-Friendly Drainage Solutions
When you’re investing time and effort into building a drainage retaining wall, why not make choices that benefit both your yard and the planet? The good news is that eco-friendly drainage solutions often work better than conventional methods while reducing your environmental footprint.
Let’s start with permeable materials. Instead of relying solely on gravel and perforated pipes, consider incorporating permeable pavers or crushed recycled concrete into your drainage system. These materials allow water to filter through naturally while reducing runoff. I’ve seen homeowners transform potential drainage problems into environmental wins by using recycled materials that might otherwise end up in landfills.
One of my favorite sustainable approaches is directing your drainage water back into your landscape rather than sending it straight to storm drains. Your retaining wall’s drainage system can feed directly into lawn areas or garden beds that need moisture. This approach keeps precious water on your property where it belongs, naturally irrigating your plants instead of contributing to stormwater runoff that can overwhelm municipal systems and carry pollutants into local waterways.
Rain gardens offer an especially elegant solution for managing drainage discharge. These shallow depressions planted with native species can handle the water your retaining wall collects, filtering it naturally through soil and plant roots. Position a rain garden at the base of your wall or where your drainage pipe exits, and you’ll create a beautiful feature that serves a practical purpose.
Speaking of plants, the area above your retaining wall deserves attention too. Choose native plantings with deep root systems that help stabilize soil and absorb excess moisture before it ever reaches your drainage system. Native grasses, perennials, and shrubs adapted to your region require less maintenance and naturally manage water more effectively than non-native alternatives.
When selecting drainage materials, look for products made from recycled content or sustainably sourced materials. Many landscape supply companies now offer eco-friendly options that perform just as well as traditional products while reducing environmental impact.
Tools and Materials: What You’ll Actually Need
Let me walk you through exactly what you’ll need to gather before starting your drainage retaining wall project. I’ve learned the hard way that having everything on hand beforehand saves countless trips to the hardware store.
Your drainage pipe is the backbone of the system. For most residential walls under 4 feet, a 4-inch perforated corrugated pipe works beautifully. I recommend the Advanced Drainage Systems brand, which runs about $15-20 per 10-foot section. If you’re working with a taller wall or particularly wet conditions, consider upgrading to a 6-inch schedule 40 PVC perforated pipe, which costs around $25-30 per 10 feet but offers superior durability.
Next up is landscape fabric, which prevents soil from clogging your drainage system. AgroFabric’s 4-ounce non-woven geotextile fabric hits the sweet spot at roughly $40 for a 3×50 foot roll. It’s permeable enough for water flow while blocking fine particles. For budget-conscious gardeners, DeWitt’s landscape fabric at $25 works adequately, though it may deteriorate faster.
Gravel is where many folks skimp, but don’t. You’ll need two types: three-quarter-inch crushed stone for the drainage layer behind your wall, and smaller pea gravel to surround the pipe. Budget about $50 per ton of crushed stone and $60 per ton of pea gravel. Most 20-foot walls need approximately 2-3 tons total.
Additional essentials include a shovel, wheelbarrow, level, and tamper for compacting. If you’re being environmentally conscious, consider using recycled crushed concrete as your drainage aggregate, which costs 20-30 percent less and diverts waste from landfills while performing identically to virgin stone.
Here’s the truth: a retaining wall without proper drainage is like a garden without water—it’s only a matter of time before things fall apart. But here’s the good news I want you to walk away with: installing effective drainage isn’t rocket science, and it’s absolutely within your reach as a DIYer. You’ve already taken the most important step by understanding why drainage matters and learning about the components that make it work.
Think about it this way—investing a few extra hours and dollars into proper drainage now means you won’t be rebuilding your wall in five years. Your garden beds will thrive because water flows where it should instead of pooling behind the wall. Your lawn stays healthy, your soil structure remains stable, and those beautiful plantings you’ve worked so hard on won’t get waterlogged roots. That’s the kind of sustainable, long-term thinking that separates a successful garden project from a frustrating do-over.
Whether you’re working with timber, concrete blocks, or natural stone, the drainage principles remain the same: give water an escape route. Layer your gravel, position your perforated pipe correctly, and backfill thoughtfully. These aren’t complicated steps—they just require planning and patience.
So before you place that first stone or drive that first stake, map out your drainage strategy. Sketch it, gather your materials, and commit to doing it right. Your future self, standing in a beautiful, stable garden, will thank you for it.