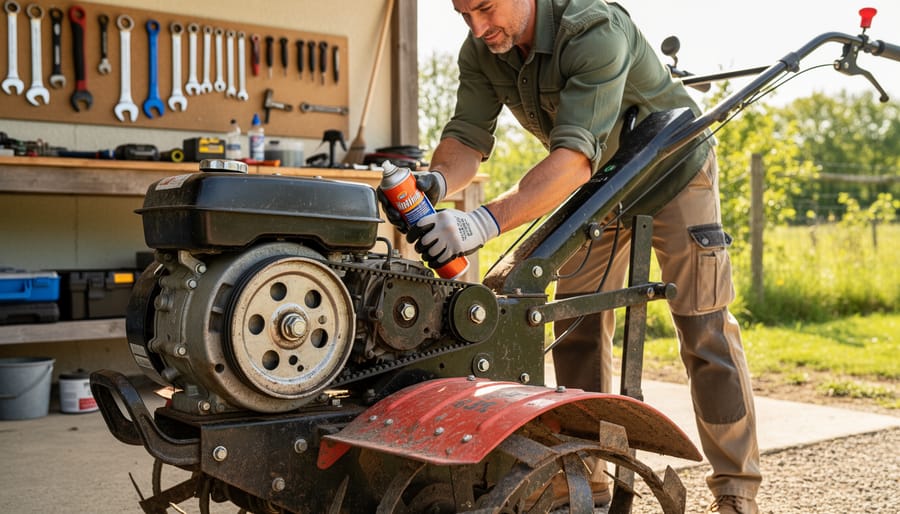
Check your tiller’s tine bolts and retaining pins before every major use—loose hardware causes 60% of mid-season tine failures and can turn a routine tilling session into an expensive repair job. Remove accumulated soil and debris from around the tine shaft after each use using a putty knife and stiff brush, then spray exposed metal surfaces with a light coating of WD-40 to prevent rust formation that weakens tine mounting points.
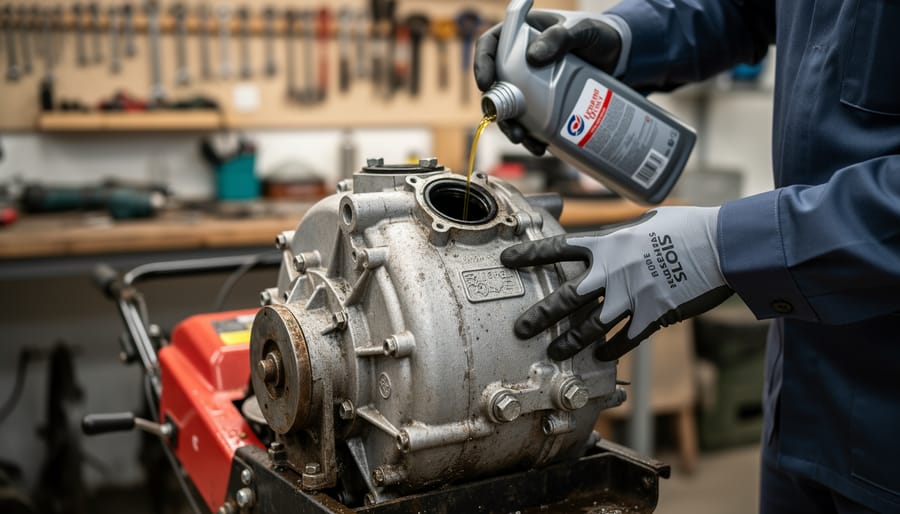
Drain and replace gearbox oil every 25 operating hours or at minimum once per season, even if the manual suggests longer intervals. Dark, gritty oil means your gears are already experiencing premature wear. Most gearboxes use 80W-90 gear oil, but always verify your model’s specification—using the wrong viscosity accelerates bearing failure in ways that won’t show up until your tiller suddenly locks mid-row.
Inspect drive belts monthly for glazing, cracking, or fraying edges, and keep a spare belt in your tool shed. A belt failure during spring preparation leaves your garden untilled during the narrow window when soil moisture is ideal. Replace any belt showing visible wear rather than waiting for failure—a new belt costs $15 to $30, while the inconvenience of downtime during planting season is priceless.
Store your tiller with fuel stabilizer added or drain the carburetor completely. Varnished fuel passages from old gasoline account for most won’t-start complaints each spring and require carburetor rebuilds that cost more than proper winterization.
Why Your Tiller Manual Doesn’t Tell You Everything
You know that manual that came with your tiller? The one tucked in the bottom of the box with diagrams that look like they were photocopied one too many times? Here’s the truth: it’s a starting point, not the complete story.
Manufacturer manuals typically focus on basic assembly, safety warnings, and the bare minimum operational instructions. They’ll tell you to check the oil and tighten the bolts, but they rarely dive into the nuanced care that actually keeps your tiller running smoothly for years. Why? Because these manuals are written for liability protection and universal application across different soil types, climates, and usage patterns. They can’t possibly address the specific challenges you’ll face in your clay-heavy backyard or after tilling through a particularly rocky patch.
I learned this the hard way during my third season of gardening. My tiller started making an unsettling grinding noise, and nowhere in that glossy manual did it explain what to do when your gearbox starts sounding like a coffee grinder. The maintenance schedule suggested checking the gearbox oil annually, but it didn’t mention that frequent use in dusty conditions means you should inspect it every few weeks, or that certain oil weights perform better in different temperatures.
The biggest gaps you’ll find in most manuals involve preventative care for tines, which wear differently depending on your soil composition, and real-world troubleshooting that goes beyond “contact your dealer.” They also tend to skip over the connection between proper maintenance and sustainable equipment longevity, an approach that reduces waste and saves money while being kinder to our planet.
That’s exactly why hands-on experience and community wisdom become invaluable resources for keeping your tiller performing at its best.
Understanding Your Tiller’s Critical Components
Tines: The Hardworking Front Line
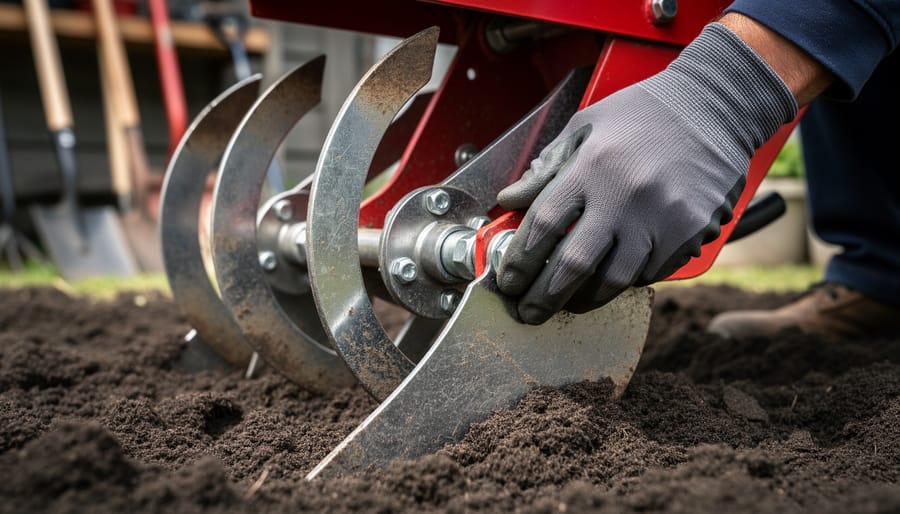
Think of tines as the hardworking fingers of your soil tiller, doing the heavy lifting every time you prepare your garden beds. These rotating blades dig into the earth, breaking up compacted soil, mixing in organic matter, and creating that beautiful, crumbly texture your plants love. Understanding your tines means understanding how to keep your tiller running smoothly for years to come.
You’ll typically encounter three main tine types, each designed for specific soil conditions. Bolo tines feature a curved, knife-like shape that’s perfect for mixing amendments into already-worked soil and creating fine seedbeds. Slasher tines have aggressive, forward-cutting edges ideal for breaking new ground and tackling tough, compacted earth. Pick-and-chisel tines combine pointed picks with chisel blades, making them versatile workhorses for medium-duty tasks and root-filled soil.
Here’s the reality: tines take a beating. They’re constantly colliding with rocks, roots, and hard clay, which gradually dulls their edges and can bend or break them entirely. Rocky soil accelerates wear dramatically, while sandy conditions create a grinding effect that slowly erodes the metal. This inevitable wear isn’t a design flaw; it’s simply the nature of the job. Regular inspection and timely replacement of damaged tines prevents strain on your gearbox and ensures your tiller maintains its efficiency, supporting both your gardening goals and sustainable equipment management.
The Gearbox: Your Tiller’s Power Transfer System
Think of your tiller’s gearbox as the heart of the operation—it’s what takes the power from your engine and transforms it into that satisfying churning motion that breaks up compacted soil. Without a healthy gearbox, even the sharpest tines won’t do much good. This enclosed housing contains a series of gears that reduce engine speed while increasing torque, giving your tiller the muscle it needs to dig deep.
The gearbox works hard, and that means it faces considerable stress. The most common failure points? Worn gears from inadequate lubrication, cracked seals that let dirt infiltrate the system, and stripped teeth from hitting unexpected rocks or roots. You might notice early warning signs like unusual grinding noises, difficulty engaging the tines, or oil leaking from the housing.
Here’s the good news: most gearbox problems are preventable with regular attention. Checking your oil level before each season and changing it according to your manual’s schedule can add years to your tiller’s life. Keep an eye on those seals too—replacing a worn gasket costs far less than rebuilding an entire gearbox. By understanding what’s happening inside that metal case, you’re taking an important step toward sustainable tool ownership and avoiding the waste of premature equipment replacement.
Essential Tine Maintenance Your Manual Barely Mentions
Pre-Season Inspection Checklist
Before you fire up your tiller for the season, give it a thorough once-over to catch small issues before they become expensive problems. Start by examining the tines closely for wear patterns—look for rounded edges or uneven wear that signals it’s time for replacement. Proper tine maintenance keeps your tiller working efficiently and protects your soil structure. Check for hairline cracks in metal components, especially around weld points and high-stress areas. Bent tines should be replaced rather than straightened, as they compromise tilling performance and can damage the gearbox. Walk around the entire machine and test every bolt—vibration loosens hardware over time. Pay special attention to the tine mounting bolts and engine mounts. A few minutes spent tightening connections now saves you from mid-season breakdowns and potential safety hazards.
Cleaning Tines the Right Way
After each use, cleaning your tiller tines properly can add years to their lifespan while keeping them performing like new. Start by knocking off large clumps of soil immediately after tilling—wet soil is much easier to remove than dried, caked-on dirt. Use a sturdy brush or old putty knife to scrape away stubborn debris from between the tines.
For a thorough cleaning, mix a simple eco-friendly solution of white vinegar and water in equal parts. This gentle blend cuts through organic matter without harsh chemicals that could contaminate your garden soil or harm beneficial organisms. Spray or brush the solution onto the tines, let it sit for a few minutes, then scrub with a natural bristle brush.
Once clean, rinse with plain water and dry completely to prevent rust formation. For tines showing early corrosion spots, use a wire brush to remove surface rust before applying a thin coat of vegetable oil or mineral oil as a protective barrier. This sustainable approach keeps your equipment in top shape while staying true to environmentally responsible practices. Store your freshly cleaned tiller in a dry location to maintain those pristine tines between gardening sessions.
Sharpening and Balancing Techniques
Sharp tines make all the difference in tilling efficiency! Check your tines after every 10-15 hours of use—if they’re rounded or struggling to penetrate hard soil, it’s time to sharpen. Remove the tines and use a metal file or angle grinder at a 45-degree angle, working from the inside edge outward. These same sharpening techniques apply whether you’re maintaining garden tools or mower blades.
Once sharpened, maintaining proper balance prevents excessive vibration and premature wear on your tiller’s shaft. Weigh each tine or hang them on a nail—they should be nearly identical in weight. If one side is heavier, file a bit more material from that edge until balanced.
You’ll need a metal file or bench grinder, safety goggles, work gloves, and a simple nail or balance cone. This sustainable approach keeps your equipment running smoothly for years, reducing the need for replacements and minimizing waste.
Knowing When to Replace vs. Repair
Deciding whether to repair or replace tines comes down to assessing the damage. If tines are slightly bent or have minor chips, you can often reshape them with a file or grinder. However, tines with significant cracks, severe bending, or missing chunks compromise your tiller’s performance and safety. These need immediate replacement to prevent equipment damage or potential injury from flying debris.
Check your manual for recommended replacement intervals, typically every few seasons depending on use. When replacing, consider the sustainability angle by recycling old metal tines at local scrap yards rather than tossing them in the trash. Many communities accept metal garden equipment parts for recycling.
Safety should always guide your decision. If you’re questioning whether tines are safe, err on the side of replacement. Quality replacement tines are relatively affordable investments that protect both you and your machine. Keep spare tines on hand during peak gardening season so unexpected damage doesn’t derail your soil preparation plans.
Gearbox Maintenance That Prevents Expensive Repairs
Lubrication: The Lifeblood of Your Gearbox
Think of gearbox oil as the lifeblood of your tiller—without it, things grind to a halt pretty quickly. Most manufacturers recommend SAE 140 or 80W-90 gear oil, but always check your manual first since using the wrong type can void warranties and damage seals.
Get in the habit of checking your oil level before each tilling session. With the tiller on level ground, remove the oil plug and peek inside—the oil should reach the bottom of the fill hole. If it’s low, top it up right away. As for changing the oil, plan on doing this at least once per season or after every 50 hours of use, whichever comes first. Heavy clay soil or extended tilling sessions mean more frequent changes.
Here’s a sustainable tip that matters: never dump old gearbox oil down drains or onto the ground. That stuff is toxic to plants, wildlife, and water sources. Instead, collect it in a sealed container and take it to your local auto parts store or recycling center—most accept used oil for free. Some communities even have hazardous waste collection days specifically for this purpose.
Fresh oil keeps your gearbox running smoothly for years, and proper disposal keeps your garden and community healthy. It’s a win-win for everyone.
Seal and Gasket Inspection
Checking your tiller’s seals and gaskets regularly can save you from messy oil leaks and costly repairs down the road. Think of these components as your tiller’s protective barriers, keeping lubricants in and dirt out—both essential for smooth operation.
Start by inspecting around the transmission case, wheel axles, and engine shaft areas. Look for telltale signs like fresh oil spots, darkened streaks, or accumulated grime that sticks to leaked fluids. Run your finger along seal edges; if you feel greasiness, you’ve found a leak. Don’t ignore small seeps—they’ll worsen over time.
Worn seals often appear cracked, flattened, or brittle. If you can see gaps where seals meet metal surfaces, replacement is overdue. Preventing dirt ingress is equally important; contaminated oil accelerates wear on internal components. After each use, wipe down shaft areas to remove soil buildup that can work past seals.
Replacing seals is surprisingly straightforward for most home gardeners. You’ll typically need basic hand tools and the correct replacement parts from your manufacturer. Carefully pry out old seals using a flat screwdriver, clean the housing thoroughly, then press new seals into place ensuring proper alignment. This small investment of time protects your tiller’s longevity while supporting sustainable equipment care.
Listening for Early Warning Signs
Your tiller will often tell you when something’s wrong if you know how to listen. Think of these sounds as your equipment’s way of asking for help before a small issue becomes a costly repair.
Grinding noises typically signal worn gears or insufficient lubrication in the gearbox. If you hear this harsh, metal-on-metal sound, stop immediately and check your oil levels. Low oil is the most common culprit and catching it early can save your gearbox from serious damage.
Clicking sounds usually point to loose bolts or worn bearings. These can start subtle but grow louder over time. Don’t ignore them—tighten all fasteners and inspect bearing housings for play or wobble.
Whining or squealing often indicates belt problems or bearing wear. Check belt tension first, as this is an easy fix. If the noise persists after adjusting belts, your bearings may need replacement.
Here’s my practical advice: run your tiller briefly before each session and listen carefully. Any new or unusual sound deserves investigation. Taking five minutes to diagnose strange noises can prevent hours of repair work later. Remember, addressing these warning signs promptly isn’t just about saving money—it’s about maintaining reliable equipment that serves your sustainable gardening goals for years to come.
Bolt Torque and Housing Integrity
Your tiller works hard, and those mounting bolts holding everything together deserve regular attention. Every few uses, run through your bolts with the appropriate wrench, checking they’re snug but not overtightened. Your manual should list specific torque specifications, typically between 25-45 foot-pounds for most garden tillers, though this varies by model. Think of it like Goldilocks: too loose and parts rattle apart, too tight and you risk stripping threads or cracking the housing.
While you’re checking bolts, give the gear housing a thorough visual inspection. Look for hairline cracks, especially around bolt holes and weld points where stress concentrates. Catching a small crack early means a simple repair instead of a costly replacement. Excessive vibration often signals loose hardware or worn bushings, so address unusual shaking immediately. A well-maintained tiller should run relatively smooth. This simple five-minute check protects your investment and prevents those frustrating mid-season breakdowns that derail your gardening plans.
Creating Your Seasonal Maintenance Schedule
Spring Pre-Season Preparation
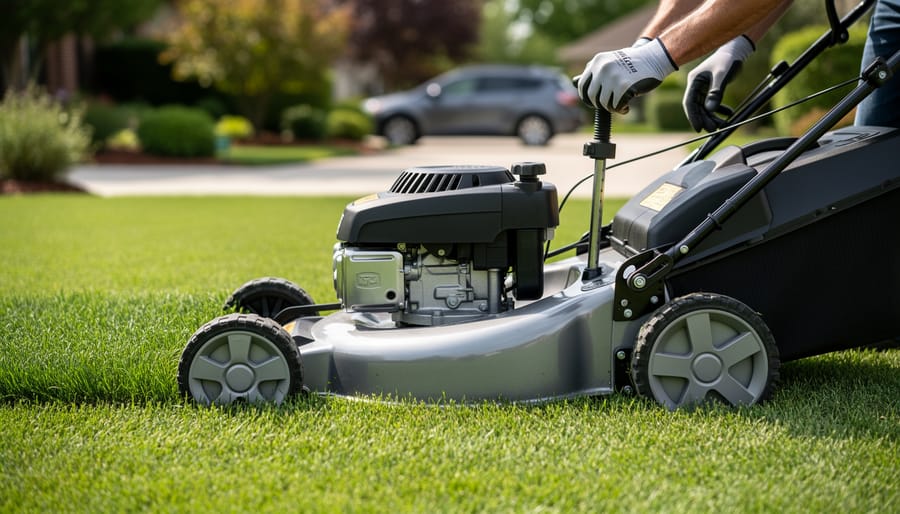
After months of winter hibernation, your tiller needs some TLC before tackling spring soil. Start by draining any old fuel and replacing it with fresh gasoline mixed with fuel stabilizer—old fuel is the number one cause of starting troubles. Next, check the spark plug for corrosion or buildup and replace if necessary. Inspect tines for damage, rust, or dullness; wire brush away surface rust and sharpen or replace worn tines to ensure efficient soil breaking. Examine all belts and cables for cracks or fraying, and lubricate moving parts according to your manual’s specifications. Change the engine oil if you didn’t do so before storage—clean oil means smoother operation and longer engine life. Test the air filter and clean or replace it to optimize performance. Finally, inspect tires for proper inflation and check that all safety guards are securely attached. This fifteen-minute checklist prevents frustrating mid-season breakdowns and keeps your tiller running reliably when your garden needs it most.
Mid-Season Quick Checks
During the busy growing season, when your tiller is seeing regular action, quick visual inspections can save you from unexpected breakdowns. Before each use, take just a few minutes to check tine bolts for tightness—vibration naturally loosens them over time. Look for any fresh oil spots beneath the gearbox, which might signal a developing leak. Run your hand along the tines to feel for unusual wear patterns or damage from hidden rocks. These simple checks, done consistently, help you catch small issues before they become expensive repairs. Think of it as a friendly conversation with your equipment—you’re just making sure everything’s still happy and working smoothly. If you notice the tiller struggling through soil it previously handled easily, that’s your cue to stop and investigate rather than push through. This mindful approach not only extends your tiller’s life but also ensures you’re preparing quality soil for healthy, sustainable plant growth.
Fall and Winter Storage Prep
As gardening season winds down, proper seasonal maintenance ensures your tiller starts reliably next spring. Begin by running the engine until it consumes all fuel, preventing gummy deposits in the carburetor. Clean tines thoroughly, removing all soil and plant debris, then inspect for damage. Apply a light coating of oil to metal surfaces to prevent rust during storage. Check and tighten all bolts, and lubricate moving parts according to your manual. Store your tiller in a dry, covered location, preferably elevated off concrete floors to avoid moisture absorption. Remove the spark plug, add a teaspoon of engine oil into the cylinder, and pull the starter cord slowly to distribute it. This simple routine protects your investment and guarantees you’ll be ready to break ground when warmer weather returns.
Troubleshooting Common Tine and Gearbox Problems
Tines Won’t Rotate or Rotate Poorly
When your tines refuse to budge or move sluggishly, don’t panic—this is one of the most common tiller breakdowns you’ll encounter, and it’s usually fixable at home.
Start by checking the simplest culprit: debris wrapped around the tine shaft. Power off your tiller completely and inspect where the tines meet the transmission. Tangled roots, wire, or compacted soil often create resistance. Clear everything carefully with gloves and pruning shears.
Next, examine the drive belt for wear or looseness. A stretched or cracked belt won’t transfer power effectively. If the belt looks glazed or shows fraying, replacement is your best sustainable solution rather than struggling with poor performance.
Check transmission fluid levels if your model has a gearbox—low lubricant causes grinding and poor rotation. Finally, inspect the tine mounting bolts. Loose hardware allows tines to slip rather than rotate properly, creating an illusion of mechanical failure when you just need a wrench.
Excessive Vibration or Noise
If your soil tiller suddenly sounds like it’s auditioning for a rock band or shaking more than usual, don’t ignore these warning signs. Excessive vibration and noise often point to loose components, worn parts, or debris caught in the mechanism. Start by turning off your tiller and checking for loose bolts around the tines, handlebars, and engine mounts. Tighten any you find, but don’t overdo it.
Next, inspect the tines themselves. Bent or unevenly worn tines create imbalance, causing vibration that can damage other components over time. If you spot bent tines, replace them promptly. Also check for rocks, roots, or compacted soil wedged between the tines. Even small obstructions can create surprising racket.
Listen carefully to identify where noise originates. A grinding sound from the gearbox might indicate low lubrication or worn gears, while rattling from the engine area could mean a loose heat shield or exhaust component. From a sustainability perspective, addressing these issues quickly prevents minor problems from becoming major repairs that might otherwise send your tiller to the landfill prematurely. Regular maintenance checks after every few uses help catch these concerns early, keeping your equipment running smoothly for years to come.
Oil Leaks and Low Lubrication
Oil leaks can sneak up on you, often appearing as dark spots under your tiller or a slick coating on the gearbox housing. Start by wiping down all surfaces with a clean rag, then run your tiller briefly to identify where fresh oil emerges. Common culprits include worn gaskets, loose drain plugs, and cracked seals around the transmission shaft.
For a temporary fix during tilling season, clean the area thoroughly and apply an oil-resistant sealant designed for small engines. Tighten any loose bolts around the gearbox, but avoid overtightening, which can strip threads or crack housings.
The permanent solution involves replacing worn gaskets and seals. Consult your manual for the correct parts and torque specifications. While you’re addressing leaks, check your oil level regularly using the dipstick. Low lubrication causes friction damage that’s far more expensive to repair than a simple seal replacement. This proactive approach not only extends your tiller’s life but reduces waste, keeping perfectly good equipment out of landfills and supporting your sustainable gardening goals.
Sustainable Practices for Long-Term Equipment Care
Maintaining your soil tiller doesn’t have to come at the expense of the environment. In fact, adopting sustainable practices not only helps protect the planet but also saves you money and extends your equipment’s lifespan significantly.
Start by choosing eco-friendly maintenance products whenever possible. Look for biodegradable lubricants and cleaners that won’t harm soil organisms or contaminate groundwater when residues inevitably drip onto your garden beds. Many plant-based oils work beautifully for rust prevention and moving parts, and they’re safer for you to handle too. I switched to bio-based chain lubricant years ago and haven’t looked back—it works just as well as petroleum products without the environmental guilt.
Proper disposal of maintenance materials is equally important. Never pour used oil down drains or onto the ground. Instead, collect it in sealed containers and take it to local recycling centers that accept automotive fluids. Many auto parts stores offer free oil recycling services. Old air filters, worn tines, and metal parts can often be recycled as scrap metal, keeping them out of landfills where they’d rust away wastefully.
The most sustainable practice, however, is simply making your tiller last longer. Regular cleaning, timely repairs, and proper storage prevent premature equipment failure. When you need replacement parts, consider refurbished or remanufactured options—they’re often just as reliable as new parts but require fewer resources to produce. Quality repairs beat quick replacements every time.
By treating your tiller as a long-term investment rather than a disposable tool, you’re actively reducing waste and resource consumption. That mindset shift, combined with conscientious maintenance choices, makes you a steward of both your garden and the broader environment.
Here’s the truth that most soil tiller manuals won’t tell you: the difference between equipment that lasts five years and equipment that serves you for decades comes down to the maintenance practices you implement today. By going beyond the basic instructions and embracing a comprehensive seasonal maintenance schedule for your tines and gearbox, you’re not just preventing costly breakdowns—you’re making a meaningful choice for sustainability.
Think about it. Every tiller that ends up in a landfill prematurely represents wasted resources and unnecessary environmental impact. When you properly maintain your equipment, you’re reducing demand for new manufacturing, saving money on repairs and replacements, and keeping a reliable tool ready whenever your garden needs it.
The seasonal maintenance framework we’ve covered isn’t complicated, but it does require commitment. Start by marking your calendar for those quarterly checks, and keep a simple maintenance log. You’ll be amazed at how quickly these practices become second nature.
We’d love to hear from you as you implement these strategies. What maintenance discoveries have you made? What challenges have you overcome? Sharing your experiences helps build a community of gardeners who value longevity, reliability, and environmental responsibility. Your tiller—and your garden—will thank you for years to come.