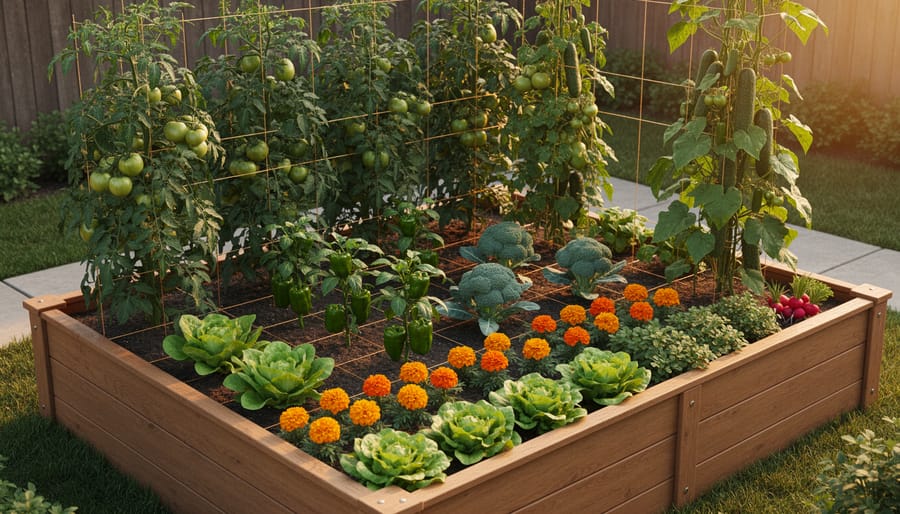
Divide your 8×4 raised bed into a grid system using 1-foot squares to calculate precise plant spacing and maximize every inch of growing area. This 32-square-foot space can produce an astonishing variety of vegetables when you apply strategic garden bed layout planning that considers each plant’s mature size, root depth, and sunlight requirements.
Position tall crops like tomatoes, pole beans, and trellised cucumbers along the north side of your bed to prevent them from shading shorter plants throughout the growing season. Place medium-height vegetables such as peppers, bush beans, and broccoli in the middle section, then reserve the southern edge for low-growing crops like lettuce, radishes, and herbs that benefit from morning sun exposure.
Implement companion planting principles by pairing heavy feeders with nitrogen-fixing legumes and pest-deterring aromatics. Plant basil alongside tomatoes to improve flavor and repel aphids, tuck marigolds between vegetable rows to discourage destructive nematodes, and interplant quick-maturing radishes with slower-growing carrots to maximize space utilization.
Calculate exact plant quantities using square-foot spacing guidelines: allocate 4 squares for a single tomato plant, 1 square per pepper, 4 lettuce heads per square, or 16 radishes per square. This methodical approach eliminates guesswork and prevents overcrowding that leads to disease, poor air circulation, and reduced yields. Your 8×4 bed can comfortably accommodate 20-30 different plants when properly organized, providing fresh produce from spring through fall while maintaining soil health through thoughtful crop rotation.
The Sweet Spot: Why 8×4 Beds Work So Well
There’s something almost magical about the 8×4 raised bed dimension – it’s become the Goldilocks of garden beds because it’s not too big, not too small, but just right for most gardeners. Let me share why this size has earned its reputation as a backyard favorite.
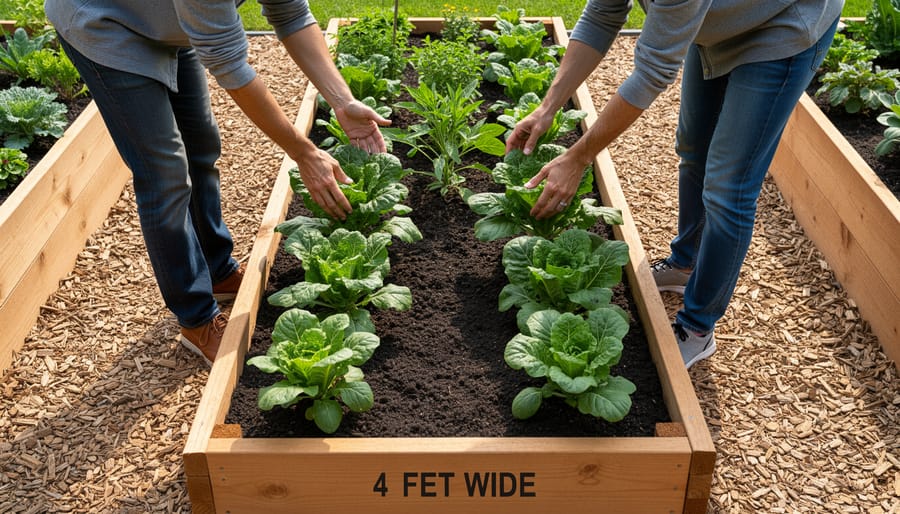
The four-foot width is where the real genius lies. This measurement isn’t arbitrary – it’s based on human ergonomics. Most adults can comfortably reach about two feet into a bed without straining or stepping on the soil. With a four-foot width, you can access the entire bed from either side, keeping your soil uncompacted and your back happy. I’ve worked with countless gardeners who started with wider beds only to realize they were inadvertently crushing their carefully cultivated soil structure just trying to harvest tomatoes from the middle.
At 32 square feet, an 8×4 bed offers substantial growing space without becoming overwhelming. You’re looking at roughly 10-12 cubic feet of soil if you build it 10-12 inches deep, which is manageable to fill initially and amend seasonally. This is enough volume to support healthy root systems for most vegetables while remaining financially reasonable – buying soil for a bed twice this size often causes sticker shock that derails garden dreams before they begin.
The eight-foot length provides excellent versatility for crop rotation and succession planting. You can easily divide the bed into sections, perhaps dedicating one end to leafy greens you’ll replant every few weeks and the other to longer-season crops like peppers or squash. This length also fits beautifully in most yard configurations, whether you’re tucking it along a fence line or creating a focal point in your landscape.
For sustainability-minded gardeners, this size maximizes productivity per square foot while minimizing resource waste. You’ll use water more efficiently than in-ground gardens, and the contained space makes it easier to implement practices like companion planting and intensive growing methods that reduce pest pressure naturally.

Planning Your 8×4 Garden Bed Layout
Choosing the Perfect Location
Before you fill your beautiful 8×4 garden bed with soil and seeds, let’s talk about placement—because even the most thoughtfully planned layout won’t thrive in the wrong spot. I learned this the hard way when my first raised bed, tucked conveniently near my back door, produced leggy tomatoes and disappointing peppers due to inadequate sunlight.
Start by observing your yard throughout the day. Most vegetables need at least 6-8 hours of direct sunlight, so understanding sun exposure requirements is crucial for success. Spend a weekend tracking which areas receive full sun from morning through afternoon. You might discover that what looks like a sunny spot at noon is actually shaded by your neighbor’s oak tree by 3 p.m.
Drainage is equally important for sustainable gardening. While raised beds naturally provide better drainage than ground-level plots, avoid placing them in low-lying areas where water pools after rain. Standing water can lead to root rot and soil compaction, undermining all your hard work. A gentle slope is ideal, allowing excess moisture to drain away naturally.
Consider proximity to your water source too. An 8×4 bed holds significant volume, and lugging watering cans across your yard gets old fast. Positioning within hose reach makes consistent watering manageable, which is essential during hot summer months.
Finally, assess your yard’s microclimates. That sunny south-facing wall might provide extra warmth for heat-loving crops, while morning sun with afternoon shade could be perfect for lettuce and spinach. Understanding these nuances helps you work with nature rather than against it, setting up your garden bed for long-term success and abundant harvests season after season.
Single Bed vs. Multiple Bed Arrangements
One of the first decisions you’ll face is whether to install a single 8×4 bed or divide your gardening space into multiple smaller beds. Both approaches have merit, and your choice depends on your yard size, physical abilities, and gardening goals.
A single 8×4 bed works beautifully for compact spaces and offers simplicity in construction and maintenance. However, if you have the room, creating multiple beds often proves more practical and sustainable in the long run. Smaller beds, such as two 4×4 sections or three 4×3 arrangements, reduce the reach required when tending plants, preventing strain on your back and knees. This consideration becomes especially important for gardeners with mobility concerns.
When planning multiple beds, pathways are essential. I recommend leaving at least 2 to 3 feet between beds for comfortable access. This spacing allows you to walk through with gardening tools, wheelbarrows, or harvest baskets without trampling plants or compacting soil. If you use a wheelchair or mobility device, consider widening pathways to 4 feet for easier navigation.
For visual appeal and functionality, arrange multiple beds in geometric patterns that complement your yard’s existing features. Parallel beds with straight pathways create a classic, organized look, while L-shaped or U-shaped configurations can define garden zones and maximize corner spaces. Consider how sunlight moves across your yard throughout the day, positioning beds to ensure all plants receive adequate light.
Adding mulched or gravel pathways between beds not only looks attractive but also suppresses weeds and provides stable footing during wet weather, supporting your overall sustainable gardening approach.
Orientation Matters: North-South vs. East-West
Before you fill that beautiful 8×4 bed with soil, let’s talk about which direction it should face—because orientation makes a surprisingly big difference in how your plants perform throughout the season.
In most situations, a north-south orientation is your best bet. When your bed runs north to south, the long sides face east and west, meaning plants receive morning sun on one side and afternoon sun on the other. This setup distributes light more evenly throughout the day and minimizes the shadows taller plants cast on their neighbors. It’s particularly brilliant for maximizing production in smaller spaces where every inch counts.
That said, an east-west orientation has its place, especially in hotter climates. When your bed runs east to west, you can strategically plant taller crops on the south side to provide afternoon shade for heat-sensitive plants like lettuce and spinach on the north side. I’ve found this works wonderfully in southern gardens where afternoon temperatures can stress cool-season vegetables.
Consider your microclimate too. If you’re gardening in a cooler region with short growing seasons, prioritize maximum sun exposure with north-south orientation. In scorching climates, an east-west setup gives you built-in shade options that can extend your harvest of crops that typically bolt in heat.
Also think about prevailing winds and existing shade from buildings or trees. Sometimes your site conditions will make the decision for you. The key is understanding that orientation isn’t just about compass points—it’s about creating the right light and temperature conditions for what you want to grow.
Five Smart Planting Layouts for Your 8×4 Bed
The Row Method: Simple and Beginner-Friendly
If you’re new to vegetable gardening, the row method is your best friend. This straightforward approach organizes your 8×4 bed into simple, parallel rows running lengthwise, making planting, weeding, and harvesting remarkably easy to manage.
For an 8-foot bed, I recommend creating 3-4 rows depending on what you’re growing. Space rows about 18-24 inches apart, leaving narrow walking paths between them. This traditional layout works beautifully for crops like lettuce, carrots, beans, and beets—vegetables that don’t mind growing close to their neighbors.
Here’s what makes rows so beginner-friendly: you can clearly see where you’ve planted, weeds are easy to spot between defined lines, and watering becomes a breeze when you can target each row individually. Plus, this method naturally encourages succession planting. As one row finishes producing, you can immediately replant it with a new crop for continuous harvests throughout the season.
The sustainability bonus? Organized rows make it simple to add compost precisely where needed and help you avoid compacting soil since you’re not stepping randomly throughout the bed. Start with fast-growing crops like radishes or leaf lettuce to build your confidence before tackling more demanding vegetables.
Square Foot Gardening Adaptation
Square foot gardening is an absolute game-changer for your 8×4 bed, transforming those 32 square feet into a highly productive growing space. Here’s how to make it work beautifully: Divide your bed into a grid of one-foot squares using string, wooden slats, or even laying a yardstick across as you plant. This gives you 32 individual planting zones to work with.
The magic happens when you match plants to their spacing needs. Each square can hold one large plant like tomatoes or peppers, four medium plants like lettuce or chard, nine compact growers like beets or bush beans, or even sixteen tiny plants like radishes or carrots. This system naturally maximizes diversity—you might grow 16 different crops in a single bed!
I love recommending this method for beginners because it prevents overcrowding and makes crop rotation intuitive. Simply replant each square as it’s harvested, keeping your bed productive all season. The sustainability factor is impressive too: you’ll use less water, fewer amendments, and virtually eliminate waste since you’re only preparing the exact space each plant needs. Mark your squares on a simple diagram to track what’s planted where, and you’ll quickly see how this organized approach turns a modest 8×4 bed into an incredibly efficient food-producing powerhouse.
The Companion Planting Layout
Companion planting is one of my favorite sustainable strategies for getting the most out of an 8×4 bed while naturally reducing pest problems. Think of it as creating little plant communities where everyone benefits from their neighbors.
A classic combination that works beautifully in larger beds is the “Three Sisters” grouping: corn along the back third, pole beans climbing up the corn stalks, and squash spreading at ground level. This trio originated with Indigenous American farmers and maximizes vertical space while the squash leaves shade out weeds.
For a more diverse layout, try dedicating sections to proven partnerships. Plant tomatoes with basil and marigolds—the basil enhances tomato flavor and deters aphids, while marigolds repel nematodes. Position carrots next to onions or chives, since the strong onion scent confuses carrot flies. Tuck lettuce and spinach beneath taller crops like peppers or eggplant for natural shade during hot months.
I always include flowering herbs like dill, cilantro, and chamomile scattered throughout the bed. They attract beneficial insects like ladybugs and lacewings that naturally control pest populations. Meanwhile, nasturtiums planted along edges work as “trap crops,” drawing aphids away from your prized vegetables.
The key is grouping plants with similar water and nutrient needs while considering their mature sizes to prevent overcrowding—companion planting works best when everyone has room to thrive together.
Succession Planting Design
The secret to getting the most from your 8×4 bed isn’t just what you plant, but when you plant it. Succession planting transforms a single bed into a continuous harvest machine throughout the growing season.
Start by dividing your planting calendar into waves. Instead of sowing all your lettuce at once, plant a new row every two weeks from early spring through fall. This simple strategy means you’ll have tender greens ready to pick for months rather than dealing with a massive harvest that bolts before you can use it all.
Quick-maturing crops are your best friends here. Radishes (25 days), arugula (30 days), and baby lettuce (21 days) can fill gaps between slower-growing plants or replace harvested crops. When your spring peas finish producing in early summer, pull them out and immediately plant bush beans or a second round of cucumbers.
For year-round productivity in milder climates, follow warm-season crops like tomatoes with cool-season plantings of kale, spinach, or garlic in fall. Even in colder regions, you can extend harvests well into winter using simple cold frames or row covers over your bed.
Keep a simple garden journal noting what you planted and when. This takes the guesswork out of timing and helps you refine your succession schedule each year for maximum productivity.
The Vertical Growing Layout
When you’re working with just 32 square feet, growing upward is one of the smartest moves you can make. Think of vertical growing as creating a second story for your garden bed—suddenly, you’ve got double the growing space without expanding your footprint.
The back or north side of your 8×4 bed is prime real estate for trellises and supports. This placement ensures your climbing plants won’t shade out their shorter neighbors. Install a sturdy trellis along the entire 8-foot length, and you can grow pole beans, cucumbers, peas, and indeterminate tomatoes with ease. These vigorous growers will happily climb 5 to 6 feet high, producing abundantly while taking up minimal ground space.
Tomatoes deserve special mention here. While bush varieties work fine, staking or caging indeterminate varieties like Cherokee Purple or San Marzano gives you more fruit per square foot. Place cages or stakes in a row about 18 inches apart, and watch your tomatoes reach for the sky while leaving room below for lettuce or herbs.
Pole beans are another vertical superstar—they’ll produce three times longer than bush varieties and keep climbing as long as you keep harvesting. Cucumbers trained upward also stay cleaner and healthier, with better air circulation preventing common fungal issues. This sustainable approach maximizes your harvest while naturally reducing disease pressure, making your garden more productive and environmentally friendly.
What to Plant: Crop Selection for 8×4 Beds
High-Yield Vegetables Perfect for This Size
An 8×4 bed offers 32 square feet of prime growing space, and choosing the right vegetables makes all the difference between a decent harvest and an abundant one. Let me walk you through the superstars that’ll give you the biggest bang for your buck in this setup.
Tomatoes are absolute champions for an 8×4 bed. Plant 4-6 determinate varieties or 3-4 indeterminate types along the back or center, spacing them 24 inches apart. They’ll reward you with pounds of fruit throughout the season while growing vertically to save precious ground space.
Peppers thrive with 12-18 inch spacing, meaning you can comfortably fit 6-8 plants. Bell peppers, jalapeños, or a colorful mix will produce consistently from midsummer through fall, and they’re wonderfully low-maintenance once established.
Leafy greens like lettuce and spinach are perfect gap-fillers. Tuck them between larger plants with just 6-8 inches between heads, or practice succession planting every two weeks for continuous harvests. You can easily grow 12-16 lettuce plants in a dedicated 2×4 section.
Herbs deserve their own corner—basil, parsley, and cilantro need only 8-10 inches each. Plant 6-8 herb plants for more fresh flavor than you’ll know what to do with.
Bush beans are productivity powerhouses, requiring 4-6 inches between plants. A 2×4 section accommodates about 24 plants, providing multiple harvests if you succession plant.
The key to success? Pair heavy feeders like tomatoes with lighter feeders like beans, practice crop rotation annually, and always consider each plant’s mature size when planning your spacing.
Plants to Avoid (They’ll Overwhelm Your Space)
Look, I’ll be honest with you—some plants are just garden bed hogs, and in an 8×4 space, they’ll take over faster than you can say “harvest time.” Learning which plants to skip will save you from that sinking feeling when you realize one plant is crowding out everything else.
The biggest space thieves are vining crops like pumpkins, watermelons, and traditional winter squash varieties. A single pumpkin plant can easily sprawl 15-20 feet in every direction, turning your organized garden bed into a jungle gym of vines. Watermelons aren’t much better—they’re enthusiastic travelers that will hop right out of your bed and colonize your lawn if given half a chance.
Sprawling cucumber varieties and indeterminate melon types also fall into this category. While cucumbers can work in an 8×4 bed, you need compact bush varieties or ones specifically bred for containers—not those vigorous vining types that belong in a field.
Here’s the good news: you don’t have to give up on these crops entirely. Bush varieties are your best friends in a compact space. Look for bush pumpkins like ‘Baby Boo’ or ‘Wee-B-Little,’ which produce small pumpkins on manageable plants. For summer squash, zucchini varieties like ‘Raven’ or ‘Eight Ball’ stay reasonably compact while still producing abundantly.
If you’re craving melons, try ‘Sugar Baby’ watermelon or small cantaloupe varieties, and train them vertically on sturdy trellises. This sustainable approach maximizes your vertical space while keeping your bed organized and productive.
Sustainable Soil and Maintenance Practices
Building Healthy Soil in Raised Beds
Your 8×4 raised bed’s success starts from the ground up, and trust me, skimping on soil quality is like trying to bake a cake without flour. Let’s talk about creating that perfect growing foundation.
For an 8-foot by 4-foot bed with an 8-inch depth, you’ll need approximately 21 cubic feet of soil. That’s roughly three-quarters of a cubic yard, which might sound like a lot, but it’s a one-time investment that pays dividends season after season.
I recommend what I call the “balanced blend” approach for your soil mix. Start with equal parts quality topsoil, compost, and either peat moss or coconut coir. This combination gives you excellent drainage, nutrient retention, and that crumbly texture plant roots love to explore. If you’re near a local garden center, they often sell raised bed soil mixes that follow similar ratios and can save you mixing time.
Here’s where sustainability really shines: integrate composting right from the start. I layer about 2-3 inches of finished compost into my beds each spring, which naturally feeds the soil ecosystem. You can even practice trench composting during the growing season by burying kitchen scraps between plant rows.
For organic amendments, consider adding a handful of worm castings per square foot, which introduces beneficial microorganisms. Bone meal provides slow-release phosphorus for root development, while kelp meal offers trace minerals. Mix these amendments into the top 4-6 inches before planting.
Remember, healthy soil is living soil. It should smell earthy and hold together when squeezed but crumble easily. With this foundation, you’re setting up your 8×4 garden for abundant harvests.
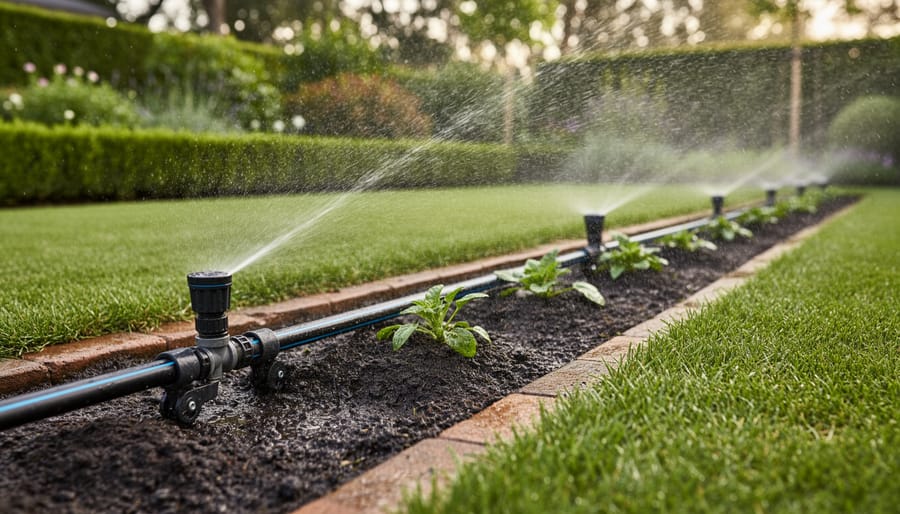
Water-Smart Irrigation for 8×4 Beds
Your 8×4 garden bed needs consistent moisture to thrive, but that doesn’t mean wasting water. The compact size actually makes these beds perfect for implementing efficient watering methods that conserve resources while keeping plants happy.
Drip irrigation is my top recommendation for 8×4 beds. You can run a simple system with a timer that delivers water directly to plant roots, reducing evaporation by up to 50% compared to overhead watering. For a budget-friendly alternative, soaker hoses work beautifully in this bed size—just lay them in a serpentine pattern and cover with mulch.
Speaking of mulch, this is your secret weapon for water conservation. Apply 2-3 inches of organic mulch like straw or wood chips around your plants, leaving a small gap at the stem. This reduces evaporation, moderates soil temperature, and suppresses weeds that compete for moisture.
Water deeply but less frequently to encourage strong root growth. Early morning watering minimizes disease issues and ensures plants have moisture for the day ahead. With the right setup, you’ll cut water usage significantly while growing healthier, more productive plants.
Common Mistakes and How to Fix Them
Even experienced gardeners can stumble when working with an 8×4 bed, but the good news is that most mistakes are easy to correct once you recognize them.
Overcrowding ranks as the most common pitfall. It’s tempting to squeeze in just one more tomato plant or add extra lettuce seedlings, but this creates competition for nutrients, water, and sunlight. Plants need breathing room to thrive and resist disease. If you’ve already planted too densely, don’t worry. Thin out the weakest seedlings early on, or transplant extras to containers. For future plantings, always follow spacing recommendations on seed packets. Remember, a few well-spaced plants will actually produce more than a crowded bed full of struggling ones.
Poor spacing within the bed is closely related but slightly different. Many beginners fail to account for mature plant sizes, placing slow-growing crops too close to their fast-expanding neighbors. This is where raised bed planning becomes invaluable. Sketch your layout before planting, considering both current seedling size and eventual spread. Leave adequate pathways between sections so you can reach all areas without compacting soil or damaging plants.
Ignoring crop rotation is another mistake that catches up with gardeners over time. Planting the same family of vegetables in the same spot year after year depletes specific nutrients and encourages pest buildup. The fix is simple: keep a garden journal noting what you planted where each season. Rotate plant families annually, following heavy feeders like tomatoes with soil-building legumes the next year. This sustainable practice maintains soil health naturally without relying on excessive fertilizers.
Finally, inadequate planning leads to harvest gaps and wasted space. Map out succession plantings so you’re tucking in new crops as others finish. Plant quick-maturing radishes between slower squash plants, or follow spring lettuce with summer beans. This forward-thinking approach maximizes your 8×4 space throughout the growing season.
An 8×4 garden bed truly is the sweet spot for sustainable gardening success, whether you’re planting your first seeds or you’re a seasoned grower looking to maximize your harvest. The beauty of this dimension lies in its versatility—it’s large enough to support a diverse mix of crops and companion plantings, yet manageable enough that you won’t feel overwhelmed by maintenance or planning.
Throughout this guide, we’ve explored various layout strategies, from grid systems to succession planting techniques, all designed to help you make the most of your 32 square feet of growing space. The key takeaway is that thoughtful design truly matters. When you take the time to plan your layout with consideration for plant spacing, sunlight requirements, and companion relationships, you’re setting yourself up for abundant harvests season after season.
Remember, there’s no single perfect layout—the best design is one that reflects your family’s eating habits, your climate conditions, and your gardening goals. Start by sketching out your ideas on paper, considering what vegetables you actually enjoy eating and which crops thrive in your growing zone. Don’t be afraid to experiment and adjust as you learn what works best in your specific situation.
The journey to a productive garden bed begins with that first step of putting pencil to paper. Grab some graph paper or use an online planning tool, and start mapping out your dream 8×4 layout today. Your future self, enjoying fresh tomatoes and crisp lettuce straight from the garden, will thank you for the effort you invest now in creating a well-planned, sustainable growing space.