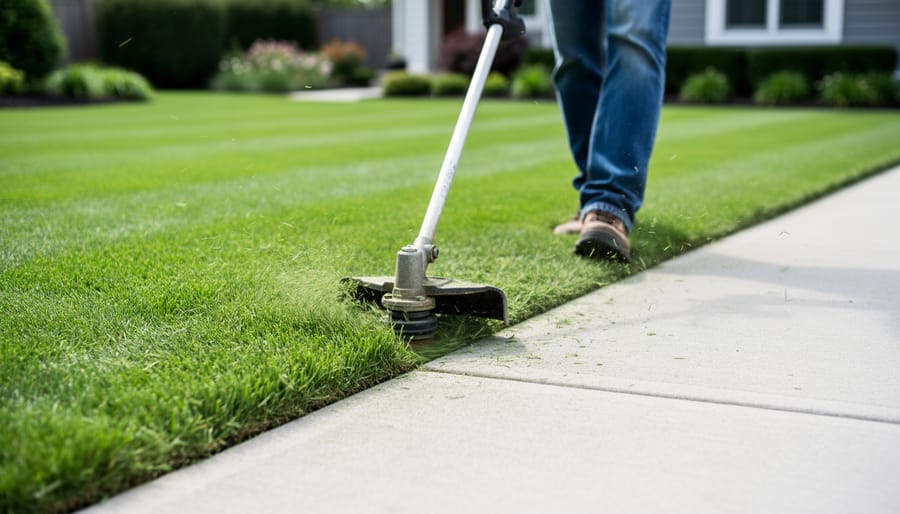
Edging your lawn with a string trimmer takes about 30 minutes for an average-sized yard and transforms ragged grass borders into crisp, professional-looking lines that make the rest of your lawn look sharper. The technique is straightforward: hold your trimmer vertically, use the cutting line to shave away grass that creeps over sidewalks, driveways, and garden beds, then sweep away the debris. When you master this single skill, you’ll notice an immediate difference in how polished your property looks, even if you haven’t changed anything else about your mowing routine.
Most homeowners already own a string trimmer but use it exclusively for horizontal trimming around fence posts and obstacles. Rotating that same tool 90 degrees unlocks its edging potential without buying dedicated equipment. The vertical position lets you create those defined borders that separate turf from hardscape, and the process complements lawn care basics like mowing patterns and height adjustments.
What makes string trimmer edging particularly valuable is how it enhances visual impact. Clean edges create shadow lines that emphasize lawn stripes, making your mowing patterns more prominent. Think of edging as the frame around a painting: the grass is your canvas, and those sharp borders draw the eye to your careful work. You don’t need expensive tools or years of experience. You just need to understand the right angle, walking speed, and safety precautions that turn a basic string trimmer into a precision edging tool.
Why String Trimmer Edging Matters for Lawn Striping
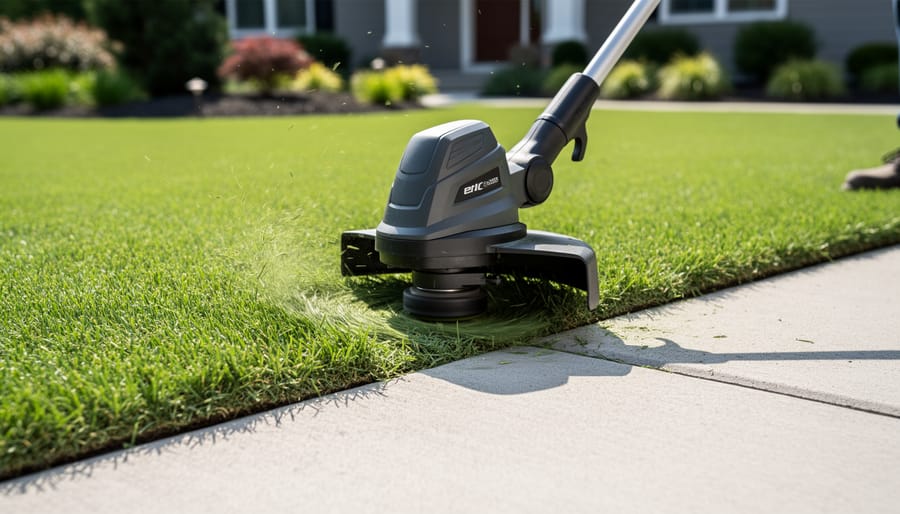
Sharp edges transform your lawn striping from pleasant to professional. When you create crisp boundaries between your grass and walkways, driveways, or flower beds, you’re essentially framing your striping patterns. Those dark and light bands you’ve worked hard to achieve become dramatically more visible and impressive when they meet clean, well-defined edges rather than ragged, overgrown borders.
Think of edging as the frame around a painting. You wouldn’t hang a masterpiece without proper framing, and the same principle applies to your lawn. Without distinct edges, even the most meticulously striped lawn loses definition where it meets hardscapes or garden beds. The patterns blur and fade at the boundaries, diminishing the overall impact of your work.
The contrast between vertical edges and horizontal striping creates visual depth that makes your lawn appear more carefully maintained and intentional. This combination signals attention to detail, the hallmark of exceptional lawn care. When neighbors or visitors see both elements working together, they immediately recognize the elevated level of craftsmanship you’ve put into your landscape.
Beyond aesthetics, proper edging prevents grass from creeping onto sidewalks and patios, which can obscure your striping patterns and create a messy appearance. By maintaining these boundaries regularly with your string trimmer, you’re investing minimal effort for maximum visual payoff. The result is a cohesive, polished landscape where every element contributes to the overall presentation.
What You’ll Need: Tools and Materials
Before you fire up your trimmer, let’s gather everything you need for successful edging. Having the right equipment makes the job easier, safer, and more enjoyable.
Your string trimmer is obviously the star of the show, and you’ve got three main power options. Gas trimmers pack serious power and runtime, making them ideal for large properties, though they’re heavier and require fuel mixing and maintenance. Electric corded models offer consistent power without refueling, perfect for smaller yards within extension cord reach. Battery-powered trimmers have become increasingly popular for their quiet operation, zero emissions, and improving runtime, though you’ll want a backup battery for bigger jobs.
The trimmer line itself matters more than most people realize. For edging work, you’ll want to use correct string size for your trimmer, typically 0.080 to 0.095 inches in diameter. Thicker line creates cleaner edges and lasts longer, but check your trimmer’s manual for maximum capacity. Round line works fine for most situations, though square or twisted line can cut more aggressively if you’re tackling overgrown edges.
- String trimmer with adequate power for your yard size
- Replacement trimmer line (0.080-0.095 inch gauge)
- Safety glasses or face shield
- Long pants and closed-toe shoes
- Work gloves for grip and protection
- Hearing protection (especially for gas models)
- Garden hose or marking paint (optional, for curved edge guides)
- Rake or leaf blower for cleanup
For a sustainable approach, consider battery-powered equipment that you can charge with solar panels, or maintain a quality gas trimmer for years rather than replacing cheaper models frequently. Biodegradable trimmer line is emerging as an eco-friendly option, though availability remains limited. Whatever you choose, proper maintenance extends equipment life and reduces waste.
Safety First: Important Precautions
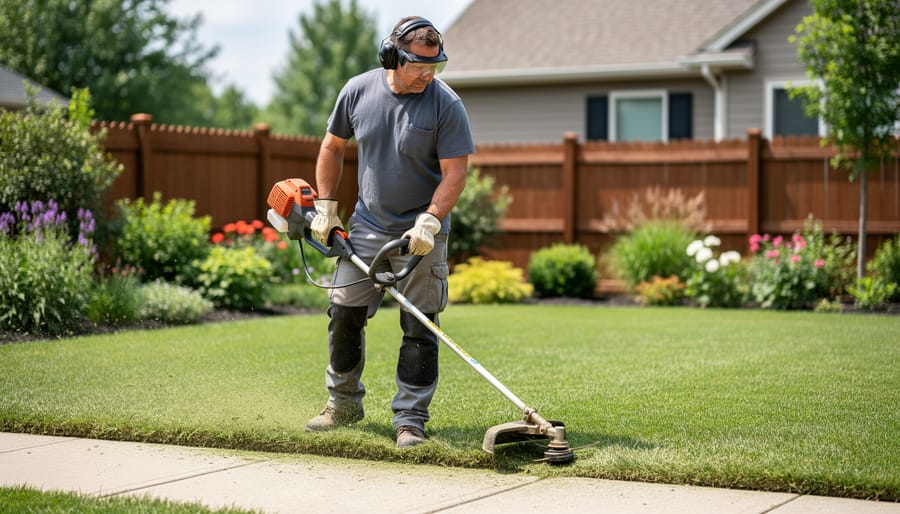
Before you fire up your string trimmer, protect yourself and your surroundings. String trimmers fling debris at high speed, rocks, twigs, clumps of dirt, and broken line fragments can strike you or bystanders within seconds. Always wear impact-resistant safety glasses or a full face shield; regular sunglasses won’t cut it. Long pants made from durable fabric shield your legs from flying debris and the whirring trimmer line, while closed-toe shoes with good tread prevent slips and protect your feet from stray projectiles.
Hearing protection matters more than most people realize. Gas-powered trimmers especially can damage your hearing over time, so foam earplugs or earmuff-style protectors are essential for extended sessions. Walk your entire edging route beforehand, removing anything that could become airborne, and check that kids, pets, and neighbors are at a safe distance, at least 50 feet is wise. Never trim in loose clothing or dangling jewelry that could catch in moving parts.
Handle your trimmer with both hands at all times for maximum control, and keep the cutting head below waist height. This isn’t just about safety; proper technique connects to your overall lawn mowing methods and creates cleaner results. When debris does fly, collect and compost grass clippings rather than blowing them into storm drains, and sweep up soil from hardscapes to prevent erosion and water pollution. Responsible cleanup protects both you and your local ecosystem.
Step-by-Step: How to Edge Your Lawn with a String Trimmer
Prepare Your Edging Path
Walk your lawn’s perimeter before starting, looking for natural boundaries, sidewalks, driveways, flower beds, or patios, that define where grass ends. These hard edges give you clear targets. Check that you’ve already mowed; edging works best on recently cut grass because you can see exactly where the turf meets hardscapes.
Clear sticks, rocks, toys, and other debris from the edging zone. This prevents projectiles and protects your trimmer line from premature wear. For curved beds or garden borders without hard edges, lay down a garden hose or spray marking paint to create a guide line. Gentle curves look more natural than sharp angles and complement striping patterns beautifully.
Consider when to mow and edge, ideally, edge first, then mow to clean up scattered clippings. If you’re planning to stripe your lawn, visualize how crisp edges will frame those mowing patterns. Sharp borders act like a picture frame, making stripes appear more defined and intentional. Plan your edges to run parallel or perpendicular to your intended striping direction for maximum visual impact.
Position Your Trimmer Correctly
Stand with your feet shoulder-width apart and hold the trimmer so the cutting head is perpendicular to the ground, imagine you’re holding it like a wheel rather than a lawnmower. This 90-degree angle creates the vertical cut that defines a proper edge.
Position yourself comfortably with the trimmer slightly to your side, not directly in front of you. Your arms should be relaxed but firm, with elbows slightly bent. This stance gives you better control and prevents fatigue during longer edging sessions.
Most string trimmers let you rotate the cutting head for edging. Look for a button or lever near the shaft that releases the head to turn. Rotate it so the trimmer line spins in a vertical plane, parallel to the edge you’re creating. If your model doesn’t have this feature, you’ll tilt the entire trimmer, which works but requires more effort to maintain the correct angle.
Keep the guard facing away from the lawn and toward the hardscape. This directs debris outward and protects the grass from excessive cutting. Walk slowly and let the trimmer’s rotation do the work, forcing it creates ragged edges and wears out line faster.
Make the Initial Pass
Start at a corner or endpoint rather than the middle of your edging path, it gives you a clear reference point and makes it easier to maintain a straight line. Squeeze the throttle to bring the trimmer to full speed before making contact with the grass. Speed matters here, but not in the way you might think.
Walk at a comfortable, deliberate pace, about the speed you’d use for a casual stroll. Moving too quickly creates ragged, uneven edges because the trimmer line doesn’t have time to cut cleanly. Too slowly, and you risk scalping too deep or creating divots. Find that sweet spot where you hear the trimmer working steadily without the engine bogging down or the line whipping wildly.
Let the trimmer’s weight and the spinning line do the cutting. Don’t push down or lean into the edge, that’s how beginners end up with wobbly lines and sore shoulders. Instead, guide the trimmer along your path with light, steady pressure. Think of yourself as steering rather than forcing.
When you reach a corner, slow down slightly and pivot smoothly in one continuous motion. Sharp, jerky movements create those telltale gouges that ruin an otherwise clean edge.
Create Clean, Defined Lines
Once you’ve made your initial pass, refining those edges into crisp, professional lines requires steady technique and a bit of finesse. Think of this step as sculpting, you’re carving out definition that’ll make your striping patterns really pop.
The secret to razor-sharp edges lies in consistency. Keep your trimmer at that same 90-degree angle throughout each section, letting the spinning line do the cutting rather than muscling the trimmer forward. If you start wavering between angles, you’ll end up with scalloped or uneven edges that look amateurish. Move at a walking pace that matches your trimmer’s power, if you rush, you’ll miss spots; too slow and you risk digging too deep or creating gouges.
Overlap your passes by about an inch as you work along the edge. This ensures you don’t leave fuzzy strips of grass between cuts. I find it helpful to work in 10 to 15-foot sections, completing each fully before moving to the next. This approach keeps you focused and lets you step back occasionally to check your work from a distance.
When you encounter obstacles like tree roots or protruding rocks, ease off the throttle slightly and guide the trimmer around them rather than forcing through. For uneven terrain, follow the natural contour instead of trying to create an artificially straight line, your lawn will look better with edges that flow naturally with the landscape. Adjust your stance on slopes to maintain balance and that crucial trimmer angle.
Clean Up as You Go
As you work your way around the lawn, grass clippings and loose soil will inevitably scatter. Instead of leaving cleanup for the end, pause every few feet to manage debris. This prevents clippings from drying onto driveways and sidewalks, where they’ll stain and become much harder to remove.
Angle your trimmer to direct clippings back onto the lawn rather than onto hardscapes. A slight adjustment in your body position makes this easy, face away from patios and walkways as you edge, letting gravity and the trimmer’s rotation work with you. If clippings do land on concrete, use a blower or stiff broom to sweep them back immediately.
Collect the loose soil and grass you’ve dislodged. This material is gold for your compost bin, it’s nitrogen-rich and breaks down quickly when mixed with carbon sources like dried leaves. If you’re not composting, spread small amounts thinly across your lawn beds where they’ll decompose naturally and return nutrients to the soil.
Avoid washing debris into storm drains or street gutters. Those clippings contribute to waterway pollution and nutrient runoff. A quick sweep after each section keeps your work area tidy and supports healthier local ecosystems.
Pro Tips for Edging Perfection
Timing makes all the difference when edging. Slightly moist soil produces the cleanest cuts because the trimmer line slices through without excess crumbling or dust clouds. Edge a day or two after rain or irrigation, but avoid soaking wet conditions that create mud and clumps. Early morning works beautifully when overnight dew has softened the ground just enough.
Different grass types respond differently to edging. Cool-season grasses like fescue and bluegrass edge cleanly almost any time during the growing season. Warm-season grasses such as Bermuda and zoysia cut best when actively growing in late spring through summer, their dense root systems hold edges longer between maintenance sessions.
For perfectly straight edges along sidewalks or driveways, anchor your focus on a fixed point down the path rather than watching the trimmer head. Your body naturally follows your eyes, creating straighter lines. With curved beds, work in short segments and frequently step back to check your arc. A garden hose laid along the desired curve beforehand gives you a visual guide that prevents wandering lines.
Coordinate your edging with mowing for dramatic results:
- Edge before you mow so clippings from both tasks get collected in one pass
- Stripe immediately after edging while the contrast is sharpest
- Maintain edges every two to three mowings to keep borders crisp without excessive soil removal
- Adjust your mower to cut lower near edges for enhanced definition, but only within healthy limits for your grass type
- Schedule edging when you have time to work slowly, rushing creates wavy, inconsistent lines
Save your trimmer line by working perpendicular to hard surfaces rather than dragging line along concrete. Let the line’s tip do the cutting while the trimmer head stays slightly above pavement. This technique extends line life and reduces wear on your equipment while delivering the same professional edge.
How to Know You’ve Done It Right: Verification and Next Steps
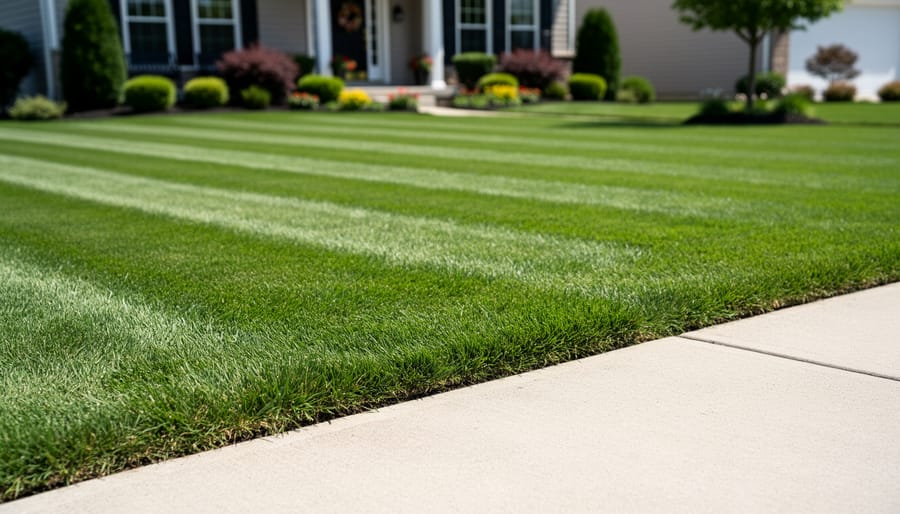
Step back and admire your work from several angles. Crouch down at ground level to check that your edges form consistent, vertical walls rather than sloped transitions. Run your eyes along each border, straight sections should look ruler-straight, and curves should flow smoothly without sudden angles or wobbles.
Walk the entire perimeter and inspect for uniform depth. Your edging should create a distinct boundary about two to three inches deep, separating lawn from hardscape or beds. If some sections look shallow while others cut too deep, you’ll notice immediately. Uneven depth disrupts the clean lines you’re after and may expose roots or create drainage issues.
Check that you’ve removed grass and soil cleanly from the edge itself. No ragged strands of grass should hang over sidewalks or driveways. The transition between turf and hardscape should be crisp, almost like the edge was stamped with a cookie cutter.
These sharp boundaries make a tremendous difference when you stripe your lawn. Fresh edges frame your mowing patterns, making light and dark stripes pop with professional clarity. For best results, edge first, then mow and stripe within a day or two while edges are still pristine.
Plan to re-edge every three to four weeks during the growing season. Understanding the difference between weed wacker vs edging techniques helps you maintain these borders efficiently between full edging sessions. With regular touch-ups, you’ll spend less time on each maintenance pass while keeping that sharp, finished look year-round.
Common Questions About String Trimmer Edging
Common Questions About String Trimmer Edging
Even experienced gardeners encounter challenges when edging with a string trimmer, and beginners often have questions before they start. Here are answers to the most common concerns that come up when creating clean lawn borders.
How often should I edge my lawn?
Most lawns benefit from edging every 2-3 weeks during the growing season, or whenever the grass begins to creep over borders. If you maintain regular edging, touch-ups become quicker and easier each time.
Can I use my regular string trimmer for edging?
Yes, nearly all string trimmers can edge by rotating the head 90 degrees to position the line vertically. Some models have dedicated edging attachments or wheels that make the process even easier, but they’re not required.
What should I do if my edges look choppy or uneven?
Choppy edges usually result from moving too quickly or holding the trimmer at an inconsistent angle. Slow down, maintain a steady 90-degree angle to the ground, and make a second pass if needed to smooth out irregularities.
Is it better to edge before or after mowing?
Edge before mowing so your mower can pick up the loose grass and soil debris created during edging. This approach saves cleanup time and gives you a cleaner finished look.
How deep should I cut when edging?
Aim for a depth of 2-3 inches for most residential lawns. Going deeper can damage roots and create erosion problems, while shallow edging won’t provide the crisp definition you’re after.
What if I accidentally remove too much soil while edging?
Fill the gap with screened topsoil, tamp it gently, and overseed if you’ve exposed bare areas. Going forward, focus on removing grass rather than gouging into soil, using lighter pressure and letting the trimmer line do the work.
The technique improves with practice, so don’t worry if your first attempts aren’t perfect. Each edging session teaches you how your particular trimmer handles and how your grass responds. Pay attention to what works on your property, adjust your approach based on soil conditions and grass growth patterns, and you’ll develop a rhythm that makes edging feel natural. Remember that even small improvements in edge quality make a noticeable difference in your lawn’s overall appearance, especially when combined with striping techniques that rely on those clean borders for maximum visual impact.
Mastering string trimmer edging transforms your lawn from casually maintained to professionally groomed. Those crisp, clean boundaries you’ve created don’t just look polished on their own, they’re the finishing touch that makes your mowing patterns pop and your lawn striping efforts truly shine. When sharp edges frame your carefully crafted stripes, the entire effect becomes strikingly intentional.
What makes this skill particularly valuable is that you’re likely working with tools you already own. There’s real satisfaction in maximizing your existing equipment rather than acquiring specialized edgers that serve just one purpose. You’re being resourceful and reducing your environmental footprint while achieving results that rival professional lawn services.
Don’t expect perfection on your first attempt. Like any gardening skill, string trimmer edging improves with practice. Each session teaches you how your specific lawn, soil, and grass type respond. You’ll develop muscle memory for the right angle and walking pace, and you’ll discover little techniques that work perfectly for your particular landscape.
The investment you’re making is simply time and attention. The payoff, a lawn that looks meticulously cared for, with stripes that truly stand out against clean borders, is entirely within your reach. Get out there and give it a try.