Recognize when your DeWalt string trimmer struggles to cut cleanly, makes unusual rattling sounds, or won’t feed line properly—these are clear signs your trimmer head needs replacement, not just new string. The good news? You can tackle this repair yourself in about 15 minutes with minimal tools, saving the cost and hassle of professional service while extending your trimmer’s life for seasons to come.
Start by identifying your exact DeWalt model number, typically found on the motor housing, since different models require specific replacement heads—universal heads rarely perform as well as OEM parts designed for your trimmer. Remove the old head by pressing the shaft lock button while turning the head counterclockwise, a simple twist-off process that doesn’t require special expertise. Choose between bump feed heads for general lawn maintenance or fixed-line heads if you prefer consistent cutting without tapping, considering how you actually use your trimmer rather than defaulting to what came originally.
Install your new head by threading it clockwise onto the shaft until hand-tight, then load fresh line according to the arrow directions printed on the spool—proper line installation prevents tangles and ensures your replacement head performs optimally from day one.
Why DeWalt Trimmer Heads Need Replacement (And When)
Signs Your Trimmer Head Is Beyond Repair
Sometimes a trimmer head reaches the point where repair just isn’t worth your time or money. Knowing when to replace rather than fix will save you frustration and keep your lawn care routine running smoothly.
The most obvious red flag is a cracked or broken housing. Even small cracks can expand during operation, potentially causing the head to fail completely mid-trim. If you notice any damage to the outer casing, it’s time for a replacement—this isn’t just about performance, it’s about safety too.
A non-functioning auto-feed mechanism is another clear indicator. If you’ve cleaned the head thoroughly and the line still won’t advance automatically, the internal spring or feed mechanism has likely worn out. While some DIY enthusiasts might attempt internal repairs, the cost and effort rarely justify the savings compared to a new head.
Wobbling during operation signals worn-out bearings or a warped base. This uneven motion not only produces poor cutting results but also puts unnecessary stress on your trimmer’s motor. Listen to your tool—if it’s vibrating excessively or making unusual sounds, investigate immediately.
Finally, stripped mounting threads spell the end. If the head won’t securely attach to your trimmer shaft, no amount of tightening will help. This creates a dangerous situation where the head could detach during use.

How Long Should a DeWalt Trimmer Head Last?
Here’s the reality: there’s no magic number stamped on your DeWalt trimmer head, and that’s completely normal. Think of it like the tires on your car—how long they last depends entirely on how much you drive and where you’re driving.
For most homeowners trimming weekly during growing season, a quality DeWalt trimmer head typically lasts one to two years before showing significant wear. If you’re tackling heavy-duty jobs or maintaining larger properties, you might find yourself replacing it annually. Weekend warriors with smaller yards? You could easily stretch that to three years or more.
Here’s the encouraging part: needing a replacement doesn’t mean something went wrong. Trimmer heads are designed as wear items, just like string itself. The spinning action, constant contact with grass and debris, and exposure to the elements naturally take their toll. Regular cleaning and proper string loading can definitely extend lifespan, but eventually, those mounting points wear down and the head loses efficiency.
Watch for decreased performance rather than waiting for catastrophic failure. When you notice the head wobbling, string feeding inconsistently, or the mechanism becoming sluggish despite maintenance, it’s simply time for a fresh start. Replacing your trimmer head proactively is smart, sustainable maintenance that keeps your tool running efficiently and your lawn looking its best.
Choosing the Right Replacement Head for Your DeWalt Trimmer
OEM vs. Aftermarket: What Works Best?
When it comes to replacing your DeWalt string trimmer head, you’ll face a common dilemma: stick with genuine OEM parts or save money with aftermarket options? Let’s break down what makes sense for your situation.
Genuine DeWalt replacement heads typically cost between $20-40, depending on the model. They’re engineered specifically for your trimmer, ensuring perfect compatibility and maintaining your warranty coverage. If your tool is still under warranty, this is particularly important—using non-OEM parts could void that protection. I’ve found that OEM heads generally last longer and perform more reliably, especially under heavy use. They’re the sustainable choice in the long run because you won’t be replacing them as frequently, reducing waste.
Aftermarket options usually run $10-25 and can work surprisingly well for occasional users. Many third-party manufacturers produce quality heads that fit DeWalt trimmers perfectly. However, durability varies significantly between brands. Read reviews carefully before purchasing—look for mentions of specific DeWalt model numbers to ensure compatibility.
Here’s my practical recommendation: if you use your trimmer weekly or professionally, invest in OEM parts. The extra cost pays off through longevity and performance. For homeowners who trim occasionally, a well-reviewed aftermarket head can be a budget-friendly solution. Just verify the return policy in case it doesn’t fit properly.
Consider this: buying one quality OEM head beats purchasing two or three cheap replacements that wear out quickly. That’s better for your wallet and the environment.
Understanding Head Types and Feed Mechanisms
Choosing the right replacement head for your DeWalt string trimmer starts with understanding the three main feed mechanisms available. Each has its own personality, and finding the right match can make your trimming sessions much more enjoyable.
Bump-feed heads are the most popular choice among homeowners, and for good reason. You simply tap the head on the ground while the trimmer is running, and it automatically releases more line. The convenience factor is unbeatable when you’re working around garden beds or along fence lines. The downside? You’ll use slightly more line since it’s easy to accidentally bump and release more than needed. However, most gardeners find this trade-off worthwhile for the ease of use.
Automatic feed heads take convenience a step further by releasing line as it wears down, without any action required from you. These are wonderful if you have a large property or find yourself getting frustrated with manual feeding. The catch is they can be less precise with line usage, potentially going through your spool faster than other options.
Fixed-line heads use pre-cut lengths that you manually replace when worn. While this means stopping to reload more frequently, they’re incredibly durable and provide consistent cutting performance. They’re also the most sustainable option since you can measure exactly what you need, reducing waste. Many experienced gardeners appreciate the control and predictability fixed-line systems offer, especially when tackling tougher vegetation around their property.
Consider your lawn size, patience level, and sustainability priorities when making your choice.

The Step-by-Step Replacement Process
Tools and Prep Work You’ll Need
Good news—replacing your DeWalt string trimmer head doesn’t require a workshop full of fancy equipment! Most homeowners already have everything needed for this quick job.
Here’s what you’ll need:
For the actual replacement, gather a clean workspace and the new trimmer head that’s compatible with your DeWalt model. Some heads require no tools at all, while others might need a basic wrench or socket set—check your replacement head’s instructions.
Safety first! Before you begin, disconnect your battery completely. This simple step prevents accidental starts while you’re working. If you’re running into frequent power issues with your tools, proper battery maintenance can make a real difference.
Keep a clean rag handy to wipe away grass clippings and debris from the trimmer shaft. A well-lit work area helps you see small parts and threading clearly.
That’s it! This is genuinely a manageable DIY project that saves you money and keeps your trimmer running efficiently.
Removing the Old Trimmer Head
Before you begin, make sure your trimmer is completely powered off and disconnect the battery or spark plug. Safety first, friends! Now, let’s get that old head off.
Most DeWalt trimmers use a shaft lock button, usually located near the trimmer head. Press and hold this button firmly while you turn the trimmer head. You’ll know you’ve engaged it when the shaft stops rotating. Here’s where people sometimes get confused: DeWalt heads typically unscrew counterclockwise, following the standard “lefty loosey” rule. However, some models use a reverse thread, so check your manual if you’re uncertain.
Grip the head firmly and turn it counterclockwise while keeping that shaft lock pressed. If it’s been a while since your last replacement, the head might be stuck due to grass buildup, dirt, or wear. Don’t panic! This is completely normal, especially if you’ve been tackling thick weeds and tough jobs.
For stubborn heads, try wearing rubber gloves for better grip or use a strap wrench if you have one handy. Applying a small amount of penetrating oil around the base and letting it sit for ten minutes can work wonders. Some gardeners find success by gently tapping the head with a rubber mallet while applying turning pressure. Whatever you do, avoid using excessive force with metal tools that could damage the shaft threads.
Once it loosens, the head should spin off easily. Clean any debris from the shaft threads before installing your new head—this simple step prevents future headaches and ensures a secure fit. You’re doing great, and you’re halfway there!

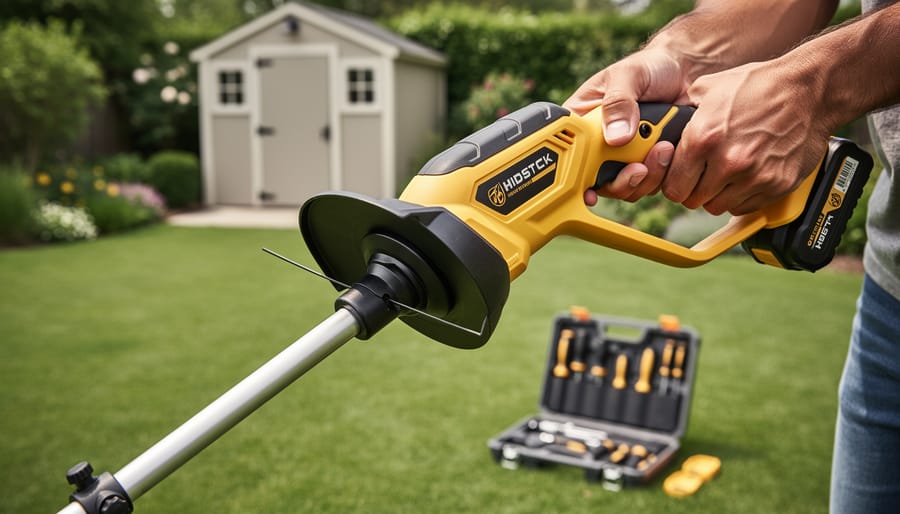
Installing Your New Head Correctly
Now comes the satisfying part—getting that new trimmer head installed correctly! The good news is that with a little attention to detail, this process is straightforward, even if you’re new to power tool maintenance.
Start by cleaning the drive shaft where your new head will attach. Remove any debris, old grass clippings, or dirt with a clean cloth. This ensures a secure connection and helps prevent future wobbling. Next, align the new head with the shaft, matching any slots or grooves. Most DeWalt trimmer heads have a bump feed mechanism that threads on counterclockwise—yes, it feels backwards, but this design prevents the head from loosening during operation.
Thread the head by hand first, turning it slowly until you feel resistance. This prevents cross-threading, which can damage both the head and shaft. Once hand-tight, use the appropriate wrench to snug it down. Here’s where many folks make a mistake: overtightening. You want it secure, but not so tight that you’ll struggle during the next replacement. A firm, solid turn beyond hand-tight is usually sufficient—think “snug, not struggling.”
For heads requiring initial line loading, feed your trimmer line through the eyelets according to the manufacturer’s diagram. Most DeWalt bump heads hold between fifteen to twenty-five feet of line, depending on the model. Wind the line in the direction indicated by the arrows on the head housing—this matters more than you’d think for optimal performance.
Before your first use, give the installed head a gentle tug and twist to confirm it’s secure. This simple check prevents mid-job surprises and keeps your lawn care routine running smoothly.
Making Your New Trimmer Head Last Longer
Daily and Seasonal Maintenance Habits
A little routine care goes a long way in extending your DeWalt trimmer head’s lifespan and keeping it running smoothly season after season. After each use, take just two minutes to wipe down the head with a dry cloth, removing grass clippings, sap, and dirt before they harden. This simple habit prevents debris from building up in the feed mechanism, which is one of the most common causes of premature wear.
Every few sessions, remove the head and inspect it more thoroughly. Look for cracks in the housing, worn feed holes, or damaged springs. Shake out any packed debris from inside the spool area—you’d be surprised how much grass and dirt can accumulate there. If you notice the line feeding inconsistently, this trapped debris is often the culprit rather than a faulty head.
When trimming season ends, clean your head thoroughly before storage. Apply proper storage practices by storing your trimmer in a dry location away from extreme temperature fluctuations. Consider removing old line and installing fresh line at the start of each season rather than leaving degraded line sitting all winter. These sustainable practices reduce waste by maximizing the life of each component while ensuring your equipment starts reliably when you need it.
Smart Trimming Techniques That Reduce Wear
Your trimming technique plays a surprisingly big role in how long your DeWalt trimmer head lasts. Think of it this way: every time you hit concrete, bricks, or tree bark, you’re asking that string to do something it wasn’t designed for. Instead, angle your trimmer slightly so the cutting plane stays parallel to the ground, keeping the string away from hard surfaces. This simple adjustment can double your head’s lifespan.
When edging along sidewalks or driveways, maintain a few inches of clearance rather than scraping right against the surface. Yes, you might need to hand-trim a tiny strip afterward, but you’ll save money on replacement heads and reduce plastic waste in the long run. Speaking of maintaining your tools, mindful trimming habits are just as important as physical maintenance.
Try working in smooth, sweeping motions rather than aggressive jabbing movements. Let the string do the work at its designed speed. When you force the trimmer into thick vegetation or repeatedly bounce it off hard objects, you’re creating unnecessary stress on both the head mechanism and the string feed system.
From an environmental standpoint, these gentler techniques mean fewer replacement parts ending up in landfills and less frequent manufacturing demand. It’s a small but meaningful way your lawn care habits contribute to sustainability while keeping more money in your pocket for other gardening projects.
Common Problems After Replacement (And Quick Fixes)
So you’ve installed your new trimmer head—congrats! But sometimes things don’t go perfectly smooth right out of the gate. Don’t worry, you’re not alone. Most post-replacement hiccups are easy to fix once you know what to look for.
If you’re experiencing excessive vibration, first check that the head is tightened properly. A loose head is the most common culprit. Turn off your trimmer, remove the battery or spark plug for safety, and hand-tighten the head clockwise until snug. If vibration continues, inspect the head for damage or check that you’ve installed the correct replacement model for your specific DeWalt trimmer.
Line feeding issues frustrate everyone, but they’re usually straightforward to resolve. Ask yourself: Did I thread the line in the right direction? Most heads have arrows showing the winding direction. Is the line the correct diameter? Using line that’s too thick or thin causes feeding problems. Try releasing tension by bumping the head on soft ground while running the trimmer at half throttle. If the line still won’t advance, remove the spool and rewind it, making sure there are no tangles or overlapping sections.
Poor cutting performance often means your line is too short. The trimmer works best when line extends about six inches from the head. If you notice the head loosening during use, you may need to apply a thread-locking compound designed for outdoor power equipment—this keeps everything secure while still allowing future removal.
Remember, most issues stem from installation details rather than defective parts. Taking five minutes to double-check your work prevents hours of frustration later. Your lawn deserves that perfectly trimmed edge, and you’ve got this!
You’ve just learned that replacing your DeWalt string trimmer head isn’t the intimidating task you might have imagined. With the right replacement part and a few simple steps, you can have your trimmer performing like new in just minutes. The difference a fresh head makes is genuinely remarkable—cleaner cuts, less frustration, and more enjoyable time spent tending your lawn.
Remember, regular maintenance like this not only extends the life of your equipment but also reduces waste, keeping perfectly good tools out of landfills. By taking charge of these simple repairs yourself, you’re making a sustainable choice while saving money on professional servicing.
We’ve covered everything from identifying worn heads to installation and ongoing care, but your lawn care journey doesn’t stop here. If you’re ready to dive deeper into equipment maintenance, explore our other guides on keeping your lawn care equipment in peak condition.
You’re now empowered to tackle this essential maintenance task confidently. Your trimmer—and your lawn—will thank you for it. Here’s to taking control of your equipment and enjoying the satisfaction that comes with a job well done.