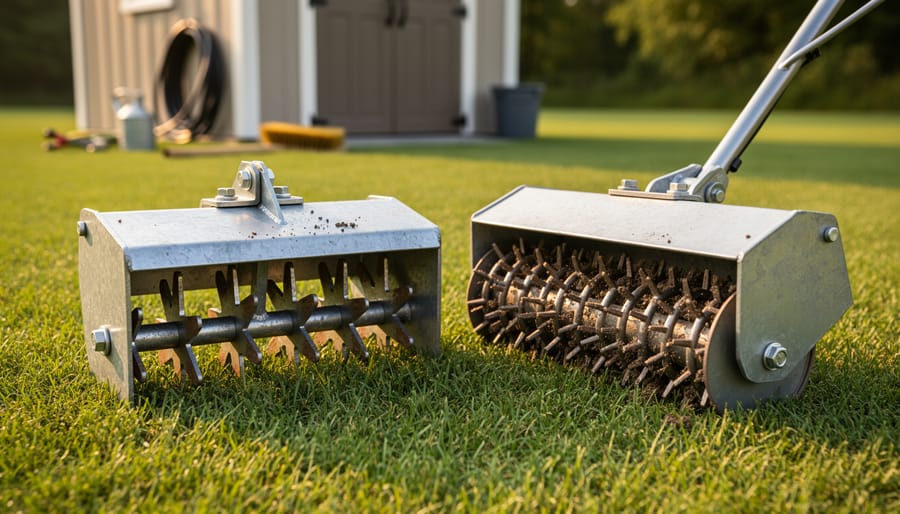
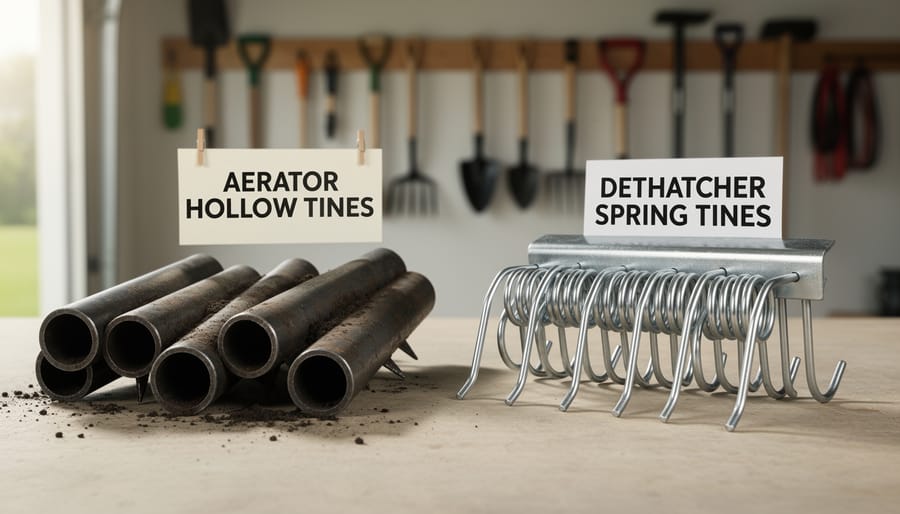
Inspect your lawn equipment’s tines after every three uses to catch bent, broken, or excessively worn components before they damage your machine or compromise performance. Aerator tines punch holes into compacted soil using hollow or solid spikes, while dethatcher tines rake horizontally through the grass surface to remove dead organic matter, and these fundamentally different actions require distinct maintenance approaches that directly impact how long your equipment lasts.
Clean aerator tines immediately after use by removing soil plugs with a stiff brush and hosing down the entire assembly, then apply a thin coat of machine oil to prevent rust formation on the metal surfaces. For dethatcher tines, remove accumulated thatch debris using a wire brush, check the spring tension that keeps tines at the correct angle, and sharpen the blade edges with a metal file when they become rounded from repeated contact with soil and roots.
Replace aerator tines when hollow cores become clogged beyond cleaning or solid spikes bend more than 15 degrees from vertical, as damaged tines create inconsistent hole patterns that reduce aeration effectiveness. Dethatcher tines need replacement when spring tension weakens, blades lose their sharp edge despite sharpening attempts, or the tine assembly shows cracks at stress points where metal fatigue typically begins.
Store both equipment types in a dry location after coating tines with protective oil, keeping them elevated off concrete floors to prevent moisture absorption that accelerates corrosion. Understanding these maintenance differences saves you hundreds of dollars in premature equipment replacement while ensuring your lawn receives the proper treatment it needs, whether you’re addressing compacted soil that prevents root growth or removing the suffocating thatch layer that harbors pests and disease.
Understanding Your Equipment: Aerator vs. Dethatcher Tines
What Aerator Tines Actually Do (And Why They’re Built That Way)
Aerator tines are your underground workers, creating breathing room for your lawn’s root system. Think of them as tiny excavators that give compacted soil the space it desperately needs. Understanding how they’re designed helps you appreciate why proper maintenance matters so much.
There are two main types you’ll encounter. Hollow core tines, which look like small metal tubes, actually pull plugs of soil out of the ground. These are the gold standard for serious aeration because they create lasting channels that allow air, water, and nutrients to penetrate deep into the root zone. As they plunge into the soil, they extract cores typically two to three inches long, leaving them on your lawn surface to break down naturally.
Solid spike tines take a different approach. Rather than removing soil, they simply poke holes by pushing soil aside. While this creates temporary openings, it can actually increase compaction around each hole. That’s why most lawn care experts recommend hollow core tines for truly compacted lawns.
The engineering behind these tines is fascinating. They need to withstand tremendous pressure as they punch through hard, compacted soil sometimes hundreds of times per minute. Quality tines are typically made from heat-treated steel to resist bending and breaking. The cutting edges on hollow tines are beveled to slice through dense ground, while the walls must be thick enough to maintain structural integrity without clogging too easily.
During operation, these tines face constant stress from rocks, roots, and variable soil conditions. This relentless pounding explains why they eventually wear down, dull, or occasionally break, making regular inspection and timely replacement essential for maintaining effective aeration results.
The Dethatcher Tine’s Job: More Delicate Than You Think
If aerator tines are the muscle of lawn equipment, dethatcher tines are more like precision tools requiring a gentler touch. Understanding their design helps explain why they need more frequent attention and care.
Dethatcher tines come in three main types, each with a specific purpose. Spring tines are flexible wire-like attachments that rake through grass, gently pulling up dead material without significantly disturbing the soil. Blade-style tines are slightly more aggressive, using sharp edges to cut through thatch. Then you have vertical cutting knives, which are the most robust option, slicing vertically into the lawn to remove dense thatch buildup. Each type shares a common trait: they work above or just at the soil surface, making them more vulnerable to wear than their aerating cousins.
The raking and cutting action creates unique maintenance challenges. As these tines sweep through grass, they encounter not just soft thatch but also hidden obstacles like small rocks, roots, and buried debris. Spring tines can bend out of shape after hitting something solid, losing their effectiveness at grabbing thatch. Blade-style tines and cutting knives dull surprisingly quickly because they’re constantly scraping against soil particles and organic matter.
Here’s the reality many equipment owners discover: dethatcher tines might need attention after every few uses, especially in challenging conditions. Bent spring tines leave unraked strips across your lawn, while dull blades simply push thatch down instead of lifting it out. The good news? Regular inspection and maintenance keeps these delicate workers performing efficiently, saving you money on premature replacements while supporting sustainable equipment practices.
Signs Your Tines Need Attention (Before They Ruin Your Lawn)
Aerator Tine Warning Signs
Knowing when your aerator tines need attention can save you from poor lawn results and prevent more serious equipment damage. Let me walk you through the telltale signs that something’s not quite right with your tines.
First up are plugged hollow tines, which are probably the most common issue you’ll encounter. When you’re using a core aerator, those hollow tines should pull up neat soil plugs and deposit them on your lawn’s surface. If you notice the tines aren’t extracting plugs anymore or the plugs are staying stuck inside the tines, you’ve got a blockage problem. This typically happens when you’re aerating wet, clay-heavy soil or when debris builds up inside the tines over multiple uses. The fix is usually straightforward cleaning, but ignoring it means you’re essentially just poking holes without achieving proper aeration.
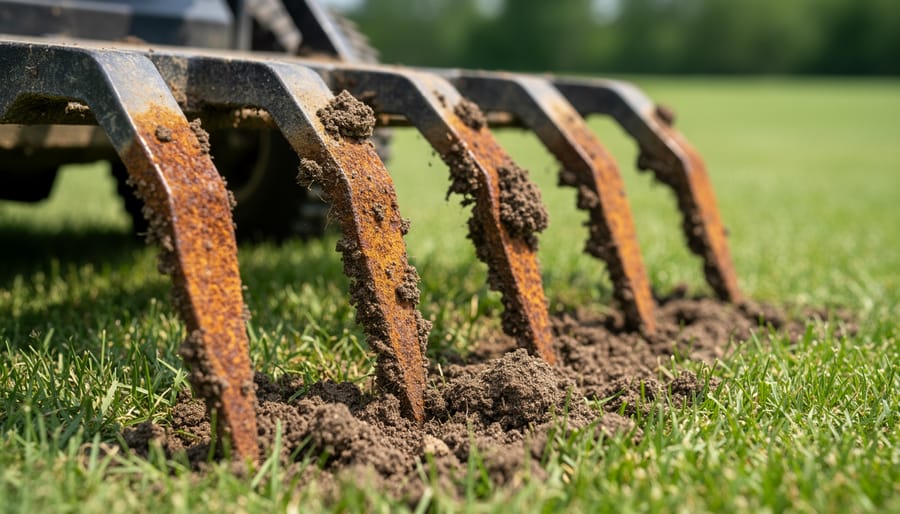
Bent or broken tines are your aerator’s cry for help. These happen when you hit rocks, roots, or other hard obstacles hidden in your lawn. You’ll notice bent tines because your aeration pattern becomes irregular, and you might hear unusual sounds during operation. Broken tines are even more obvious since they’ll leave gaps in your aeration pattern. Don’t try to work around damaged tines; replace them promptly to maintain even soil penetration and protect your machine’s drive system from unbalanced stress.
Uneven soil penetration tells you something’s off with tine condition or machine performance. Walk behind your aerator and examine the holes. If some penetrate deeply while others barely scratch the surface, your tines might be wearing unevenly or some have become dull while others remain sharp. This inconsistency defeats the purpose of aeration since your lawn receives uneven treatment.
Finally, dulled tips are the sneaky problem that develops gradually. Sharp tines penetrate soil cleanly and efficiently, while dull ones require more force and may even bounce off harder ground. If your aerator suddenly needs multiple passes over the same area or struggles in soil conditions it previously handled easily, inspect those tine tips closely.
Dethatcher Tine Red Flags
Keeping your dethatcher in top shape means staying alert to warning signs that your tines need attention. Think of tine inspection as a quick health check before each use—it only takes a couple of minutes but can save you from frustrating results and potential lawn damage.
Spring tines are your dethatcher’s workhorses, and bent tines are the most common issue you’ll encounter. Run your hand lightly along the tines (when the machine is off, of course) and feel for any that stick out at odd angles or have lost their characteristic curve. Bent tines won’t reach the proper depth, leaving strips of untouched thatch in your lawn. This creates the same frustrating result as uneven cutting patterns from a mower—an inconsistent, unprofessional appearance that defeats your hard work.
If your dethatcher uses blade-style tines instead of springs, check for dull edges. A sharp blade should catch slightly on your fingernail, while a dull one slides right over. Dulled blades tear at thatch rather than cleanly cutting through it, stressing your grass unnecessarily.
Missing tines create obvious gaps in your dethatching pattern. Count the tines periodically and compare to your owner’s manual specifications. Even one or two missing tines compromise effectiveness.
Watch for scalping patterns where the dethatcher digs too deep in certain areas. This often indicates unevenly worn tines or mounting issues rather than operator error. If you notice bare patches or exposed soil after dethatching, your tines may have worn down unevenly, causing some to penetrate deeper than intended. This sustainable approach to equipment monitoring prevents lawn damage while extending your dethatcher’s useful life through timely maintenance.
The Quick Pre-Season Inspection Routine
Before firing up your aerator or dethatcher each season, spend just five minutes on this simple inspection to catch problems early and keep your equipment running smoothly. First, check all tines for excessive wear, bending, or missing pieces—damaged tines won’t do their job effectively and can stress your machine. Second, examine bolts and fasteners to ensure everything’s tight and secure. Third, look for debris buildup around tine assemblies and clean thoroughly. Fourth, test moving parts for smooth operation without grinding or resistance. Finally, inspect belts and chains for proper tension and signs of wear. This quick routine helps you spot issues before they become expensive repairs, extends your equipment’s life, and ensures you’re working with tools that’ll give your lawn the care it deserves.
Essential Maintenance: Keeping Aerator Tines in Peak Condition
Post-Use Cleaning That Actually Works
Let’s talk about the not-so-glamorous but absolutely essential part of lawn care equipment maintenance: cleaning those tines properly. I know it’s tempting to just hose things down and call it a day, but trust me, a little extra effort here will save you money and frustration down the road.
For hollow core aerator tines, start by removing any compacted soil plugs while they’re still slightly moist. Use a thin wire or old screwdriver to push debris through from the inside out. If the soil has dried and hardened, soak the tines in a bucket of warm water for 15 minutes first. Here’s a sustainable cleaning solution I swear by: mix one part white vinegar with three parts water, adding a tablespoon of dish soap. This breaks down organic matter without harsh chemicals that could harm your lawn when you aerate next time.
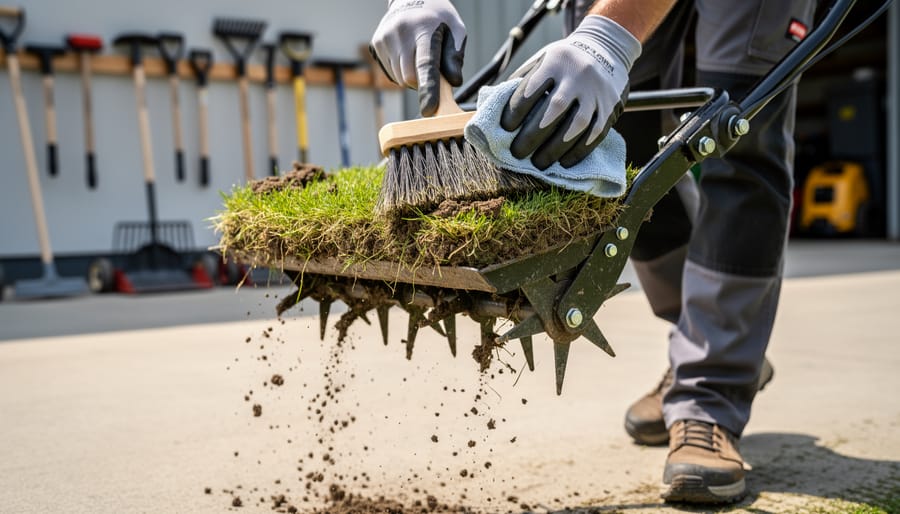
For dethatcher blades, use a stiff brush to remove grass clippings and thatch buildup. A putty knife works wonders for stubborn debris stuck in crevices. Whatever you do, avoid using metal brushes on spring tines, as they can weaken the metal over time.
Once clean, rinse everything thoroughly with fresh water and dry completely with old towels or a leaf blower. This is crucial for preventing rust. Apply a light coating of vegetable oil or specialized tool oil to all metal surfaces before storage. It’s eco-friendly and creates an effective moisture barrier. Store your equipment in a dry location, ideally hanging vertically to prevent tine distortion. This simple routine typically takes 20 minutes but can double your equipment’s lifespan.
When to Sharpen, Replace, or Rotate Tines
Knowing when to sharpen, replace, or rotate your tines can save you money and keep your lawn equipment working effectively. Just like blade balance and maintenance matters for your mower, proper tine care extends equipment life and improves results.
For aerator tines, sharpening isn’t typically necessary or worthwhile. Hollow core tines are designed to punch through soil rather than slice it, so they don’t need a sharp edge. Instead, watch for bent tips or clogged cores. Replace solid spoon tines when you notice they’re struggling to penetrate compacted soil or when the tips become significantly rounded. Most aerator tines last 20-40 hours of use depending on soil conditions, but rocky or clay-heavy soil accelerates wear.
Dethatcher tines require more attention since they work by slicing through thatch. Check the spring tines after every 3-4 uses for damage. If you notice bent or broken tines, replace them immediately because damaged tines create uneven dethatching and can scalp your lawn. While you can sometimes bend spring tines back into shape, replacement is usually the better long-term solution. These tines are relatively inexpensive, and fresh ones make a noticeable difference in performance.
Rotation is particularly important for equipment with adjustable tine positions. Every 10 hours of operation, rotate tines from high-wear positions to less-stressed spots. This ensures even wear across all tines and prevents some from wearing out prematurely while others remain barely used. Mark your tines with permanent marker to track rotation patterns.
The sustainability bonus? Proper maintenance doubles tine lifespan, reducing waste and saving you money for other garden improvements.
Storage Tips That Prevent Off-Season Damage
Before tucking your aerator or dethatcher away for winter, taking a few smart storage steps can save you from frustrating repairs come spring. Start by giving tines a thorough cleaning to remove all soil, thatch, and debris—leftover organic matter traps moisture and accelerates rust. Once clean, spray metal tines with a light coating of lubricating oil or apply a rust preventative to create a protective barrier. For spike aerators and dethatchers with fixed tines, this step is especially important since they can’t be easily replaced.
Store both tools in a dry, sheltered location like a garage or shed rather than leaving them exposed to the elements. If your aerator has removable core tines, consider taking them off and storing them separately to prevent warping. Hang dethatchers if possible to keep their tines from resting on concrete, which can draw moisture. Following these proper equipment storage practices means you’ll find your tools ready to work when lawn season returns, extending their lifespan sustainably while avoiding unnecessary replacement costs.
Dethatcher Tine Maintenance: The Care They Actually Need
Cleaning Without Damaging Delicate Spring Tines
Spring tines are gentle warriors in your lawn care arsenal, but they need equally gentle care to stay effective. After each dethatching session, take a moment to brush off debris while it’s still fresh. A stiff hand brush or old broom works perfectly for this task, sweeping along the curve of the tines rather than against them. This simple habit prevents thatch from hardening into stubborn clumps that require aggressive removal later.
For stuck-on debris, resist the urge to pry or twist. Instead, spray the tines with your garden hose using moderate pressure, letting the water do the work. If you encounter particularly stubborn buildup, mix warm water with a few drops of dish soap and use a soft-bristled brush to work it loose. Always clean from the base of the tine outward to avoid putting stress on the mounting points where they’re most vulnerable to bending.
Rust prevention is equally important for longevity. After cleaning, let your dethatcher air dry completely before storing it in a covered area. For extra protection during off-season storage, apply a light coating of mineral oil or specialized tool protectant to the tines. This sustainable approach keeps your equipment performing beautifully season after season without requiring premature replacement, saving both money and resources while maintaining a healthier lawn.
Straightening Bent Tines (And When It’s Not Worth It)
Spring tines on dethatchers sometimes bend during use, especially when they encounter rocks or thick root masses. The good news? Minor bends can often be straightened, extending your equipment’s life and keeping it out of the landfill.
For slight bends (less than 15 degrees), you can carefully straighten spring tines using a bench vise and pliers. Clamp the tine securely, then apply gradual, steady pressure to bend it back into position. Work slowly and avoid jerky movements, which can weaken or snap the metal. Think of it like bending a wire coat hanger – patience prevents breakage.
However, there’s a point where straightening becomes unsafe. If a tine shows multiple bends, cracks, or extreme angles (more than 30 degrees), replacement is your best option. Weakened metal can snap during operation, potentially causing injury or damaging your equipment further. Similarly, if you’ve already straightened the same tine once before, the metal’s been compromised through work hardening.
Aerator tines, being solid spikes or hollow cores, typically can’t be straightened effectively. When they bend, replacement is necessary to maintain proper soil penetration depth and ensure consistent results across your lawn. The investment in new tines pays off through safer operation and better performance for your turf.

Sharpening Dethatcher Blades for Better Performance
Sharp blades make all the difference when dethatching your lawn. Dull blades tear rather than cut through thatch, stressing your grass and reducing your machine’s efficiency. The good news is that keeping your dethatcher blades sharp isn’t complicated, and regular maintenance will save you time and energy in the long run.
For blade-style dethatchers, you’ll want to inspect your blades before each major dethatching session. Look for rounded edges, nicks, or visible wear. If you notice the machine pulling harder than usual or leaving ragged thatch behind, it’s definitely time to sharpen. Most homeowners with average-sized lawns (around 5,000 square feet) should plan on sharpening their blades once or twice per season. If you’re dealing with particularly thick thatch or have a larger property, you might need to sharpen more frequently.
The best tools for the job include a 10-inch mill bastard file, an angle grinder for seriously worn blades, or a bench grinder if you have one available. A simple file works wonderfully for routine maintenance. Remove the blades from your dethatcher first, following your manufacturer’s safety instructions. Secure each blade in a vise, then file at the existing angle, typically around 30 to 45 degrees. Work in smooth, even strokes moving in one direction only. Proper sharpening techniques ensure you maintain the blade’s balance and cutting effectiveness.
After sharpening, check for balance by hanging the blade on a nail through the center hole. If one side dips, remove a bit more metal from the heavier side. This prevents vibration during operation and extends your equipment’s life while supporting sustainable lawn care practices.
Common Mistakes That Destroy Your Tines Early
The Soil Conditions That Break Aerator Tines
Timing your aeration correctly can save you from snapped tines and costly repairs. I learned this the hard way one scorching August when I enthusiastically decided to aerate my lawn during a drought. Three broken tines later, I understood why soil conditions matter so much.
When soil becomes extremely dry and compacted, it essentially turns into concrete. Your aerator tines have to penetrate several inches deep, and in bone-dry conditions, they’ll bend or snap rather than glide through the earth. Similarly, if your lawn has excessive rocks or hidden obstacles just beneath the surface, those solid tines will take a beating with each pass.
The sweet spot for aeration is when your soil has adequate moisture, ideally the day after a good rain or thorough watering. The soil should feel slightly damp but not soggy. Think of it like working with clay in pottery: too dry and it crumbles, too wet and it’s unworkable, but just right and it’s perfectly pliable.
For most regions, early fall or spring offers ideal conditions when natural rainfall keeps soil moisture balanced. Before aerating, always walk your lawn to identify any rocks, sprinkler heads, or shallow utility lines. This simple inspection protects your equipment investment and ensures your aerator tines last season after season, which aligns perfectly with sustainable lawn care practices.
How You’re Accidentally Ruining Your Dethatcher Tines
Let me be honest with you – I’ve seen more dethatcher tines meet an early demise from simple mistakes than from actual wear and tear. The good news? Most of these mishaps are completely preventable once you know what to watch for.
The biggest culprit is dethatching too deeply. I get it – you want to be thorough. But when those spring tines dig more than half an inch into your soil, you’re not just removing thatch anymore. You’re damaging roots and bending those tines beyond their intended flex point. Think of it like raking leaves – you wouldn’t scrape your rake across concrete, right? Same principle applies here.
Hitting hidden obstacles is another tine killer. Rocks, sprinkler heads, and those forgotten garden edging stakes can bend or break tines instantly. Always walk your lawn first and flag anything suspicious. It takes five minutes and can save you fifty dollars in replacement tines.
Here’s something many folks don’t consider: dethatching when your lawn is wet or soggy. Wet thatch clumps up and creates uneven resistance, causing tines to snag and twist rather than glide through smoothly. This irregular stress weakens the metal over time. Wait for your lawn to be slightly moist but not saturated – usually a day or two after watering. Your tines will thank you with years of reliable service.
The Storage Mistake Nearly Everyone Makes
Here’s a scenario most of us are guilty of: finishing up your lawn work, feeling accomplished, and tossing your aerator or dethatcher straight into the shed without a second thought. That soil and grass debris clinging to those tines? It’s actually your equipment’s worst enemy. When you store tools with organic matter still attached, you’re creating the perfect environment for rust and corrosion to take hold. Moisture trapped in that debris keeps metal constantly damp, eating away at your tines and shortening their lifespan significantly. Taking just five minutes to clean your equipment before storage can literally add years to its life, saving you money and keeping your tools performing like new.
Choosing Replacement Tines: What Actually Matters
OEM vs. Aftermarket: Making the Right Choice
When it’s time to replace worn tines, you’ll face the classic OEM versus aftermarket decision. Original Equipment Manufacturer (OEM) tines are made by your machine’s manufacturer and typically offer guaranteed compatibility and consistent quality. They’re the safe bet, especially if you’re new to equipment maintenance and want peace of mind.
However, aftermarket tines have come a long way. Quality third-party manufacturers now produce excellent alternatives that often cost 30-50% less than OEM parts. I’ve had great success with reputable aftermarket brands, and many experienced users swear by them for regular maintenance needs.
The key is doing your homework. Check reviews from other users with your specific equipment model, verify the steel grade matches or exceeds OEM specifications, and ensure proper dimensions. Avoid bargain-bin options from unknown suppliers, as poor-quality tines can damage your machine and create safety hazards.
For aerator tines, which face less wear overall, aftermarket options are generally reliable. Dethatcher tines endure more punishment, so investing in OEM parts might make sense if you’re tackling heavily thatched lawns regularly. Consider your usage intensity, budget, and comfort level with trying new suppliers. Many gardeners adopt a hybrid approach, using OEM for critical components while choosing quality aftermarket parts for routine replacements.
Material Quality Indicators to Look For
When you’re investing in an aerator or dethatcher, paying attention to material quality can save you money and headaches down the road. Think of it like choosing a good pair of garden shears—quality materials make all the difference in how long they’ll serve you.
Start by examining the tines themselves. High-carbon steel is your gold standard here, offering excellent durability and resistance to bending. You’ll often see tines described as “heat-treated” or “tempered,” which means they’ve undergone a process that makes them much tougher and less likely to snap under pressure. This is especially important for aerator tines that need to penetrate compacted soil repeatedly.
Look for protective coatings too. Powder-coated or galvanized tines resist rust far better than bare metal, which is crucial since these tools work in moist soil conditions. A rusty tine isn’t just unsightly—it weakens the metal and can eventually fail mid-job.
Check the weld points and attachment mechanisms carefully. Quality manufacturers use solid welds without gaps or rough spots. The connection between tines and the main shaft should feel secure, not wobbly. If you can easily wiggle tines by hand before use, that’s a red flag.
For dethatcher blades, spring steel construction allows them to flex without breaking, bouncing back to shape after hitting obstacles. This resilience translates to longer service life and fewer replacements, making your lawn care routine more sustainable and cost-effective in the long run.
Creating Your Seasonal Tine Care Schedule
Let me share a straightforward maintenance calendar that’ll keep your tines in top shape year-round. Think of this as your seasonal checklist for both aerator and dethatcher care, designed to make maintenance feel less overwhelming and more manageable.
Spring is your busiest season for both tools. After aerating, clean your hollow tines immediately and inspect for bent or clogged cores. Run a wire brush through each tine opening and check for wear patterns. For dethatchers, spring use demands post-session cleaning to remove accumulated thatch from the spring tines. Check tension and flexibility, replacing any tines that have lost their bounce. This routine equipment maintenance prevents small issues from becoming expensive repairs.
Summer requires lighter attention. Mid-season, give your aerator tines a quick inspection even if stored. Check for rust if humidity is high in your area. Dethatcher tines benefit from a midsummer tension check, especially if you’ve done multiple passes on tough lawns.
Fall brings your second major maintenance window. Post-aeration, deep clean those hollow tines and apply protective oil before winter storage. Dethatcher spring tines need thorough cleaning after tackling fall thatch buildup. This is also the perfect time to order replacement tines so you’re ready for spring.
Winter is for storage and planning. Keep tines in a dry location, checking monthly for moisture or rust. Use this downtime to research sustainable maintenance products and organize your spring toolkit.
For commercial users or large properties, add monthly quick-checks during active seasons. Residential users can stick with pre-season and post-season deep maintenance. This rhythm keeps both tools performing reliably while extending their lifespan significantly.
Taking care of your aerator and dethatcher tines isn’t just routine maintenance—it’s a genuine investment in both your lawn’s health and your equipment’s longevity. Think about it: well-maintained tines work more efficiently, penetrate soil more effectively, and save you money by lasting multiple seasons instead of requiring frequent replacements. Plus, there’s something satisfying about knowing your equipment is ready to perform at its best whenever your lawn needs it.
Here’s my challenge to you: choose just one maintenance practice from this article and implement it this week. Maybe it’s cleaning your tines thoroughly after your next dethatching session, or perhaps it’s checking those aerator tines for wear patterns before storing your equipment for winter. Starting with a single habit makes the entire maintenance routine feel manageable rather than overwhelming, and you’ll quickly see the difference in your equipment’s performance.
The beauty of proper tine care is that it aligns perfectly with sustainable gardening practices. By extending your equipment’s lifespan, you’re reducing waste and getting more value from what you already own. Your lawn benefits from consistently effective aeration and dethatching, while your wallet benefits from fewer replacement purchases.
Now I’d love to hear from you! What tine maintenance challenges have you encountered? Do you have a clever cleaning trick or storage solution that works brilliantly for you? Drop your experiences, questions, or tips in the comments below. Your insights might be exactly what another lawn enthusiast needs to hear, and I’m always eager to learn from this community’s collective wisdom.