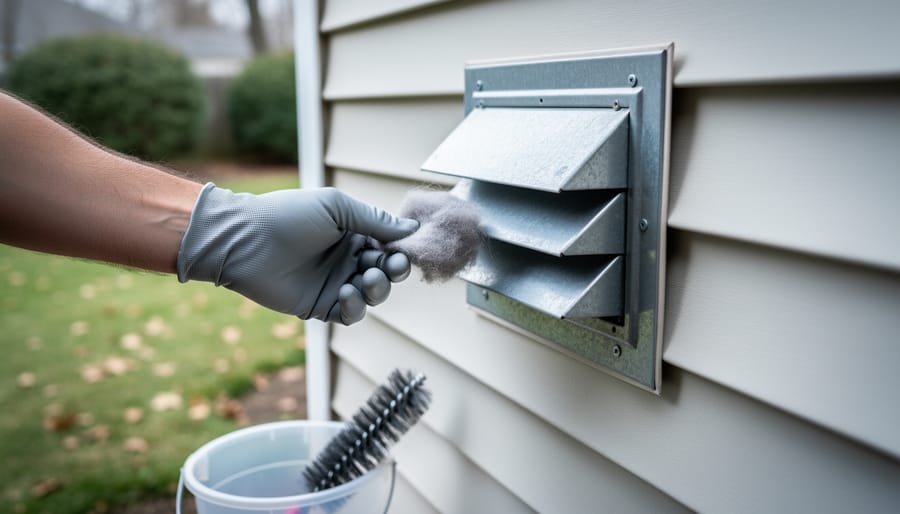
Clean your exterior dryer vent cover every three months by removing the hood, pulling out lint buildup with gloved hands, and scrubbing the louvers with a stiff brush and warm soapy water. Check that the damper flaps open and close freely—stuck flaps create dangerous backdrafts and reduce drying efficiency by up to 30 percent.
Inspect the vent opening after every ten loads during fall when leaves, spider webs, and nesting materials accumulate rapidly, just as you’d monitor your gutters and other outdoor maintenance responsibilities during seasonal transitions. Birds and rodents target dryer vents as cozy shelters, and a single nest can block airflow completely within days.
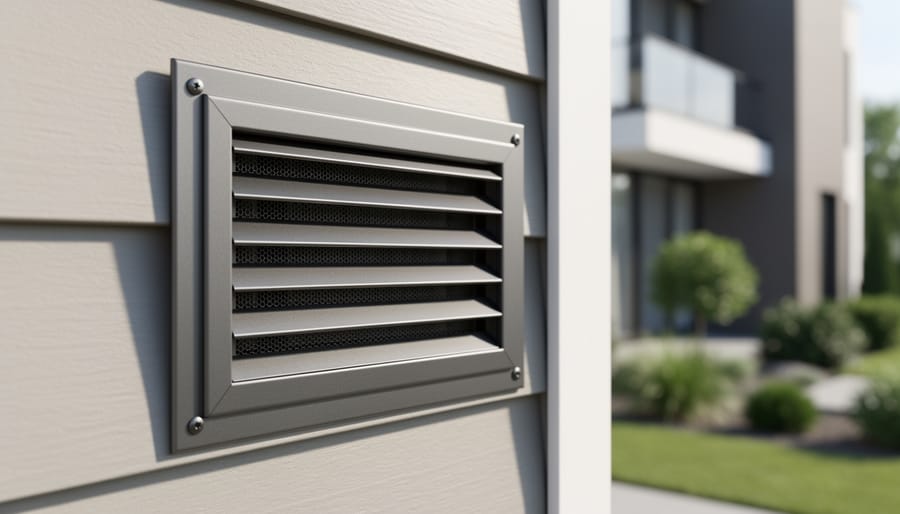
Replace plastic or vinyl vent covers with metal versions that resist weather damage and pest intrusion while lasting fifteen years or more. Metal hoods with built-in pest guards cost between fifteen and thirty dollars but prevent the hundreds you’d spend on emergency repairs from blocked vents or wildlife removal.
Most homeowners overlook this simple task until their dryer takes twice as long to finish a cycle or their energy bills spike unexpectedly. That exterior vent represents the final checkpoint in your dryer’s airflow system—when lint, debris, or damage compromises it, moisture gets trapped inside your walls, creating perfect conditions for mold growth and structural damage.
The good news is that maintaining your exterior dryer vent requires the same straightforward approach you already use for yard work: regular inspections, seasonal deep cleaning, and addressing small problems before they escalate. You’ll improve your dryer’s efficiency, reduce fire risk, lower energy costs, and extend your appliance’s lifespan with just a few minutes of attention each season.
Why Your Exterior Dryer Vent Deserves the Same Attention as Your Lawn
You wouldn’t dream of letting your lawn go unmowed for months on end, watching the grass grow wild and creating an eyesore in your neighborhood. Yet many of us overlook a critical piece of exterior home maintenance hiding in plain sight: the dryer vent on the outside of our homes.
Just as neglected grass leads to pest problems and property devaluation, an ignored dryer vent creates its own set of serious issues. The buildup of lint and debris in these vents forces your dryer to work harder and run longer, wasting significant energy with every load. If you’re someone who carefully waters during off-peak hours and chooses native plants to conserve resources, it’s worth knowing that a clogged dryer vent can increase your energy consumption by up to 30 percent. That’s like leaving your sprinkler system running unnecessarily, day after day.
The environmental impact extends beyond your utility bill. When dryers struggle against blocked vents, they release more carbon emissions and often need replacement sooner, contributing to landfill waste. This contradicts the sustainable practices many gardeners work hard to maintain in their outdoor spaces.
More alarming is the fire risk. The U.S. Fire Administration reports that failure to clean dryer vents causes thousands of residential fires annually. Lint is highly flammable, and the combination of heat, restricted airflow, and accumulated debris creates a genuine hazard that puts your home and family at risk.
Regular dryer vent maintenance takes minimal time compared to lawn care, yet delivers substantial returns. You’ll save money on energy bills, extend your appliance’s lifespan, and protect your home from fire danger. Think of it as composting for your home’s safety: a small, consistent effort that prevents bigger problems down the road while supporting your commitment to responsible homeownership and environmental stewardship.
Spotting the Warning Signs: When Your Exterior Vent Needs Attention
Visual Clues You Can Spot From Your Backyard
Just like you’d walk your garden beds checking for weeds or pest damage, a quick visual inspection of your exterior dryer vent can reveal plenty about its condition. Think of it as part of your regular outdoor maintenance routine, right alongside checking gutters and trimming hedges.
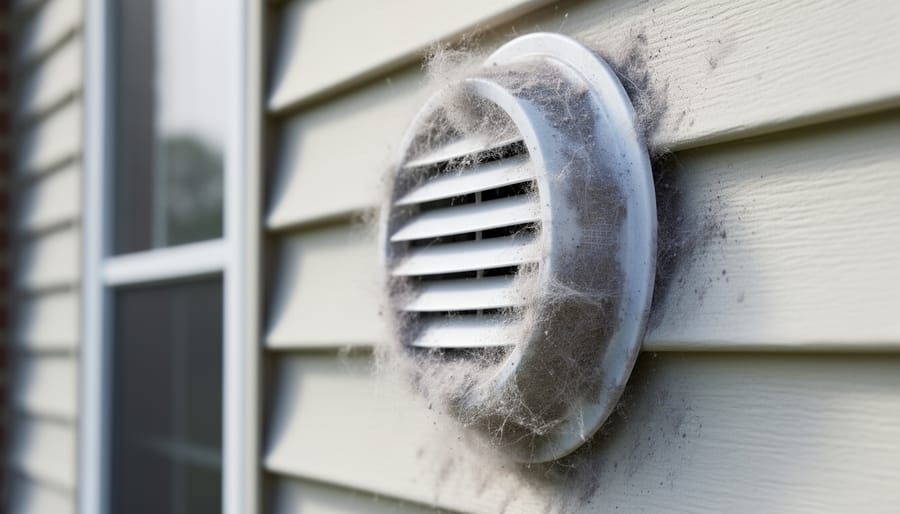
Start by looking at the vent opening itself. If you notice gray, fluffy lint clinging around the edges or accumulated on nearby siding, that’s your dryer crying out for attention. Similar to how mulch buildup can smother plant roots, lint accumulation restricts airflow and creates a fire hazard. For thorough cleaning, you might want to consult dryer vent cleaning Clearwater experts who can address hidden blockages.
Next, examine the vent cover or hood. Is it missing flaps, cracked, or hanging loose? Damaged covers invite birds, squirrels, and insects to nest inside, much like how gaps in fencing let critters into your vegetable patch. Bird nests are surprisingly common and completely block airflow while creating serious fire risks.
Look for visible debris like leaves, twigs, or even abandoned nests around the vent area. Check whether the vent cover flaps open freely when your dryer runs. Finally, inspect the materials themselves. Cracked plastic, rusted metal, or deteriorating caulk around the vent indicate it’s time for repairs. These small issues compound quickly, affecting both your dryer’s efficiency and your home’s energy use, contradicting those sustainable living goals we all share.
Performance Problems That Point to Vent Issues
Just like you’d notice your lawn mower struggling when the air filter gets clogged, your dryer will send clear signals when the exterior vent needs attention. Being able to recognize these warning signs early can save you energy, money, and potentially prevent a serious safety hazard.
The most obvious red flag is when your clothes take noticeably longer to dry. If you’re running two or even three cycles for loads that used to dry in one, that’s your dryer telling you something’s blocking the airflow. Think of it like trying to water your garden with a kinked hose – the system can’t work efficiently when the pathway is restricted.
You might also notice your laundry room feels unusually hot and humid during drying cycles. This happens because moisture and heat can’t escape properly through the blocked vent, so they back up into your home instead. Similarly, if your dryer itself feels extremely hot to the touch, that’s heat that should be venting outside but isn’t finding its way out.
Here’s something that might surprise you: take a walk outside near your dryer vent while a load is running. You should feel warm, moist air flowing freely from the vent opening. If there’s barely any airflow, or if you detect musty or burning odors, that’s a clear indication something’s wrong. A properly functioning vent should release steady airflow without any concerning smells – just like how proper garden composting shouldn’t create offensive odors when done correctly.
The Homeowner’s Guide to Exterior Dryer Vent Maintenance
Essential Tools You’ll Need (Most You Already Own)
Good news! Just like maintaining your garden shed or cleaning your lawn mower, dryer vent maintenance doesn’t require a trip to the hardware store for specialized equipment. Most homeowners already have what they need tucked away in their garage.
Start with a vacuum cleaner featuring a long hose attachment – the same one you use for cleaning cobwebs works perfectly here. You’ll also need a screwdriver (likely Phillips head) to remove the exterior vent cover, and an old toothbrush or small cleaning brush for scrubbing away lint buildup around the opening.
For a more thorough cleaning, consider investing in a dryer vent cleaning kit, which typically runs between $15-30. These kits include flexible brushes that attach to your drill, allowing you to reach deep into the vent pipe. Popular options include the LintEater Rotary Dryer Vent Cleaning System and the Gardus RLE202 LintEater, both available at most home improvement stores.
A flashlight helps inspect the vent’s interior condition, while work gloves protect your hands from sharp edges. Think of this as your seasonal maintenance toolkit – similar to preparing your gardening tools each spring, having these items ready means you can tackle vent cleaning whenever needed, promoting both home safety and energy efficiency.

Seasonal Cleaning: A Task for Every Quarter
Just as you schedule quarterly lawn care tasks throughout the year, your exterior dryer vent deserves the same seasonal attention. I like to tackle this job when I’m already outside doing my spring cleanup, mid-summer maintenance check, fall yard prep, and winter walkthrough. It’s a simple routine that takes about fifteen minutes but makes a real difference in your home’s efficiency and safety.
Start by locating your exterior vent, typically found on an outside wall near your dryer. You’ll need a screwdriver, a bucket, work gloves, and a small brush or old toothbrush. Begin by carefully removing the vent cover. Most covers are secured with just a couple of screws, though some snap into place. Set the hardware somewhere safe so it doesn’t disappear into the grass.
Once the cover is off, you’ll likely be surprised by how much lint has accumulated. Using your gloved hand, gently pull out any visible lint and debris. This is where that small brush comes in handy for getting into corners and crevices. I’ve found everything from dryer lint nests to leaves and even the occasional curious insect making a home in there.
Next, inspect the vent flap, that little door that should swing freely to let air out but close to keep pests and weather out. Give it a few test pushes to ensure it moves smoothly. If it’s stuck or damaged, replacement covers are inexpensive and easy to install.
Check the vent cover itself for cracks, rust, or damage. While you’re at it, peek inside the vent opening with a flashlight to spot any obvious blockages deeper in the ductwork. Finally, wipe down the cover, reattach it securely, and you’re done until next quarter.
Protecting Your Vent from Nature’s Intruders
Your dryer vent is surprisingly attractive real estate for wildlife. Birds see that cozy opening as the perfect spot for nesting, while mice and insects view it as a convenient entrance to your warm home. I learned this the hard way when a determined sparrow built a nest in my vent one spring, completely blocking airflow and creating a serious fire hazard.
The good news? You can protect your vent without harming wildlife. Installing a quality vent cover with a pest guard is your first line of defense. Look for covers with flaps or louvers that open when the dryer runs but close when it’s off. I recommend models with quarter-inch wire mesh screens that keep out birds and rodents while maintaining excellent airflow. The Gardus RVG001 Pest Guard is a reliable choice that many homeowners swear by, featuring a sturdy cage design that birds simply can’t penetrate.
For those committed to sustainable solutions, consider vent covers made from galvanized steel or heavy-duty aluminum. These materials last for years and resist rust, meaning fewer replacements and less waste. The Deflecto Dryer Vent Bird Guard receives consistently high marks for durability and effectiveness.
Check your vent cover seasonally, just as you would inspect your garden beds. Spring is prime nesting season, so April inspections are crucial. If you discover nesting materials, remove them carefully and install protection immediately. Regular monitoring prevents problems before they start, keeping both your home safe and wildlife peacefully relocated to more appropriate nesting sites.
When to Call the Professionals: Inspection and Repair Essentials
Red Flags That Require Expert Intervention
Just as you’d call in a landscape professional for major yard projects beyond your expertise, some dryer vent situations genuinely need expert help. There’s no shame in recognizing when a problem exceeds DIY territory—it’s actually the smart, sustainable choice that prevents bigger headaches down the road.
If you discover damaged or disconnected ductwork during your inspection, don’t attempt makeshift repairs with duct tape. Compromised vents leak moisture and lint into walls, creating conditions ripe for mold growth and fire hazards. Similarly, if your dryer vent runs longer than 25 feet or involves multiple turns and elbows, it may not meet current building codes. These complex routing situations require professional assessment to ensure proper airflow and safety.
Persistent clogs that return shortly after cleaning often indicate deeper issues—perhaps crushed ductwork behind walls or improper slope causing lint accumulation. If you notice any structural damage around your exterior vent opening, like rotted siding or compromised seals, addressing this promptly prevents moisture intrusion that could damage your home’s envelope.
When upgrading older systems or dealing with code compliance questions, professionals bring specialized tools like camera inspections and air pressure testing. Think of it like hiring an arborist for a diseased tree—sometimes expert intervention protects your larger investment while ensuring everything operates safely and efficiently for years to come.
What Professional Inspection Actually Involves
When you call in a professional, you’re getting more than just a basic cleaning—think of it like the difference between raking leaves yourself and having an arborist evaluate your entire yard’s health. Technicians arrive with specialized camera equipment that snakes through your entire vent system, identifying hidden lint buildup, damage, or even bird nests you’d never spot from ground level. This is especially valuable for longer vent runs or those with multiple bends.
They use industrial-grade rotary brush systems and high-powered vacuums that extract every bit of lint, not just what’s near the surface. Many professionals also perform airflow testing before and after cleaning, measuring actual cubic feet per minute to ensure your dryer operates at peak efficiency. This matters for both safety and your utility bills—a well-ventilated dryer uses significantly less energy.
The comprehensive service typically includes checking the exterior hood for damage, ensuring the flapper opens freely (similar to how you’d check garden gate hinges each season), and sealing any gaps where pests might enter. If they discover crushed or disconnected sections, most can handle repairs on the spot. While the investment runs higher than DIY approaches, professional inspections every few years provide peace of mind and catch problems before they become hazardous or costly.
Upgrading Your Exterior Vent: Sustainable Solutions That Last
Just as you’d upgrade your garden tools for better performance and longevity, modernizing your exterior dryer vent can save you time, money, and headaches down the road. Let’s explore some eco-conscious options that align with the same sustainable mindset you bring to your lawn care routine.
Today’s exterior vent covers have come a long way from those flimsy plastic models that crack after one harsh winter. Look for heavy-duty aluminum or stainless steel options with powder-coated finishes that resist rust and weathering. These materials last decades rather than years, reducing replacement waste and perfectly complementing other sustainable home improvements you might be tackling around your property.
Pest-resistant designs are game-changers for homeowners tired of evicting birds, rodents, or insects from their vent systems. Magnetic closure vents automatically seal when your dryer isn’t running, creating an impenetrable barrier against unwanted visitors while maintaining proper airflow during operation. Spring-loaded damper models work similarly, using gravity and tension to keep critters out without requiring electricity or complicated mechanisms.
Energy efficiency matters here too. When warm, moist air escapes through gaps in old vent covers during winter, you’re essentially heating the outdoors. Modern tight-sealing designs prevent this waste while still allowing proper ventilation when needed. Some models feature built-in backdraft dampers that minimize heat loss without restricting necessary airflow.
Consider vent covers with removable screens or grilles that make quarterly cleaning simpler. Quick-release designs let you maintain your system in minutes rather than wrestling with corroded screws each season. This ease of maintenance means you’re more likely to stay on top of it, just like keeping your mower blades sharp ensures a healthier lawn.
When shopping, prioritize products with solid warranties from established manufacturers. A vent cover with a 10-year guarantee might cost more initially, but the reduced maintenance frequency and durability make it worthwhile for both your wallet and the environment.
Creating Your Maintenance Schedule: Integration with Outdoor Chores
Just like you wouldn’t forget to fertilize your lawn or prune your roses, your exterior dryer vent deserves a spot on your regular home maintenance calendar. The good news? It’s incredibly easy to sync dryer vent care with the outdoor tasks you’re already doing throughout the year.
Think of your dryer vent maintenance as another form of seasonal outdoor maintenance, just like aerating your lawn or cleaning gutters. Here’s a simple quarterly approach that pairs perfectly with your existing garden routine:
Spring (March-May): While you’re clearing winter debris from your garden beds, take a few minutes to inspect your vent cover. Remove any leaves, bird nests, or accumulated lint. This is also when birds are actively nesting, so early prevention saves headaches later.
Summer (June-August): During your regular lawn mowing schedule, do a quick visual check of the vent opening. Make sure the flap moves freely and isn’t blocked by overgrown vegetation. Trim back any plants encroaching within 12 inches of the vent for proper airflow.
Fall (September-November): As you’re raking leaves and preparing your garden for winter, give your vent a thorough cleaning. This pre-winter maintenance is crucial since you’ll likely be running your dryer more during cold months.
Winter (December-February): After heavy snowstorms, clear any snow accumulation around the vent opening. While you’re shoveling pathways, add this quick task to your routine.
Keep a simple checklist in your garden journal or phone alongside your fertilizing schedule. This integration means you’ll never forget this important task, and it becomes just another sustainable practice protecting both your home and the environment.
Just like tending to your garden beds or maintaining your lawn mower, keeping your exterior dryer vent clean is one of those simple outdoor tasks that pays enormous dividends. As someone who appreciates the connection between mindful maintenance and long-term sustainability, you already understand that small efforts add up to significant impacts.
By adding exterior dryer vent maintenance to your seasonal home care routine—perhaps alongside spring garden prep or fall lawn winterization—you’re practicing responsible homeownership that benefits both your household and the environment. A clean vent means your dryer works efficiently, using less energy and reducing your carbon footprint. That translates directly to lower utility bills and a smaller environmental impact, aligning perfectly with sustainable living principles.
Think of it this way: you wouldn’t let weeds choke out your carefully planted perennials, so why let lint and debris compromise your home’s safety and efficiency? This straightforward maintenance task takes less time than edging your walkway but prevents potential fire hazards and extends your appliance’s lifespan.
So grab your tools during your next outdoor work session—maybe when you’re already outside cleaning gutters or preparing garden beds. Your future self will thank you when your dryer performs better, your energy bills drop, and you’ve eliminated a common household hazard. It’s practical, effective, and environmentally responsible—exactly the kind of solution that makes homeownership rewarding.