Every year, thousands of gallons of rainwater cascade off your roof and disappear into storm drains—water that could be feeding your lawn through the driest summer months. Underground irrigation water storage tanks capture this precious resource, tucking it safely beneath your yard where it stays cool, hidden, and ready to use when your grass needs it most.
Think of these systems as your personal water savings account. During spring rains, you’re making deposits. Come July’s scorching heat, you’re making withdrawals to keep your landscape thriving without watching your water bill skyrocket. Unlike rain barrels that sit visibly in your yard and hold maybe 50-100 gallons, underground tanks store anywhere from 500 to 10,000 gallons completely out of sight, giving you serious irrigation power that can sustain a substantial lawn or garden.
The beauty of underground storage lies in its efficiency. Buried tanks maintain consistent temperatures, preventing algae growth and water degradation. They don’t freeze in winter like surface containers, and they free up valuable yard space for the garden beds and play areas you actually want to see. Whether you’re tired of municipal water restrictions limiting your lawn care schedule, concerned about rising utility costs, or simply committed to reducing your environmental footprint, these systems offer a practical path toward water independence. The installation requires planning and investment upfront, but the long-term benefits—lower bills, healthier landscapes during droughts, and genuine sustainability—make underground storage an increasingly popular choice for gardeners who think beyond next season.
What Underground Irrigation Water Storage Tanks Actually Are

The Basic Setup: From Rooftop to Root Zone
Let me walk you through how this works – it’s honestly much simpler than most people think!
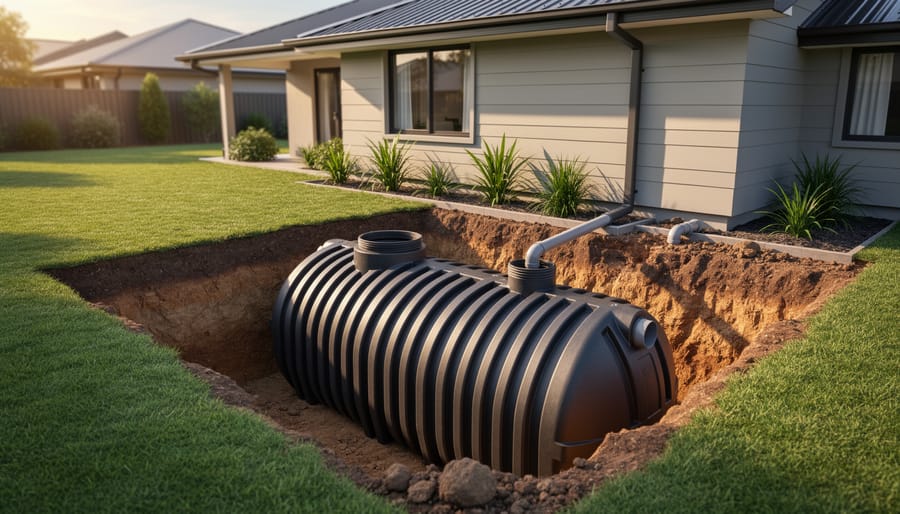
Picture this: rain falls on your roof, just like it always does. But instead of rushing down the gutters and into the street, those gutters channel the water through downspouts into a filtration system. This first step is crucial because you don’t want leaves, twigs, or debris ending up in your storage tank. Think of it as a simple screen or filter that catches the big stuff while letting clean water pass through.
From there, the filtered water flows through pipes into your underground storage tank. These tanks are typically buried a few feet below ground, which keeps the water cool and prevents algae growth. The beauty of rainwater harvesting systems is that gravity can do a lot of the heavy lifting, though most setups include a pump to maintain steady water pressure.
When it’s time to water your lawn or garden, the stored water gets pumped through your irrigation system – whether that’s drip lines, sprinklers, or soaker hoses. Many gardeners add a simple timer to automate the whole process, making it as hands-off as any municipal water system.
The entire cycle operates quietly in the background, transforming wasted runoff into a sustainable water source. You’re essentially creating your own mini water utility, powered by nature and designed to keep your landscape thriving while reducing your environmental footprint.
Tank Materials and What They Mean for Your Garden
Choosing the right material for your underground irrigation tank can feel overwhelming, but think of it like choosing containers for your garden—different materials suit different needs. Let me walk you through the three most popular options and what they mean for your watering system.
Polyethylene tanks are the go-to choice for many home gardeners, and for good reason. These plastic tanks are lightweight, resistant to cracking, and won’t corrode over time. I’ve found them particularly appealing because they’re relatively affordable and easier to install without heavy machinery. They’re also naturally resistant to algae growth when kept dark, which means cleaner water for your plants. The downside? They can shift or float if groundwater levels rise, so proper installation with anchoring is essential. They’re perfect for most residential gardens where you’re storing moderate amounts of rainwater.
Concrete tanks are the workhorses of underground storage. If you’re planning a large-scale system or live in an area with high groundwater, concrete’s weight and stability make it incredibly reliable. These tanks can last decades with minimal maintenance, and they naturally help balance pH levels in acidic rainwater. However, they’re more expensive upfront and require professional installation with excavation equipment. For serious gardeners investing in long-term water independence, concrete delivers unmatched durability.
Fiberglass tanks offer a middle ground—stronger than polyethylene and lighter than concrete. They resist corrosion beautifully and handle temperature fluctuations well, making them excellent for areas with challenging soil conditions. The trade-off is cost; they’re typically the most expensive option per gallon. However, if you’re committed to a sustainable gardening system that’ll serve you for twenty-plus years with minimal fuss, fiberglass deserves consideration.
The Real Benefits of Going Underground with Your Water Storage

Your Lawn Stays Green Even When Rain Doesn’t Fall
We’ve all experienced those frustrating weeks when the weather forecast shows nothing but sunshine and your lawn begins to brown and wilt. Without consistent rainfall, maintaining a lush, green lawn becomes a daily watering chore that drains both your time and municipal water supply. This is where underground irrigation storage tanks truly shine as your lawn’s insurance policy against drought.
When you’ve collected rainwater during wet periods, your underground tank becomes a reservoir of opportunity. Instead of watching your grass go dormant or running up enormous water bills during dry spells, you’ve got gallons of free water ready to deploy through your reliable irrigation system. Picture this scenario: your neighbors are dealing with water restrictions and browning lawns, while yours stays vibrant because you’re drawing from your stored rainwater.
The beauty of this system lies in its consistency. You’re not dependent on unpredictable weather patterns or municipal watering schedules. During those critical summer months when grass needs regular moisture to thrive, your underground storage ensures you can maintain optimal watering routines. This means healthier root systems, better drought resistance, and a lawn that remains the envy of your neighborhood regardless of rainfall patterns.
Hidden Storage Means More Usable Yard Space
One of the most appealing advantages of going underground with your water storage is the valuable space you’ll reclaim at ground level. Instead of looking at bulky rain barrels or above-ground tanks taking up prime real estate, you can transform that area into something truly useful for your family and garden.
Imagine converting where a large storage tank would have sat into a beautiful flower bed, a vegetable garden, or even a cozy patio space for entertaining. Kids can have more room to play freely without navigating around obstacles, and you won’t need to sacrifice that sunny spot you’ve been eyeing for tomatoes.
This hidden approach also gives your landscape a cleaner, more polished appearance. Your neighbors will admire your yard’s aesthetic while you quietly enjoy the sustainability benefits beneath their feet. For urban gardeners working with limited square footage, this space-saving solution can be transformative, allowing you to maximize every inch of your property for enjoyment rather than infrastructure.
The Sustainability Factor That Actually Matters
Let’s talk about what really matters when it comes to underground irrigation storage tanks: the practical benefits you’ll actually notice. First up, there’s the reduced municipal water use, which translates directly to lower water bills. One of my neighbors installed a 1,500-gallon system and saw her summer water costs drop by nearly 40 percent. That’s money back in your pocket season after season.
Beyond the savings, these tanks help address a problem you might not even realize you’re contributing to: stormwater runoff. When rain hits your roof and rushes into storm drains, it picks up pollutants and overwhelms local waterways. By capturing that water instead, you’re keeping it on your property where it belongs, giving your garden the hydration it needs while easing pressure on municipal systems.
The environmental impact adds up quickly across a neighborhood. If just five homes on your street captured rainwater, that’s potentially thousands of gallons per month staying out of the storm drain system. You’re not just maintaining a beautiful lawn; you’re participating in genuine watershed protection. And honestly, there’s something satisfying about watering your tomatoes with yesterday’s thunderstorm rather than treated tap water.
Choosing the Right Tank Size for Your Landscape
How Much Rainwater Can You Actually Collect?
Here’s the exciting part: figuring out how much free water is literally falling on your roof! The basic calculation is surprisingly simple, and once you see the numbers, you’ll understand why rainwater harvesting is such a smart sustainability choice.
The formula is straightforward: For every inch of rainfall, you can collect approximately 0.6 gallons of water per square foot of roof area. Don’t worry if math isn’t your thing—I’ll walk you through some real examples.
Let’s say you have a modest 1,000 square foot roof. During a typical 1-inch rainfall, you could collect around 600 gallons of water. If your area receives 30 inches of rain annually, that’s a potential 18,000 gallons per year! For a larger 2,000 square foot roof, you’re looking at about 1,200 gallons per inch of rain, or 36,000 gallons annually with the same rainfall.
To calculate your specific potential, measure your roof’s footprint (length times width), multiply by 0.6, then multiply by your area’s average annual rainfall in inches. You can find rainfall data through your local weather service or online climate databases.
Keep in mind this is theoretical maximum collection. In reality, you’ll capture about 75-90% of this amount due to evaporation, splash-out, and your first-flush diversion system that discards initial runoff containing debris. Even accounting for these losses, the harvestable volume is impressive and can substantially reduce your reliance on municipal water for irrigation throughout the growing season.

Matching Storage Capacity to Your Garden’s Thirst
Choosing the right storage capacity starts with understanding your garden’s weekly water appetite. A simple rule of thumb: most lawns need about one inch of water per week, which translates to roughly 0.6 gallons per square foot. For a typical 1,000-square-foot lawn, that’s 600 gallons weekly during growing season.
Small gardens with primarily drought-tolerant plants might get by with a 500-1,000 gallon tank, especially if you’re supplementing municipal water and experiencing regular rainfall. This size works beautifully for new gardeners dipping their toes into rainwater harvesting without overwhelming investment.
Medium-sized properties with mixed landscaping, including thirsty vegetables and ornamental beds, typically benefit from 1,500-3,000 gallon capacity. This gives you breathing room during dry spells and means you’re not constantly worrying about running dry mid-week.
Extensive gardens covering multiple zones need serious storage, often 3,000-5,000 gallons or more. Think about it like having a reserve fund for your plants. During those stretches when Mother Nature forgets to show up, you’ll be glad you’ve got the backup.
Here’s a practical tip from experience: calculate your weekly needs, then multiply by two. This buffer accounts for unexpected dry periods and gives your collection system time to refill between irrigation cycles. Remember, it’s better to have slightly more capacity than you need than to watch your garden struggle while waiting for the next rainfall to replenish your tanks. Consider your climate patterns too, as regions with prolonged dry seasons naturally require larger reserves.
Installation Considerations You Need to Know Before Digging
Site Selection: Where to Put Your Underground Tank
Choosing the right spot for your underground tank can mean the difference between a smoothly functioning system and a maintenance headache. Let’s walk through the key considerations together.
First, take a good look at your soil. Clay-heavy soils can retain water and create drainage issues around your tank, while sandy soils typically drain better but may require additional structural support during installation. Consider having a simple soil test done if you’re unsure about your ground composition.
Next, think about proximity to your downspouts and the garden areas you’ll be irrigating. The closer your tank sits to your water collection points, the less piping you’ll need, which translates to lower costs and fewer potential leak points. Similarly, positioning it reasonably close to your garden beds makes distribution more efficient.
Drainage is absolutely essential. Your tank should sit in an area where water naturally drains away, not toward the tank. Poor drainage can compromise the installation and create ongoing problems.
Don’t forget about access for maintenance. You’ll need to service your tank periodically, so ensure there’s enough clearance for inspections, pump repairs, and eventual cleaning. A tank buried beneath your deck might seem convenient now, but future-you will appreciate easier access when maintenance time rolls around.

Permits, Codes, and Regulations (Yes, They Matter)
I know navigating permits and regulations sounds about as fun as pulling weeds in July, but hear me out—this step can actually save you from major headaches down the road. Before you break ground on your underground storage tank, check with your local building department about what’s required in your area. Most municipalities have specific codes about tank depth, placement distances from property lines and foundations, and water quality standards. Some regions embrace rainwater harvesting with open arms and streamlined permits, while others have stricter requirements.
The good news? Many areas now recognize the environmental benefits of these systems and have made the process surprisingly straightforward. Start by calling your local building department—they’re typically more helpful than you’d expect. Ask specifically about rainwater harvesting systems, required inspections, and any rebates or incentives available (yes, some places actually reward you for being sustainable!). You might also need approval from your homeowners association if you have one.
Getting proper permits protects you legally and ensures your system is safe and effective. Plus, permitted systems often increase property value, while unpermitted ones can complicate future home sales. Take this step seriously, but don’t let it intimidate you—consider it part of building something meaningful for your garden’s future.
When to DIY and When to Call the Pros
Let’s be honest about this: installing an underground irrigation water storage tank isn’t like setting up a rain barrel on your deck. If you’re handy with basic plumbing and comfortable with modest excavation work, smaller systems (250-500 gallons) with straightforward installations might be within reach. You’ll need some muscle power, a weekend of time, and willingness to rent equipment like a compact excavator.
However, I strongly recommend calling professionals for larger systems or complex installations. Here’s why: proper excavation depth matters tremendously for tank stability and frost protection. You’ll need accurate grading to ensure water flows correctly, and connecting to existing irrigation systems requires precise plumbing knowledge. Plus, professionals understand local codes and can navigate permit requirements that might trip up even experienced DIYers.
The sweet spot for DIY? Installing above-ground components like gutters, downspouts, and filters, then hiring pros for the underground work. This hybrid approach saves money while ensuring critical installation elements are handled correctly.
Think of it this way: a poorly installed tank can lead to collapsed structures, drainage nightmares, or contaminated water. Professional installation typically includes warranties and guarantees your sustainable watering system will function reliably for decades. Sometimes the investment in expertise pays dividends through peace of mind and proper performance.
Connecting Your Tank to Your Irrigation System
Pump Selection Made Simple
Choosing the right pump doesn’t have to feel overwhelming. Think of it as matchmaking between your tank and your irrigation needs—you just need to find the perfect partner!
Start by measuring your tank depth. Submersible pumps work beautifully for deeper tanks (typically 8 feet or more), sitting quietly underwater and pushing water up through your system. For shallower setups, surface pumps installed near the tank opening are often more practical and easier to maintain.
Next, consider your irrigation demands. Calculate your total GPM (gallons per minute) by adding up all the sprinkler heads or drip lines you’ll run simultaneously. A small vegetable garden might only need 5-10 GPM, while a comprehensive lawn system could require 15-25 GPM or more. Your pump should comfortably meet this demand without straining.
Don’t forget about pressure requirements. Most drip irrigation systems thrive with 20-40 PSI, while traditional sprinklers typically need 30-50 PSI. Check your specific equipment recommendations—they’re usually printed right on the packaging or available online.
Here’s a sustainable bonus: look for energy-efficient pumps with variable speed options. They adjust their power based on actual demand, saving electricity and extending the pump’s lifespan. Many modern pumps also feature automatic shut-off when water levels drop, protecting both the equipment and your investment.
Finally, consider future expansion. If you’re planning to expand your garden beds or add more irrigation zones, choose a pump with slightly more capacity than you currently need. It’s easier than upgrading later!
Filtration: Keeping Your System Clean and Efficient
Think of your filtration system as the gatekeeper that protects your entire irrigation setup. Without proper filtration, debris, sediment, and organic matter can wreak havoc on your system, clogging emitters and damaging pumps while potentially exposing your plants to harmful contaminants.
For underground storage tanks, you’ll typically need two stages of filtration. Start with a pre-filter or screen filter at the tank inlet to catch leaves, twigs, and larger particles before they enter your stored water. This is your first line of defense and incredibly easy to maintain with periodic cleaning. Next, install a main filter between your tank and irrigation system. Disc or screen filters work wonderfully for most gardens, removing particles down to 150 mesh, which protects even the smallest drip emitters.
Here’s something I learned the hard way: check your filters monthly during peak growing season. A clogged filter doesn’t just reduce water flow; it forces your pump to work harder, shortening its lifespan and wasting energy. Clean filters mean efficient watering, healthier plants, and equipment that lasts years longer. It’s a small investment of time that pays massive dividends in system performance and sustainability.
Maintenance That Keeps Your System Running Smoothly
Seasonal Checks That Take Minutes
Good news: maintaining your underground irrigation storage tank doesn’t require a mechanical engineering degree or an entire weekend. Set aside just 15-20 minutes each season for these straightforward checks, and you’ll catch potential issues before they become expensive headaches.
Start by inspecting the inlet filter or screen where rainwater enters your tank. Remove any accumulated leaves, debris, or that mysterious gunk that somehow always appears. A clogged inlet means wasted rainwater running off instead of being stored for your garden’s thirsty days ahead.
Next, check your overflow outlet. Pour a bucket of water near it to ensure it’s draining properly and not blocked by roots or sediment. This simple test prevents water from backing up during heavy rainfall.
Pop open your access hatch and give the water a quick look and sniff. Yes, really! It should be relatively clear and odor-free. Any foul smells or murky appearance might indicate stagnant water or algae growth, signaling it’s time for a cleaning.
Finally, walk around your tank’s location checking for any ground settling or unusual wet spots, which could indicate leaks. These quarterly check-ins protect your sustainable watering investment while keeping your irrigation system running smoothly year-round.
Troubleshooting Common Issues Before They Become Problems
The good news? Most underground tank issues are easy to spot and fix when you catch them early. Think of it like tending your garden—a little regular attention prevents big headaches down the road.
Start by checking your tank’s inlet screens monthly during peak collection seasons. Leaves, pine needles, and debris love to accumulate there, reducing water flow. A quick rinse with your garden hose keeps things flowing smoothly and prevents overflow problems during heavy rains.
Sediment buildup is perfectly normal, especially if you’re collecting from rooftops. Once a year, inspect the bottom of your tank using a flashlight (or hire a professional for larger systems). If you notice more than a few inches of settled material, it’s time for a flush-out. This simple maintenance protects your pump and keeps your irrigation water clean.
Speaking of pumps, listen for unusual sounds when yours kicks on. Grinding, rattling, or struggling noises often signal that your pump filter needs cleaning or that sediment has reached concerning levels. Catching these signs early saves you the cost of pump replacement.
Finally, watch for unexpected drops in water levels between rainstorms—they might indicate small leaks in your system that are easy to repair before they waste your precious harvested water.
Cost Reality: Investment vs. Long-Term Savings
What You’ll Actually Spend
Let’s talk real numbers, because knowing what you’ll actually spend helps you plan effectively. For a modest residential system storing 500-1,000 gallons, expect to invest between $1,200 and $3,500 total. The tank itself typically runs $600-$1,500, while installation adds another $600-$2,000 depending on your soil conditions and how deep you’re going.
Mid-sized systems holding 1,500-3,000 gallons generally cost $3,000-$7,000 complete. The larger tanks command $1,500-$3,500, and installation becomes more involved, usually $1,500-$3,500, especially if you need excavation equipment or encounter rocky soil.
Don’t forget the extras that make your system actually work. A quality pump runs $200-$800, depending on whether you need pressure or just gravity flow. Filtration systems range from $100 for basic screens to $500 for sophisticated first-flush diverters. Budget another $150-$400 for piping, connectors, and overflow management.
Here’s the encouraging part: many gardeners find DIY installation cuts costs by 40-60 percent if you’re handy with basic tools and can rent an excavator for a weekend. Professional installation brings peace of mind but naturally costs more.
The investment pays dividends through reduced water bills and healthier gardens fed by chlorine-free rainwater. Most homeowners recover their costs within 3-7 years, while enjoying the satisfaction of harvesting nature’s free resource. That’s sustainability that actually makes financial sense.
The Payback Period Nobody Talks About
Let’s be honest about the money side of things. Most homeowners see payback somewhere between 3 to 7 years, depending on your water rates and how much you actually use the system. If you live in an area with high water costs or frequent watering restrictions, you’ll hit the sweet spot faster. I’ve talked with gardeners in drought-prone regions who’ve recouped their investment in just two summers by keeping their lawns thriving while neighbors faced brown patches and hefty water bills.
The calculation gets more interesting when you factor in local incentives. Many municipalities offer rebates for rainwater harvesting systems, sometimes covering 20-40% of installation costs. Check with your water utility and environmental agencies about available programs. Don’t forget the intangible benefits that don’t show up on spreadsheets: increased property value, reduced stormwater runoff, and the satisfaction of maintaining a lush landscape sustainably. Your garden doesn’t care about payback periods, but it certainly appreciates consistent water access. Consider this an investment in both your property and environmental stewardship rather than a purely financial decision.
Making Underground Storage Work in Different Scenarios
Small Yards and Urban Lots
If you’re working with a compact city lot or a modest suburban yard, underground storage tanks might be your secret weapon. Let’s face it—when every square foot counts, dedicating precious surface space to bulky rain barrels isn’t always practical. That’s where going underground makes perfect sense.
Underground tanks free up your patio, garden beds, and entertaining areas while still capturing hundreds or even thousands of gallons of rainwater. I’ve seen townhouse gardeners transform their irrigation capabilities by installing a 500-gallon tank beneath a small flower bed—completely invisible yet incredibly functional.
These systems work beautifully in narrow side yards where traditional storage would create accessibility issues. You can even position tanks under driveways or walkways with proper load-bearing installation, maximizing every inch of your property. For urban gardeners committed to sustainable practices, underground storage lets you harvest rainwater without compromising your outdoor living space or aesthetic vision. It’s an investment that pays dividends in both water conservation and yard usability.
Large Landscapes and Acreage
When you’re managing a large property, one underground tank rarely cuts it. I remember visiting a friend’s five-acre homestead where a single 1,500-gallon tank seemed impressive until we calculated their actual irrigation needs during summer. They were constantly rationing water!
For properties over two acres, consider a multiple-tank approach. Start by calculating your total irrigation needs based on planted areas, not just total acreage. You might need 3,000-10,000 gallons or more depending on your landscape design. The beauty of underground systems is that you can link multiple tanks together, creating a modular network that grows with your property’s needs.
Position tanks strategically near high-demand zones like vegetable gardens or ornamental beds rather than installing one massive central tank. This reduces pressure requirements and piping costs. Many large-property owners start with two or three 2,500-gallon tanks and add more as budgets allow.
Don’t forget infrastructure scaling too. Larger systems need robust filtration, bigger pumps, and potentially zone controllers to manage different irrigation areas efficiently. Professional consultation becomes especially valuable here, ensuring your system design matches both current needs and future expansion plans.
Taking the leap into underground irrigation water storage is more than just adding infrastructure to your garden—it’s about embracing a smarter, more responsible approach to lawn care that pays dividends for years to come. You’ll conserve thousands of gallons of precious municipal water annually, reduce your utility bills, and give your plants the pure, chemical-free hydration they truly thrive on. Plus, you’re doing your part to ease the burden on stormwater systems and protect local waterways from runoff pollution.
The beauty of these systems is their flexibility. Whether you’re working with a modest budget and a small garden or planning a comprehensive irrigation setup for a larger property, there’s a solution that fits your needs. Start by honestly assessing your water usage, available space, and long-term gardening goals. Don’t feel overwhelmed by the technical aspects—many homeowners begin with simpler above-ground collection before transitioning underground, while others jump straight in with professional installation.
Remember, sustainable gardening isn’t an all-or-nothing proposition. Every gallon you harvest is a gallon saved, every rain event captured is one less strain on municipal resources. The initial investment might seem significant, but when you consider the environmental impact alongside the practical benefits of drought resilience and lower water bills, the value becomes crystal clear. Your garden, your wallet, and your community will thank you for making this forward-thinking choice. The time to start planning your underground water storage system is now.