Check your oil level before every use and change it after the first five hours of operation, then every 50 hours thereafter—dirty oil is the leading cause of engine failure in Husqvarna mowers. Clean or replace your air filter monthly during mowing season, as a clogged filter reduces engine efficiency by up to 20% and forces your machine to work harder than necessary. Sharpen your blade every 25 hours of use rather than waiting for visible damage, since dull blades tear grass instead of cutting cleanly, leaving your lawn vulnerable to disease and browning.
Your Husqvarna lawn mower represents a significant investment in your yard’s health, and proper maintenance directly translates to years of reliable service and a healthier lawn. Most mower breakdowns stem from neglected routine care rather than manufacturing defects, meaning you hold the power to prevent costly repairs through simple, regular maintenance tasks. The difference between a mower that lasts five years and one that performs flawlessly for fifteen years often comes down to spending just 20 minutes per month on preventative upkeep.
This comprehensive guide breaks down essential Husqvarna maintenance into manageable tasks organized by frequency and component, helping you develop a sustainable care routine that protects both your investment and the environment. You’ll learn exactly when and how to service each critical system, understand which tasks prevent specific mechanical failures, and discover how proper maintenance actually improves your lawn’s appearance while reducing fuel consumption and emissions.
Understanding Your Husqvarna: The Basics That Matter
Common Mechanical Issues You Can Actually Prevent
Most mechanical headaches you’ll encounter with your Husqvarna can be traced back to skipped maintenance tasks. Understanding this connection helps you stay motivated with your upkeep routine.
Engine failure tops the list of frustrating issues, and it’s often preventable. Dirty oil, clogged air filters, and stale fuel are the usual culprits. Regular oil changes keep your engine lubricated and running smoothly, while fresh fuel and clean filters ensure proper combustion. Think of it like this: your mower’s engine works hard in dusty, debris-filled conditions, so it needs consistent care to perform season after season.
Blade problems come in second. Dull, damaged, or loose blades not only give you a ragged cut but can also stress your engine and create safety hazards. Sharpening blades several times per season and checking blade bolts regularly takes just minutes but saves you from uneven cutting and potential equipment damage.
Drive system troubles, like difficulty self-propelling or jerky movement, usually stem from worn drive belts or lack of lubrication on moving parts. Inspecting belts for cracks and keeping pivot points greased prevents these annoying issues that can make mowing feel like a workout.
Finally, starting difficulties frustrate owners most commonly. Beyond fuel quality, spark plug maintenance makes a tremendous difference. Replacing spark plugs annually and keeping the starting mechanism clean ensures reliable starts every time. These preventable issues respond beautifully to a consistent maintenance schedule, keeping your Husqvarna dependable and your lawn looking its best.
The Essential Maintenance Schedule Your Husqvarna Needs
Before Every Mow: Your Quick Safety Check
Think of this five-minute routine as your mower’s morning coffee – a little wake-up ritual that keeps everything running smoothly. Before you fire up your Husqvarna, take a quick walk around and give it some attention.
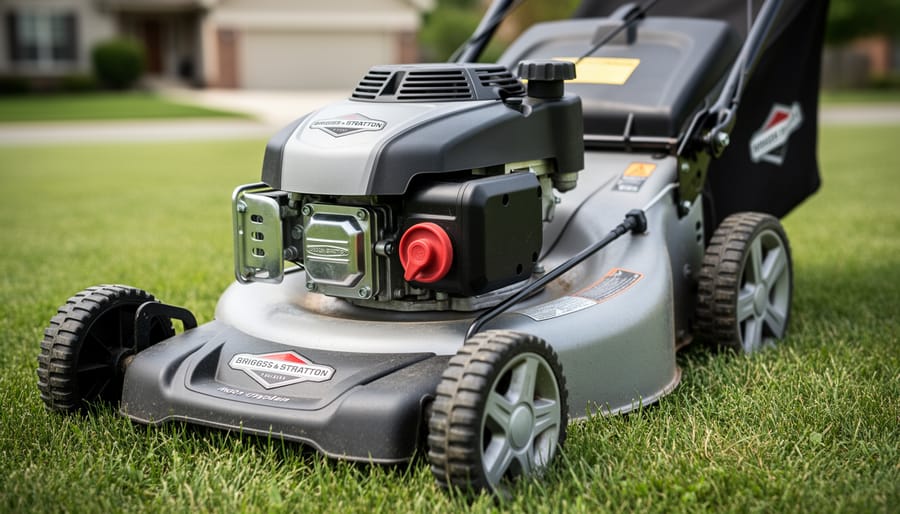
Start by checking your oil level with the dipstick. Dark, gunky oil? Time for a change. Clean, amber-colored oil at the right level means you’re good to go. Low oil is one of the fastest routes to engine damage, so this 30-second check is worth its weight in gold.
Next, give your blade a visual once-over. You don’t need to remove it – just tilt the mower (air filter side up to prevent oil spills) and look for obvious nicks, bends, or dullness. A damaged blade tears grass rather than cutting it cleanly, stressing your lawn and wasting fuel.
Check tire pressure if you have a riding mower. Uneven pressure causes scalping and uneven cuts, forcing you to re-mow sections. Most Husqvarna models need 10-14 PSI, but check your manual.
Finally, remove any debris from the deck, air intake, and around the engine. Grass clippings trapped against hot metal are both a fire hazard and efficiency killer. This simple habit prevents overheating and extends your mower’s lifespan significantly while supporting sustainable equipment use through better performance.
Monthly Maintenance: Keeping Things Running Smooth
Once a month, give your Husqvarna a more thorough inspection to catch potential issues before they become expensive repairs. Start with the air filter, which acts as your mower’s lungs. Remove the filter cover and check for dirt buildup. If it’s foam, wash it with mild soap and water, let it dry completely, then apply a light coating of clean oil. Paper filters should be tapped gently to remove debris or replaced if heavily soiled. A clean air filter improves fuel efficiency and prevents engine strain, a win for both your wallet and the environment.
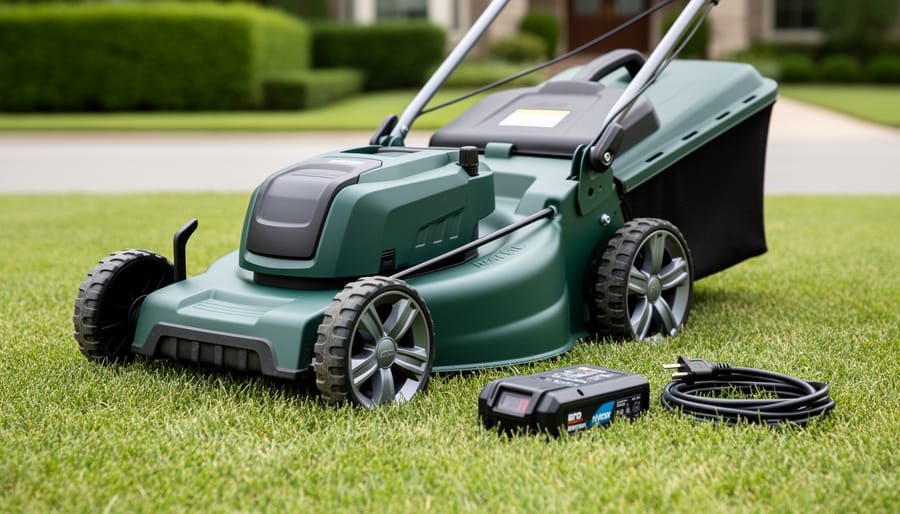
Next, perform battery checks on electric or self-propelled models. Clean any corrosion from terminals using a wire brush and baking soda solution. Check the charge level and connections to ensure reliable starts.
Finally, flip the mower on its side (air filter side up) and scrape away grass buildup from under the deck. This prevents rust and maintains proper airflow for even cutting. Use a putty knife or deck scraper, then rinse with a garden hose. This simple habit significantly extends your mower’s life while ensuring it operates at peak performance.
Seasonal Deep Care: Preparing for Peak Performance
Just like your lawn shifts through seasons, your Husqvarna mower needs different care at key times throughout the year. Think of seasonal maintenance as giving your mower a tune-up before its busiest performance—much like you’d prep a marathon runner before race day.
Start each growing season with an oil change. Fresh oil keeps your engine running smoothly and prevents the buildup of combustion byproducts that can shorten your mower’s life. For most climates, change oil in early spring before heavy mowing begins. If you’re in warmer regions with year-round mowing, consider doing this twice annually—spring and fall work perfectly.
While you’re at it, inspect and replace the spark plug. This small component makes a huge difference in starting reliability and fuel efficiency. A fouled or worn spark plug can waste fuel and make starting frustrating. Replacement is inexpensive and takes just minutes, making it one of the best investments you can make in your mower’s performance.
Don’t overlook the drive belt and mower deck belt. These workhorses handle tremendous stress, transferring power to your blades and wheels. Check them for cracks, glazing, or fraying before peak season. Catching wear early prevents the inconvenience of mid-season breakdowns.
For northern gardeners, late fall is perfect for this deep care routine, preparing your mower for winter storage. Southern friends might schedule seasonal checks around rainfall patterns when grass growth accelerates. Remember, proactive maintenance isn’t just about avoiding repairs—it’s about sustainable ownership, reducing waste, and keeping your reliable Husqvarna running for decades.
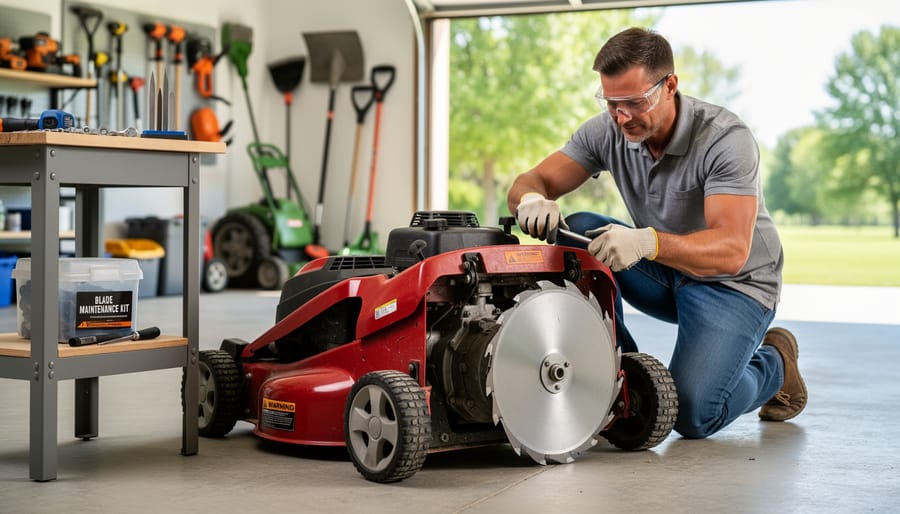
Blade Care: Your First Defense Against Mechanical Problems
When to Sharpen vs. When to Replace
Knowing whether to sharpen or replace your Husqvarna blades comes down to a simple inspection. Here’s my rule of thumb: sharpen your blades every 20-25 hours of mowing time, which typically means 2-3 times per season for most homeowners. If you’re mowing particularly rough terrain or hitting debris regularly, you’ll need to sharpen more frequently.
During your inspection, look for these replacement indicators: cracks anywhere on the blade, metal worn so thin you can see light through it, or the cutting edge ground down more than 1/4 inch from its original width. If your blade has deep gouges or chunks missing from the edge, replacement is your safest bet. Also, if you’ve sharpened the same blade 4-5 times already, it’s probably time to invest in a new one.
From a sustainability perspective, sharpening extends blade life and reduces waste, but safety always comes first. A compromised blade can break during operation, creating dangerous projectiles. The cost-benefit usually favors sharpening since professional sharpening runs about $10-15 versus $20-40 for replacement blades. However, damaged blades should never be sharpened. Keep a spare blade on hand so you can swap them out for sharpening without missing mowing time.
The Right Way to Sharpen Husqvarna Blades
Sharp blades are essential for a healthy lawn because they cut grass cleanly rather than tearing it, which reduces stress on your turf and helps prevent disease. I recommend sharpening your Husqvarna blades at least twice per season, or more frequently if you notice ragged grass edges.
First, prioritize safety. Disconnect the spark plug wire before touching the blade, and wear heavy-duty work gloves throughout the process. Remove the blade using a socket wrench, marking which side faces down with a piece of tape so you can reinstall it correctly.
For sharpening, you have two solid options. A 10-inch mill bastard file works perfectly for hand sharpening and costs under ten dollars. Hold the file at the blade’s existing angle, typically around 30 degrees, and push it across the cutting edge in smooth, one-directional strokes. Count your strokes and match them on both ends to maintain balance. Alternatively, use a bench grinder for faster results, but avoid overheating the metal, which weakens it.
The biggest mistake homeowners make is over-sharpening. You want a sharp edge, not a razor blade. The cutting edge should feel keen but still have a slight bluntness when you carefully run your finger perpendicular to it. After sharpening, check the blade’s balance by hanging it on a nail through the center hole. If one side dips, remove a bit more metal from that end.
Engine Maintenance: The Heart of Your Husqvarna
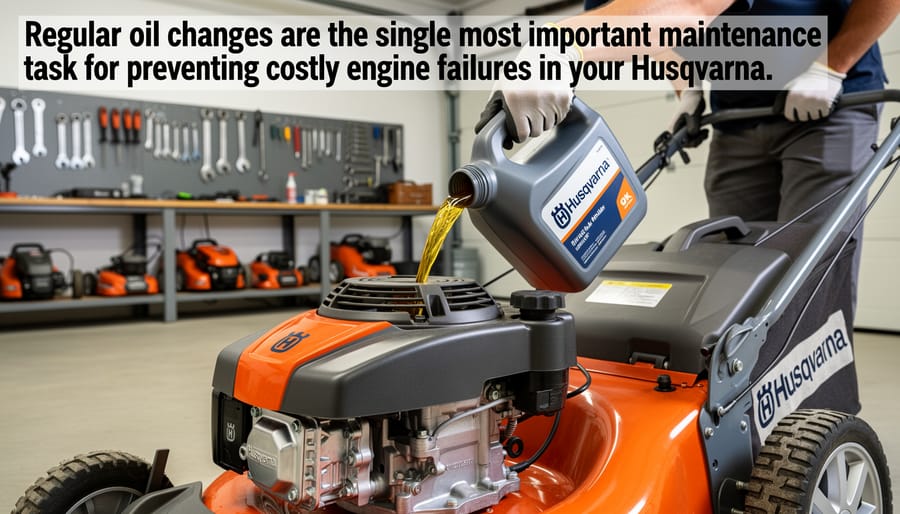
Oil Changes: Timing and Technique
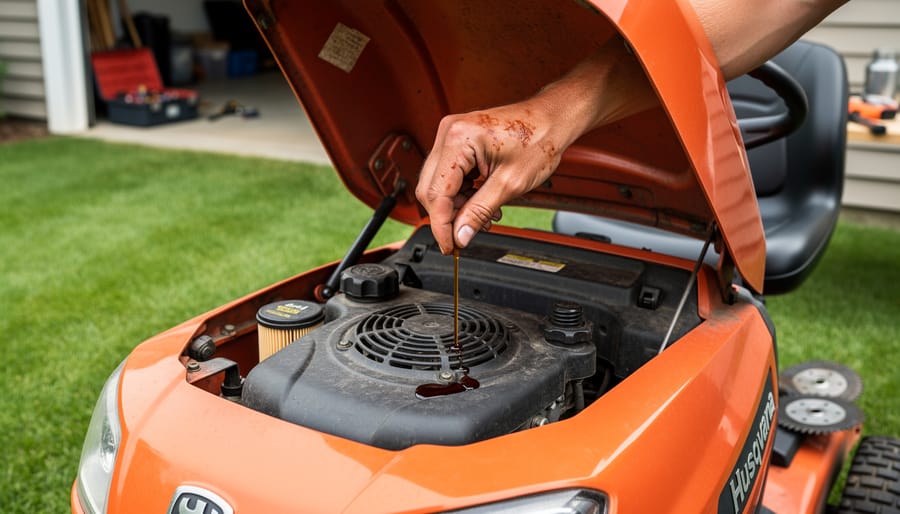
Regular oil changes are the lifeblood of your Husqvarna mower’s engine, and getting them right means the difference between years of reliable service and premature wear. Most Husqvarna models need fresh oil every 50 hours of operation or once per season, whichever comes first. If you mow weekly during growing season, that’s roughly once a year for most homeowners.
Choose SAE 30 oil for warmer temperatures or 10W-30 for year-round flexibility. Always check your owner’s manual for manufacturer specifications. I’ve found that using quality detergent oil designed for four-stroke engines pays dividends in engine longevity.
Before draining, run your mower for a few minutes to warm the oil, making it flow more easily and carrying contaminants with it. Position a drain pan underneath, remove the drain plug or tip the mower (air filter side up), and let gravity do its work.
Here’s where sustainability matters: never pour used oil down drains or onto soil. Collect it in a sealed container and take it to a recycling center or auto parts store that accepts used oil. One gallon of improperly disposed oil can contaminate a million gallons of groundwater. Many communities offer free oil recycling, making responsible disposal easier than ever while protecting the very soil we’re working to cultivate.
Air Filter Care for Peak Performance
Your Husqvarna’s air filter is like a protective shield for the engine, keeping dust, grass clippings, and debris from causing serious internal damage. I’ve seen too many mowers suffer preventable engine problems simply because their owners overlooked this five-minute task.
Check your air filter every 25 hours of operation, or more frequently if you’re mowing in dusty conditions. Remove the filter cover and inspect the foam or paper element. If it’s foam, wash it gently with warm, soapy water, squeeze out excess moisture, let it dry completely, then apply a light coating of clean engine oil before reinstalling. Paper filters should be tapped gently to remove loose debris, but replace them if they’re heavily soiled or damaged.
Here’s the sustainability angle: a clean air filter improves fuel efficiency by ensuring proper air-to-fuel ratios, meaning you’ll use less gas and reduce emissions. Plan to replace filters annually at minimum, keeping a spare on hand so you’re never caught without one during peak mowing season.
Fuel System Maintenance and Stabilization
Fuel quality makes all the difference in keeping your Husqvarna running smoothly season after season. I learned this the hard way when my mower sputtered and refused to start one spring—all because I’d left last year’s fuel sitting in the tank over winter. Fresh gasoline is essential, and here’s a sustainable tip: only buy what you’ll use within 30 days to prevent waste and performance issues.
Adding fuel stabilizer is your insurance policy against carburetor clogs and starting headaches. Mix stabilizer into your gas can before filling the tank, following the product’s recommended ratio. This simple step prevents fuel from breaking down and leaving gummy deposits that wreak havoc on your carburetor—a component that’s surprisingly sensitive to fuel quality.
Speaking of carburetors, keeping yours clean prevents most running problems. If your mower runs rough or stalls, the carburetor likely needs attention. While some maintenance tasks are DIY-friendly, carburetor cleaning often requires patience and the right tools.
For off-season storage, you have two excellent options: run the engine until it uses all remaining fuel, or fill the tank completely with stabilized fuel to prevent moisture accumulation. I prefer the empty-tank method for its simplicity and environmental friendliness. Either way, never store your mower with unstabilized fuel—it’s the fastest route to costly repairs and frustrating spring startups.
Drive System and Transmission Care
Belt Inspection and Replacement Timing
Your mower’s belts work hard every time you cut grass, and catching wear before they snap saves you from being stranded mid-mow with an unfinished lawn. I learned this the hard way when my belt failed halfway through a Saturday morning cut—not fun!
Check your belts monthly during mowing season. Look for cracks, fraying edges, glazing (a shiny, hardened appearance), or missing chunks of rubber. Run your fingers along the belt’s underside to feel for damage you might miss visually. If you spot any of these signs, plan for replacement soon rather than waiting for failure.
Proper belt tension adjustment prevents premature wear and ensures efficient power transfer to your blades and wheels. A correctly tensioned belt should deflect about half an inch when pressed firmly at its midpoint. Too loose, and it slips and overheats; too tight, and it strains bearings and wears faster.
Replace belts every 2-3 seasons as preventative maintenance, or immediately when you notice significant wear. Keep a spare belt in your garage—it’s an inexpensive insurance policy against frustrating breakdowns during peak growing season when your lawn needs frequent attention.
Deck Maintenance: Protecting Your Investment
The Environmentally-Friendly Deck Cleaning Method
Keeping your Husqvarna deck clean doesn’t require harsh chemicals that harm your lawn or the environment. After each mowing session, simply use a stiff brush or plastic scraper to remove grass clippings while they’re still fresh. This prevents the buildup that leads to corrosion and uneven cutting performance. For stubborn residue, create a natural cleaning solution by mixing equal parts white vinegar and water in a spray bottle. Let it sit for a few minutes before scrubbing with a biodegradable brush.
I’ve found that investing in a quality deck scraper with a curved edge makes this task much easier and protects the metal surface from scratches. For deeper cleaning, consider using a pressure washer on a low setting, but avoid directing water toward the engine or electrical components. By establishing this simple, chemical-free routine, you’ll extend your mower’s life while keeping harmful substances out of your garden ecosystem. Plus, a clean deck cuts more efficiently, reducing fuel consumption and making your sustainable lawn care even more eco-friendly.
Winterization and Off-Season Storage
Properly winterizing your Husqvarna lawn mower is like tucking your garden tools in for a long winter’s nap—it prevents costly mechanical headaches and makes spring yard work infinitely more enjoyable. Trust me, there’s nothing worse than fighting with a stubborn mower on the first beautiful Saturday of spring when your grass desperately needs cutting.
Start with a thorough cleaning to remove all grass clippings, dirt, and debris from the deck, undercarriage, and engine cooling fins. This prevents moisture retention and corrosion during storage. Once clean, address the fuel system carefully. For gas-powered models, either run the tank completely dry or add a quality fuel stabilizer and run the engine for five minutes to circulate it throughout the system. Old fuel left sitting for months becomes gummy and clogs carburetors, which is the number one reason mowers won’t start after winter.
Next, change the oil while the engine is still warm—dirty oil contains contaminants that can corrode internal parts during dormancy. Remove the spark plug, inspect it for wear, and add a tablespoon of fresh oil through the spark plug hole. Pull the starter cord slowly a few times to distribute this oil, which protects cylinder walls from rust.
Disconnect or remove the battery if you have a riding model, storing it in a warm location and maintaining a charge every few weeks. Clean or replace the air filter, and sharpen or replace blades so everything’s ready for action come spring.
Store your mower in a dry, covered location away from moisture. Cover it with a breathable tarp rather than plastic, which traps condensation. A little preparation now pays huge dividends in ensuring easy spring startup and extending your mower’s lifespan for years of sustainable, reliable lawn care.
Troubleshooting Common Maintenance-Related Issues
Even with regular maintenance, you might encounter issues with your Husqvarna mower. The good news? Many problems stem from simple maintenance oversights that you can fix yourself, saving time and money while keeping your mower running sustainably for years.
If your mower won’t start, check the basics first. Old fuel is the most common culprit—gasoline degrades after 30 days, creating starting issues. Drain the old fuel and replace it with fresh gas. Also inspect the spark plug for carbon buildup or damage, and ensure the air filter isn’t clogged. For more detailed guidance on troubleshooting starting problems, we’ve got you covered with step-by-step solutions.
When your mower starts but runs roughly or loses power, you’re likely dealing with fuel system or air intake issues. Clean or replace the air filter, check for a dirty carburetor, and verify that your blade isn’t damaged or unbalanced. Remember, a dull or damaged blade not only cuts poorly but also strains your engine unnecessarily.
Excessive vibration usually indicates blade problems—either damage, improper installation, or imbalance. This is something you can check yourself by disconnecting the spark plug and carefully inspecting the blade for bends or wear.
Know when to call a professional, though. If you’ve addressed basic maintenance items and still experience persistent problems, or if you encounter issues with the engine internals, transmission, or electrical systems beyond spark plugs, it’s time for expert help. There’s no shame in seeking professional assistance—it’s actually the sustainable choice when it prevents further damage from DIY attempts beyond your comfort level. Your local Husqvarna dealer has specialized tools and knowledge to diagnose complex issues efficiently.
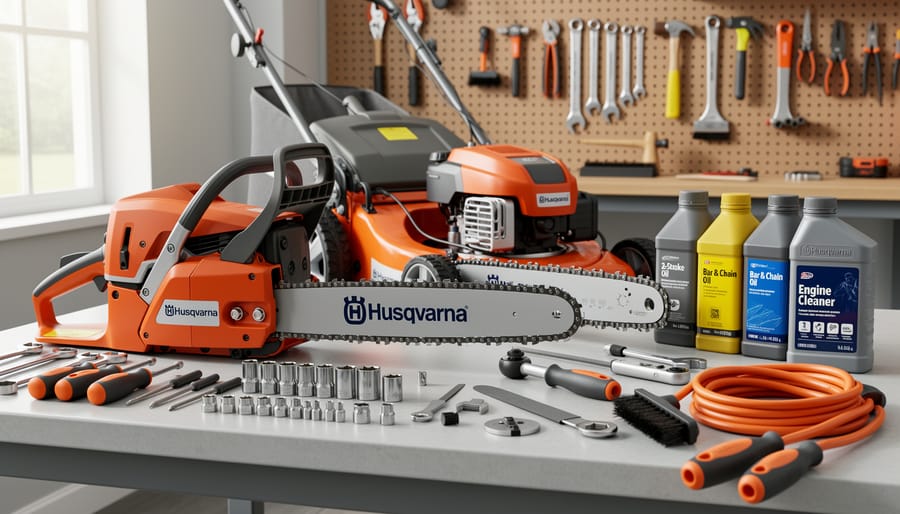
Building Your Husqvarna Maintenance Toolkit
Getting the right tools makes Husqvarna maintenance genuinely enjoyable rather than frustrating. I learned this the hard way after wrestling with a rusted blade bolt using the wrong socket wrench for twenty minutes.
Start with a quality socket set, preferably with both metric and standard sizes. Husqvarna mowers typically use metric fasteners, but a comprehensive set runs about $30-50 and lasts decades. I recommend the TEKTON Socket Set, which has held up beautifully through six seasons in my garage.
A dedicated oil drain pan with a pour spout eliminates messy oil changes. Unlike disposable options, a reusable metal or heavy-duty plastic pan pays for itself after three uses and keeps motor oil out of landfills. Look for one with at least a two-quart capacity.
Your toolkit should include a spark plug socket with a rubber insert to protect the plug during removal, a blade balancer for safer operation, and a quality torque wrench for proper reassembly. The torque wrench seems like a luxury until you’ve over-tightened a blade bolt and cracked the adapter.
For cleaning, skip aerosol degreasers. A stiff nylon brush and biodegradable dish soap work wonderfully on grass buildup without introducing harsh chemicals to your lawn ecosystem. Add some microfiber cloths that wash and reuse endlessly.
Finally, invest in a proper blade sharpening file or grinding wheel attachment for your drill. Professional sharpening costs $10-15 per visit, while a file costs under $20 and sharpens blades for years. This single tool saves money while ensuring your Husqvarna cuts cleanly all season.
Taking care of your Husqvarna lawn mower doesn’t have to be overwhelming. By incorporating simple maintenance habits into your routine, you’re making a smart investment that pays dividends in multiple ways. Regular upkeep prevents those frustrating breakdowns that always seem to happen mid-mow, saves you from expensive repair bills, and significantly extends your mower’s lifespan. Beyond the financial benefits, proper maintenance also supports your commitment to environmental sustainability. A well-maintained mower runs more efficiently, burns less fuel, produces fewer emissions, and keeps hazardous materials like old oil and worn parts out of landfills when disposed of responsibly.
Start small if you’re new to equipment maintenance. Begin with the basics like cleaning your deck after each use and checking the oil level regularly. These quick tasks take just minutes but make a tremendous difference. As you become more comfortable, gradually add seasonal tune-ups and blade sharpening to your schedule. Remember, every small step you take toward proper mower care is a step toward a healthier lawn, a lighter carbon footprint, and more money in your pocket.