**Check the fuel system first when your John Deere won’t start**—verify there’s fresh, clean fuel in the tank, inspect fuel lines for cracks or blockages, and replace any clogged fuel filters. Stale fuel is the culprit in over 40% of starting failures, and switching to ethanol-free gas prevents future carburetor gumming while supporting more sustainable equipment longevity.
**Listen to what your tractor is telling you**. A clicking sound without engine turnover points to battery or starter issues; grinding noises indicate flywheel problems; while a strong crank with no ignition means spark plug or ignition coil failure. This diagnostic approach saves hours of guesswork and prevents unnecessary part replacements.
**Address hydraulic problems by checking fluid levels and filter condition** before assuming major system failure. Low hydraulic fluid causes 60% of lifting and steering issues, yet takes just minutes to correct. Inspect hoses for leaks, ensure the reservoir isn’t contaminated with dirt, and verify your fluid matches John Deere specifications for optimal performance.
**Test the PTO engagement system when implements won’t activate**. Disengage and re-engage the clutch while checking for unusual resistance, examine the PTO shaft for damage, and confirm safety switches aren’t preventing operation. Many models, including those with John Deere 4100 problems, have seat and brake safety interlocks that stop PTO function.
This guide walks you through systematic troubleshooting that empowers you to maintain your equipment confidently, reducing downtime and repair costs while extending your tractor’s productive life through proper care.
Understanding Your John Deere Compact Tractor System
Key Components That Affect Performance
Understanding how your John Deere tractor works doesn’t require a mechanic’s certificate—think of it as getting to know a reliable gardening partner. When something goes wrong, knowing these four main systems will help you pinpoint problems quickly and get back to your lawn care tasks.
The **engine** is your tractor’s heart, converting fuel into the power needed for mowing, tilling, and hauling. It relies on clean fuel, fresh oil, and proper air intake to run smoothly. When your engine struggles, it’s often telling you about a simple issue like a dirty air filter or old fuel—problems you can tackle yourself.
The **electrical system** acts as the nervous system, managing everything from starting your tractor to powering lights and safety switches. Battery connections, fuses, and those little safety switches under the seat all work together to keep operations safe and efficient.
Your **hydraulic system** is the muscle behind lifting implements, operating loaders, and providing smooth control. It uses pressurized fluid to transfer power, making heavy lifting effortless. Low fluid levels or leaks are the most common culprits when hydraulics feel weak.
Finally, the **PTO (Power Take-Off)** transfers engine power to attachments like mowers and tillers. This spinning shaft connects your tractor to various implements, making it incredibly versatile for sustainable property maintenance.
These systems constantly communicate with each other—the engine powers the hydraulics, the electrical system controls the PTO engagement, and everything works in harmony when properly maintained.
When to Troubleshoot vs. When to Call a Professional
Safety should always be your first priority when troubleshooting your John Deere tractor. Simple fixes like checking battery connections, replacing air filters, or adjusting tire pressure are perfectly DIY-friendly tasks that most gardeners can handle confidently with basic tools. However, some situations demand professional expertise.
Always call your dealer for issues involving the hydraulic system, transmission problems, or anything requiring specialized diagnostic equipment. If you’re dealing with warranty-covered components or need John Deere X540 troubleshooting for complex electrical systems, professional service protects both you and your investment.
A good rule of thumb: if you’re uncomfortable with the repair, lack the proper tools, or the problem persists after basic troubleshooting, it’s time to call in the experts. There’s no shame in seeking help—it often saves time, money, and prevents potentially dangerous situations or further damage to your tractor.
Starting and Electrical Issues
Tractor Won’t Turn Over or Click
When you turn the key and absolutely nothing happens—no cranking, no clicking, just silence—it’s one of the most frustrating experiences in lawn care. Let’s walk through the most common culprits so you can get back to maintaining your property.
**Start with the Battery**
A dead or dying battery is usually the first suspect. Check for bad battery symptoms like dim lights or sluggish electrical components. Use a multimeter to test your battery—it should read at least 12.6 volts when fully charged. If it’s below 12 volts, try charging it overnight. Cold weather can quickly drain batteries, so if you’re troubleshooting in winter, this becomes even more likely. Before you replace an older battery, consider whether investing in a quality replacement now will save you headaches during peak mowing season.
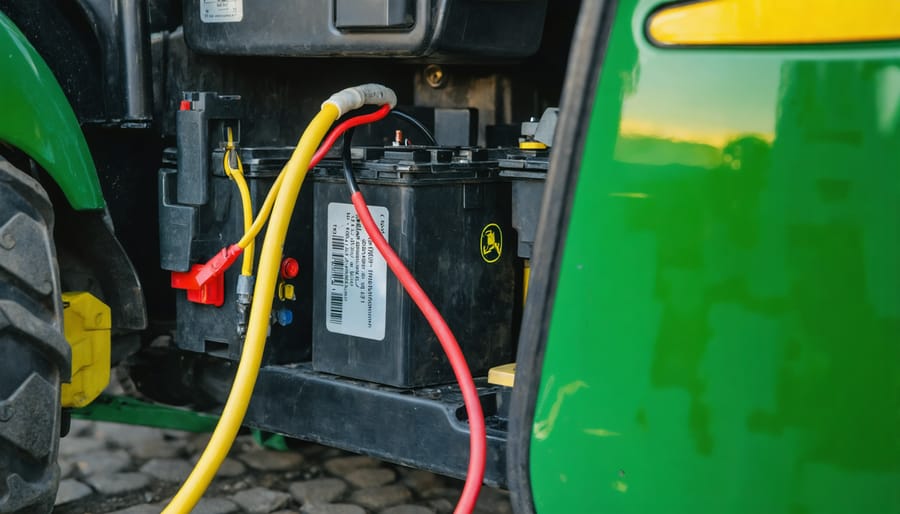
**Inspect Battery Connections**
Corroded or loose battery terminals prevent proper electrical flow. Look for white, blue, or green crusty buildup around the terminals. Disconnect the cables (negative first, always) and clean terminals with a wire brush and baking soda solution—an eco-friendly cleaning method that works beautifully. Reconnect securely, ensuring tight connections.
**Test the Starter Solenoid**
If your battery’s good but nothing happens, the starter solenoid might be faulty. Listen carefully when turning the key—a single click indicates solenoid engagement without starter motor operation. You can bypass the solenoid temporarily with a screwdriver across the terminals to test if the starter works directly.
**Check the Neutral Safety Switch**
This safety feature prevents starting unless your tractor’s in neutral. Try shifting through all gear positions, then firmly back to neutral. Sometimes these switches need adjustment or replacement, particularly on well-used tractors.
Engine Cranks But Won’t Start
Few things are more frustrating than hearing your John Deere tractor turn over without firing up—especially when you’ve got mowing to finish! When your engine cranks but won’t start, you’re typically dealing with fuel delivery, glow plug, or ignition issues. Let’s walk through these problems together.
**Check Your Fuel System First**
Start with the basics: verify you have fresh fuel in the tank. Gas older than 30 days can cause starting problems, particularly in equipment that sits seasonally. Next, check if fuel is reaching the carburetor by briefly opening the fuel line—you should see steady flow. A clogged fuel filter or blocked fuel line prevents proper delivery, so inspect and replace these components if needed. Don’t forget to examine the fuel shutoff valve; it’s surprisingly easy to overlook!
**Diesel Models: Glow Plug Essentials**
For diesel tractors, faulty glow plugs are often the culprit during cold starts. These components pre-heat the combustion chamber, making ignition possible. If your tractor struggles starting in cooler weather, test your glow plugs with a multimeter or have them professionally checked. This simple fix can save you considerable headache.
**Ignition System Troubleshooting**
Gas models rely on spark plugs and ignition coils. Remove the spark plug, reconnect it to the wire, ground it against the engine, and crank—you should see a strong blue spark. No spark? Replace the plug or check the ignition coil. Regular maintenance of these components supports sustainable ownership by extending your tractor’s lifespan.
Intermittent Starting Problems
Nothing’s more frustrating than a tractor that starts perfectly one day, then refuses to cooperate the next. These intermittent issues often point to electrical gremlins that are actually simpler to fix than you might think.
Start by checking your battery connections—corrosion and loose terminals are surprisingly common culprits. Give those terminals a gentle wiggle while someone tries starting. Movement during cranking? That’s your problem right there. Clean any white or green buildup with a wire brush and tighten everything securely.
Your ignition switch might be failing internally, especially on older models. If turning the key feels inconsistent or requires wiggling to engage, replacement is usually straightforward and inexpensive.
Don’t overlook the seat safety switch—it’s designed to shut down your tractor if you leave the seat, but these switches can wear out or get debris-clogged. Try shifting your weight while starting. If that changes results, you’ve found your issue. While these safety features protect you, a malfunctioning switch just needs cleaning or replacing to restore reliable operation and keep your lawn care schedule on track.
Engine Performance Problems
Loss of Power or Sluggish Performance
Nothing’s more frustrating than your John Deere tractor suddenly feeling like it’s lost its “oomph” when you’re halfway through mowing or working your property. If your reliable workhorse is struggling, let’s walk through some common culprits you can check yourself.
**Start with the Air Filter**
Think of your tractor’s air filter like lungs—when they’re clogged, performance suffers. Pop open the air filter housing and take a look. If you see dust, debris, or that telltale brown coating, it’s time for a cleaning or replacement. I recommend checking this every 50 hours of operation, or more frequently if you’re working in dusty conditions. A clean air filter is one of the simplest ways to maintain peak performance and fuel efficiency.
**Fuel System Issues**
A clogged fuel filter can starve your engine of the fuel it needs. If you’re experiencing hesitation or power loss, especially under load, this is often the culprit. Replace your fuel filter annually at minimum—it’s inexpensive preventive maintenance that saves headaches later. While you’re at it, check that you’re using fresh, clean fuel. Old fuel (anything over 30 days in seasonal equipment) can gum up injectors and cause all sorts of problems.
**Throttle Linkage Check**
Sometimes the fix is surprisingly simple. Inspect your throttle linkage for any looseness, binding, or debris preventing full throttle operation. A quick visual inspection and cleaning can restore lost power immediately.
Regular preventive maintenance—replacing filters on schedule and using quality fuel—keeps your tractor running strong season after season while reducing unnecessary repairs and waste.

Overheating Issues
When your John Deere starts running hotter than usual, it’s telling you something needs attention—and catching it early prevents costly repairs down the road. Let’s walk through the most common culprits so you can get back to caring for your property.
**Start with the basics:** Check your coolant level when the engine is completely cold. Low coolant is often the simplest fix. If you’re topping it off frequently, you’ve got a leak that needs addressing. While you’re there, inspect the coolant’s condition—it should be clean and the proper color, not rusty or murky.
**Examine your radiator carefully.** Grass clippings, dust, and debris love to accumulate between the fins, especially during peak mowing season. A gentle spray with your garden hose (from the engine side outward) usually does the trick. Make this part of your monthly maintenance routine, particularly in summer.
**Test the thermostat** by feeling both radiator hoses after the engine warms up—both should eventually get hot. If one stays cold, the thermostat might be stuck closed, preventing proper coolant flow.
**Listen for your cooling fan.** It should engage when temperatures rise. If it’s silent or struggling, investigate electrical connections or consider a fan replacement.
**Seasonal tip:** Before hot weather hits, flush your cooling system and replace coolant according to your manual’s schedule—preventive care beats emergency repairs every time.
Excessive Smoke or Unusual Exhaust
Your tractor’s exhaust is actually trying to tell you something important, so let’s decode those smoke signals together. **White smoke** typically means water or coolant is getting into the combustion chamber—check for a blown head gasket or cracked cylinder head. If you notice this, stop using your tractor immediately to prevent further damage.
**Black smoke** indicates your engine is running too rich, meaning there’s too much fuel and not enough air in the mixture. This often points to a clogged air filter (an easy fix!), faulty injectors, or improper fuel injection timing. The good news? Replacing a dirty air filter is one of the simplest maintenance tasks you can do yourself, and it’s an eco-friendly practice that keeps your engine running efficiently.
**Blue smoke** is your warning that oil is burning in the combustion chamber. This usually means worn piston rings, valve seals, or excessive oil levels. While this requires more involved repairs, catching it early prevents costly engine damage down the road.
Remember, any persistent unusual smoke means it’s time to investigate—your tractor’s longevity and your sustainable gardening goals depend on keeping that engine healthy!

Hydraulic and Loader Problems
Weak or Slow Hydraulic Response
If you notice your hydraulic loader moving sluggishly or your three-point hitch responding slower than usual, you’re likely dealing with a hydraulic system issue. Don’t worry—this is one of the more common problems, and often it’s something you can fix yourself with basic maintenance.
Start by checking your hydraulic fluid level. Low fluid is the most frequent culprit behind weak hydraulic performance. Locate the hydraulic reservoir (your owner’s manual will show exactly where) and check the dipstick or sight glass. If it’s low, top it off with the recommended hydraulic fluid for your specific John Deere model. Using the wrong fluid can actually cause more problems, so always stick with manufacturer specifications.
Next, examine the fluid’s condition. Dark, dirty, or milky-looking oil suggests contamination from dirt, water, or worn components. Contaminated hydraulic fluid reduces system efficiency and can damage expensive pumps and cylinders. If your fluid looks questionable, it’s time for a complete flush and refill—think of it as giving your tractor’s circulatory system fresh blood.
If fluid levels and quality check out but performance is still weak, you might have a failing hydraulic pump or malfunctioning relief valve. These components regulate pressure throughout the system. Listen for unusual whining sounds from the pump, which indicates wear. Sometimes your tractor won’t move at all when hydraulic failure is severe.
For sustainable operation, change your hydraulic fluid according to your maintenance schedule—typically every 400 hours or annually. Regular fluid changes prevent most hydraulic problems and extend your tractor’s lifespan significantly.
Three-Point Hitch Won’t Lift or Hold Position
When your three-point hitch refuses to lift your mower deck or won’t hold its position, it’s frustrating—but often fixable with some detective work. Let’s walk through the most common culprits so you can get back to maintaining your lawn sustainably.
Start by checking the control linkage beneath your seat. Over time, these connections can loosen, bend, or disconnect entirely. With the engine off, move the lift lever while watching the linkage move toward the hydraulic valve. If nothing budges or movement seems disconnected, you’ve found your problem. Tighten any loose bolts or replace worn pins—this simple fix solves many lifting issues.
Next, inspect for hydraulic cylinder leaks. Lower the hitch completely and look for oil pooling around the cylinder seals or along the chrome rod. Even small leaks mean the system can’t maintain pressure, causing your deck to slowly drop during operation. If you spot wetness, the cylinder seals need replacement.
Finally, the position control valve might be stuck or worn. Try cycling the lever through its full range several times—sometimes this frees sticky valves. If the hitch still won’t respond, the valve likely needs professional attention, as internal components may require specialized tools for proper adjustment or replacement.
Loader Drift or Uneven Operation
If your front loader drifts downward when you’re not operating it, or moves unevenly during use, you’re likely dealing with hydraulic issues that can interrupt your property maintenance work. Let’s walk through what to check.
Start by examining the hydraulic cylinders for visible oil seepage around the rod seals—a telltale sign they’re wearing out and allowing pressure to escape. Wipe the cylinders clean, then operate the loader and watch for fresh fluid appearing. If you spot leaks, those seals need replacement to restore proper holding power.
Next, test your control valve by moving the loader through its full range of motion. Jerky movement or uneven lifting on one side often points to a sticky or worn valve spool. Sometimes debris in your hydraulic fluid is the culprit, making regular fluid changes an environmentally responsible practice that prevents costly repairs.
Finally, inspect all hydraulic lines for kinks, damage, or restrictions. A pinched line creates uneven pressure distribution, causing one side of your loader to respond differently than the other. Replace any compromised hoses promptly—fresh, properly routed lines ensure smooth operation and prevent hydraulic fluid from contaminating your soil.
Transmission and Drive System Troubles
Tractor Won’t Move or Moves Erratically
If your John Deere tractor won’t budge or jerks unpredictably when you’re trying to mow, don’t worry—this is one of the most common issues homeowners face, and it’s usually fixable without a trip to the mechanic.
**Safety first**: Always engage the parking brake and shut off the engine before investigating movement issues. Never work underneath a running tractor.
Start by checking the **drive belt**, which connects your engine’s power to the wheels. With the engine off, look underneath the tractor deck for a worn, cracked, or loose belt. Over time, belts stretch and deteriorate—it’s a natural part of regular use. If the belt looks glazed or has visible damage, replacement is your answer. This is an affordable fix that makes a world of difference.
Next, examine the **hydrostatic transmission fluid level**. Low fluid often causes erratic movement or loss of power. Consult your owner’s manual for the dipstick location and proper fluid type. If you’re low, topping off may restore smooth operation immediately.
Check your **motion control linkage** beneath the seat area. These rods and connections can loosen or become misaligned, especially after years of vibration. Tighten any loose bolts and ensure everything moves freely without binding.
If problems persist after these checks, similar to PTO clutch problems, you might be dealing with internal transmission wear requiring professional attention. However, most movement issues stem from these simple, sustainable maintenance items you can handle yourself.
Four-Wheel Drive Not Engaging
When your four-wheel drive refuses to kick in, you’re likely dealing with one of three common culprits. First, check the engagement switch—it’s usually a simple lever or button near your seat. Make sure it’s moving freely and you hear a clicking sound when activated. If nothing happens, the switch itself might need replacing, which is a straightforward fix.
Next, consider hydraulic pressure issues. Your tractor needs adequate hydraulic fluid to engage the four-wheel drive system. Check your fluid level and look for any leaks around hoses and connections. Low pressure means the system can’t activate properly, leaving you stuck in two-wheel mode when you need that extra traction for sustainable land management tasks.
Finally, examine the mechanical linkage connecting your engagement switch to the actual drive mechanism. Over time, these connections can become loose, corroded, or disconnected entirely. Crawl underneath (safely, with the tractor off!) and trace the linkage from switch to axle, looking for bent rods or missing pins. A little preventive maintenance here saves major frustration later when you’re tackling those tough terrain projects.
Unusual Noises or Vibrations
Your tractor is trying to tell you something when it starts making odd sounds or shaking unusually. Think of these noises as your machine’s way of asking for help before a small issue becomes a costly repair.
**Listen carefully while operating.** A squealing or grinding noise often points to worn bearings in the engine, pulleys, or wheels. If you notice a rhythmic knocking sound, check for loose bolts on the deck, PTO shaft, or engine mounts—sometimes a simple tightening session is all you need.
**Feel for vibrations through the steering wheel or seat.** Excessive shaking typically indicates unbalanced blades, worn transmission components, or tire issues. Start with the easiest fix: inspect your mower blades for damage or debris buildup, and ensure tires are properly inflated.
**Check the transmission.** Clunking when shifting gears or a whining sound during operation suggests low transmission fluid or internal wear. Addressing these symptoms early prevents complete transmission failure and keeps your tractor running sustainably for years to come. Regular maintenance catches these problems before they sideline your lawn care routine.
PTO and Implement Connection Issues

PTO Won’t Engage or Disengages Under Load
When your PTO (Power Take-Off) won’t engage or suddenly stops working while mowing, it’s frustrating—especially when you’re mid-lawn! Let’s walk through the most common culprits so you can get back to maintaining your beautiful yard.
First, check your **safety switches**. John Deere tractors have built-in protection systems that disengage the PTO if you’re not seated properly or if the parking brake isn’t set correctly. Try repositioning yourself firmly in the seat and ensuring the brake is fully engaged before attempting to engage the PTO again. These switches can become dirty or corroded over time, so a quick cleaning with electrical contact cleaner might solve intermittent issues.
Next, examine your **PTO clutch**. If it engages but disengages under load (like when hitting thick grass), the clutch may be worn or not receiving adequate electrical power. Check the connections to ensure they’re clean and tight. A multimeter can verify if the clutch is receiving the proper voltage—typically around 12 volts.
Don’t overlook the **PTO shaft and belt system**. Look for debris wrapped around the shaft, especially under your mower deck, and inspect belts for wear, cracking, or glazing. A loose or damaged belt creates slippage under load, mimicking clutch failure. Regular maintenance and keeping your equipment clean helps prevent these issues while supporting sustainable, long-lasting tractor performance.
Excessive Vibration Through PTO
If you’re feeling excessive shaking through your tractor’s PTO (power take-off) system, don’t ignore it—this vibration can damage both your implement and tractor if left unchecked. Start by shutting everything down and inspecting the PTO shaft for any visible bending or damage. Even slight bends create significant vibration, especially at higher RPMs.
Next, check the U-joints where the shaft connects. Grab the shaft and try wiggling it—excessive play means worn U-joints that need replacement. These are relatively inexpensive parts that prevent costly damage down the road.
Implement alignment is another common culprit. Your attachment should sit level and centered with the tractor’s PTO output. Walk around your setup and check if everything lines up properly. Misalignment forces the shaft to work at extreme angles, causing vibration and premature wear.
Regular greasing of PTO components prevents many of these issues—a simple maintenance habit that keeps your equipment running smoothly for years while reducing environmental impact through fewer replacement parts.
Preventive Maintenance That Stops Problems Before They Start
Essential Daily and Weekly Checks
A few minutes of preventive checking each time you use your John Deere tractor can save you from frustrating breakdowns right when you need it most. Think of it as a friendship with your machine—a little attention goes a long way.
**Before Every Use:**
Start by walking around your tractor with a critical eye. Check engine oil using the dipstick (it should fall between the marks), and inspect hydraulic fluid levels through the sight glass. Look for any puddles underneath that might indicate leaks. Give your tires a quick pressure check—underinflated tires waste fuel and reduce traction, neither of which supports efficient, sustainable lawn care.
Test your safety systems: Does the seat safety switch stop the blades when you stand? Do the brakes respond firmly? These aren’t just conveniences—they’re essential protections.
**Weekly Deep Checks:**
Once a week, examine belts for cracks or glazing, inspect battery terminals for corrosion (a wire brush cleans them easily), and look at air filters—clogged filters reduce power and increase fuel consumption. Check cooling fins for debris buildup, especially during heavy mowing seasons.
This simple routine catches small issues before they become expensive repairs, keeping your tractor running reliably and your property maintenance on schedule.
Seasonal Maintenance Tasks
Your John Deere compact tractor will serve you better and longer when you stay ahead of seasonal maintenance. Think of it as giving your trusty garden companion the care it deserves before tackling those heavy workload periods.
**Spring Preparation**: Before your busy growing season begins, change your engine oil and filters, inspect belts for wear, and check tire pressure. Fresh hydraulic fluid ensures your loader and attachments work smoothly when you’re moving compost or spreading mulch. Don’t forget to sharpen mower blades—dull blades tear grass rather than cutting cleanly, stressing your lawn.
**Summer Mid-Season Check**: During peak use, keep a close eye on coolant levels and clean debris from air filters weekly. Overheating is preventable with regular attention.
**Fall and Winter Care**: This is where many problems begin. Before storing your tractor, stabilize fuel to prevent gumming (ethanol-free fuel is even better for the environment). Change oil before winter storage—used oil contains acids that can corrode internal parts during dormancy.
**Responsible Fluid Disposal**: Never pour used oil, coolant, or hydraulic fluid down drains or onto the ground. Most auto parts stores and recycling centers accept these fluids for free. Your local municipality likely offers hazardous waste collection days—mark your calendar! Protecting our soil and water protects the garden ecosystem we’re all working to nurture.
The good news is that most compact tractor troubles you’ll encounter aren’t as complicated as they might initially seem. Whether you’re dealing with a stubborn engine that won’t turn over, hydraulics acting temperamental, or PTO issues interrupting your mowing schedule, systematic troubleshooting can help you identify and resolve problems without an expensive service call. Think of it like diagnosing why your tomato plants aren’t thriving—you check the basics first, then work your way through potential causes methodically.
Your John Deere compact tractor is a significant investment in both your property’s appearance and your ability to maintain it sustainably. Regular maintenance isn’t just about preventing breakdowns; it’s about ensuring your equipment runs efficiently for years to come, reducing waste and the environmental impact of premature replacement. Simple habits like checking fluid levels weekly, keeping air filters clean, and storing your tractor properly during off-seasons can prevent the majority of common issues.
Remember that taking care of your equipment directly supports your sustainable gardening goals. A well-maintained tractor uses fuel more efficiently, produces fewer emissions, and helps you complete property maintenance tasks that support healthy soil and vegetation. When you do encounter problems, don’t panic—refer back to these troubleshooting steps, take your time working through diagnostics, and you’ll likely get back to your lawn care projects sooner than expected.