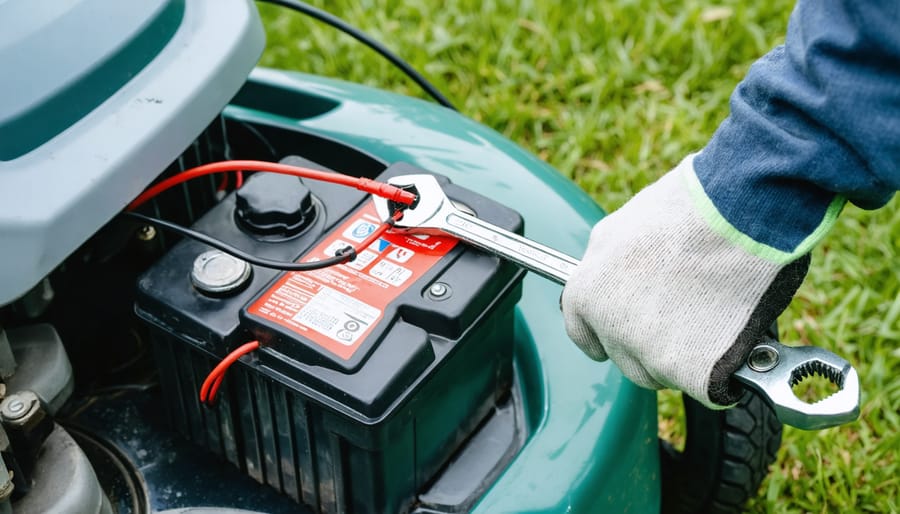
Connect the red cable to the positive terminal marked with a plus sign (+), typically covered by a red cap, and the black cable to the negative terminal marked with a minus sign (-). Always attach the positive connection first when installing a battery, then the negative, and reverse this order when removing to prevent dangerous sparks or electrical shorts. Modern battery-powered mowers make this process simpler than traditional gas models, but proper terminal identification remains essential for safe operation.
Locate terminals by looking for clear markings on both the battery posts and cable connectors—positive terminals are often slightly larger in diameter than negative ones. Clean any corrosion from terminals using a wire brush and baking soda solution before connecting, as buildup can prevent your mower from starting even with a fully charged battery. Tighten connections firmly but avoid over-torquing, which can crack the battery casing or strip terminal threads.
Understanding these fundamentals protects both you and your equipment while extending battery life. Whether you’re replacing a dead battery or troubleshooting starting problems, correct polarity connections prevent expensive damage to your mower’s electrical system and ensure reliable performance season after season.
Understanding Positive and Negative Terminals on Lawn Mower Batteries
How to Identify Which Terminal is Which
Identifying your lawn mower battery terminals is simpler than you might think, even if you’re tackling this for the first time. The positive terminal typically has a red cover or marking and displays a plus sign (+), while the negative terminal features black coloring with a minus sign (-). These visual cues are your first line of defense against incorrect connections.
Look closely at the battery top—most manufacturers stamp or emboss these symbols directly onto the plastic casing near each terminal. The positive terminal is also slightly larger in diameter on many batteries, though this isn’t always obvious to the naked eye.
When markings have faded from weather exposure or age, don’t panic. Check your mower’s owner manual, which usually includes a battery diagram. You can also trace the existing cables if they’re still attached—red almost always indicates positive, black indicates negative. Another helpful tip: the cable leading to your mower’s starter or main power system typically connects to the positive terminal.
If all markings are completely worn and cables disconnected, consider this a perfect opportunity to invest in a simple multimeter from your local hardware store. This inexpensive tool provides definitive identification and proves invaluable for future maintenance tasks. Remember, taking a few extra minutes to verify terminal identity protects both your battery’s lifespan and your mower’s electrical system—a small effort that supports sustainable equipment care.
Why Polarity Matters in Your Mower
Understanding polarity might seem like electrical wizardry, but it’s actually straightforward once you grasp the basics. Think of your mower’s electrical system as a one-way street where current flows from the positive terminal through your equipment and back to the negative terminal. When everything’s connected correctly, power flows smoothly to start your engine and run essential components like lights and safety switches.
Here’s where things get critical: reversing polarity is like forcing traffic the wrong way down that street. Connect those terminals backward, and you’re sending current through circuits designed to handle flow in the opposite direction. The immediate consequences can include blown fuses, fried voltage regulators, or damaged circuit boards. Modern mowers with electronic fuel injection or computerized engine controls are particularly vulnerable to reverse polarity damage.
Your battery itself can also suffer. Incorrect connections may cause internal damage, reducing its lifespan or rendering it completely useless. Even worse, reversed polarity can generate excessive heat, potentially causing the battery to swell, leak, or in extreme cases, create safety hazards.
The good news? Taking a few extra seconds to verify positive and negative connections protects both your investment and the environment by preventing premature equipment failure and unnecessary waste.
The Real Dangers of Reversing Battery Connections
Immediate Safety Risks
Getting your lawn mower battery connections wrong isn’t just a minor inconvenience—it can create serious safety hazards that put both you and your equipment at risk. When positive and negative terminals are reversed, you’re likely to see immediate sparking at the connection point. These sparks aren’t just alarming; they can ignite battery gases or nearby flammable materials like dry grass clippings or fuel residue on your mower deck.
The reversed polarity sends electrical current through components designed for opposite flow, potentially damaging your mower’s electrical system, melting wiring insulation, or even causing battery case rupture. In worst-case scenarios, batteries can swell, leak corrosive acid, or in rare instances, explode. Beyond equipment damage, you’re putting yourself at risk of electrical burns or chemical exposure from battery acid. Always double-check your connections before completing the circuit—taking an extra thirty seconds to verify proper polarity protects both your investment and your wellbeing. Think of it as essential safety practice, just like wearing gloves when handling fertilizers or sharp pruning tools.
Long-Term Damage to Your Mower
Connecting your battery cables incorrectly isn’t just a minor hiccup—it can cause serious damage that’ll cost you far more than a simple mistake should. When you reverse the polarity, you’re essentially sending electricity flowing the wrong direction through delicate electronic components. Modern riding mowers and battery-powered models contain sophisticated circuit boards and motor controllers that aren’t designed to handle this backward current. The result? Fried circuits, melted wiring, and potentially a ruined motor controller that can cost hundreds to replace.
Here’s the frustrating part: most manufacturer warranties explicitly exclude damage caused by improper installation or user error. That means you’ll be footing the entire repair bill out of pocket. I’ve heard from too many gardeners who faced $300-$800 in repairs because they rushed through a battery replacement. Taking just two extra minutes to verify those positive and negative terminals before connecting can save you serious money and keep your sustainable lawn care routine running smoothly for seasons to come.
Proper Battery Installation and Connection Techniques

Safe Connection Order That Prevents Sparks
Getting the connection order right isn’t just about following rules—it’s about keeping yourself safe and protecting your mower’s electrical system. Think of it as a simple recipe: follow the steps in order, and everything works beautifully.
When installing a battery, always connect the positive terminal first. Here’s why: the positive terminal carries the charge, but when it’s the only connection, there’s nowhere for electricity to flow. This means you can safely attach that first cable without worrying about sparks. Once the positive is secure, connect the negative terminal to complete the circuit.
Now, here’s where many folks make a mistake—disconnection works in reverse. Always remove the negative cable first, then the positive. By disconnecting the negative terminal first, you’re breaking the electrical circuit right away. This prevents accidental sparks if your wrench or tool happens to touch any metal part of your mower while you’re working on the positive terminal.
I like to think of it as “positive first on, negative first off.” This simple phrase has saved countless batteries and prevented potential injuries over the years. The reasoning is straightforward: minimizing the chance of creating a spark near your battery means you’re protecting yourself from potential acid splashes or, in rare cases, battery gases that could ignite. It’s a small habit that makes a significant difference in safe lawn mower maintenance.
Tools and Precautions You Need
Before you start working with your lawn mower battery, let’s make sure you have everything you need for a safe and successful experience. Trust me, having the right tools on hand makes all the difference between a quick, confident job and a frustrating afternoon.
You’ll need a few basic items: adjustable wrenches or a socket set (typically 8mm to 10mm), a wire brush for cleaning terminals, and safety goggles to protect your eyes from any battery acid splashes. I always recommend wearing rubber or nitrile gloves too, as they protect your hands while being environmentally friendlier than disposable options you’d toss after one use.
A multimeter or voltage tester is incredibly helpful for checking your battery’s charge before and after installation. This simple tool can save you from unnecessary replacements and supports more sustainable practices by preventing premature battery disposal.
Work in a well-ventilated area, preferably outdoors or in an open garage. Batteries can release hydrogen gas, which is flammable, so keep sparks and flames far away. Choose a dry day if possible, as moisture and electrical components don’t mix well.
Finally, keep baking soda and water nearby for neutralizing any accidental acid spills. This eco-friendly solution is safe, effective, and probably already in your pantry. With these preparations complete, you’re ready to tackle your battery work confidently and safely.
Maintaining Your Battery Terminals for Peak Performance
Cleaning Corroded Terminals the Right Way
Corroded terminals can prevent your mower from starting, but cleaning them is surprisingly simple using items you likely already have at home. My go-to solution is a paste made from baking soda and water—mix three tablespoons of baking soda with one tablespoon of water. This eco-friendly mixture neutralizes the acidic corrosion without harsh chemicals that could harm your lawn or garden soil.
First, disconnect your battery cables, starting with the negative terminal. Apply the baking soda paste to the corroded areas using an old toothbrush, letting it fizz for a few minutes. Scrub gently in circular motions, then wipe clean with a damp cloth. For stubborn buildup, a wire brush works wonders.
Once cleaned and completely dry, apply a thin layer of terminal protectant spray or petroleum jelly to both terminals. This protective barrier prevents future corrosion and maintains reliable connections. I check my terminals every spring and fall—it takes five minutes and saves countless headaches.
This maintenance approach works wonderfully whether you’re using traditional batteries or transitioning to eco-friendly battery mowers. Regular cleaning extends battery life, reduces waste, and keeps your mower ready when you need it most.

Regular Inspection Schedule
Making battery maintenance a habit will save you headaches down the road and extend your mower’s lifespan. I recommend giving your battery terminals a quick visual check every month during mowing season. Look for white, blue, or green crusty buildup around the connections, which indicates corrosion that needs cleaning. Also watch for frayed wires, loose connections, or any cracking in the terminal posts themselves.
Every three months, take a few extra minutes to actually disconnect and thoroughly clean the terminals using a wire brush and baking soda solution. This deeper cleaning prevents long-term damage and ensures optimal electrical flow. Before winter storage, do a complete inspection and apply a protective coating to the terminals to prevent moisture damage during the off-season.
If you notice deep cracks in the terminal posts, severe corrosion that returns quickly after cleaning, or terminals that won’t stay tight no matter how you adjust them, it’s time for replacement. These issues can lead to starting problems or even safety hazards. When connections show significant wear or your battery is over three years old and struggling, consider consulting a small engine professional. They can assess whether you need new terminal connectors, cables, or a complete battery replacement, keeping your lawn care sustainable and hassle-free.
Troubleshooting Common Battery Connection Problems
When Your Mower Won’t Start
When your mower refuses to start, don’t panic and immediately assume you need a new battery or expensive repairs. Often, the culprit is something much simpler. Start by examining your battery terminal connections. Over time, these can work loose from vibration during mowing, or corrosion can create a barrier that prevents proper electrical contact.
First, give each terminal connection a gentle wiggle test. If there’s any movement, you’ve likely found your problem. Tighten the connections using the appropriate wrench, but remember not to over-tighten, which can crack the terminal posts. Next, look closely at both terminals for that telltale white or greenish crusty buildup. Even a small amount of corrosion can prevent your mower from starting.
Before assuming battery failure, double-check that you haven’t accidentally reversed the polarity during a previous maintenance session. It happens more often than you’d think, especially after winter storage. The positive cable should connect to the positive terminal, typically marked with a plus sign and red coloring.
If connections are secure, clean, and correctly positioned but your mower still won’t start, then it’s time to test the battery’s actual charge. This systematic approach saves you time, money, and unnecessary frustration while keeping your lawn care routine sustainable and efficient.
Dealing with Loose or Damaged Connectors
Loose connections are surprisingly common culprits behind battery problems. I’ve learned this lesson after countless mornings trying to start a mower that seemed dead, only to find a slightly wiggled cable terminal fixed everything. To tighten connections properly, first disconnect the battery starting with the negative terminal. Clean both the battery posts and cable clamps with a wire brush or sandpaper to remove any corrosion. Reconnect firmly, ensuring the clamps grip tightly around the posts. You should feel resistance when tightening, but avoid overtightening, which can crack the battery casing.
If cables show cracks, fraying, or significant corrosion that cleaning won’t fix, replacement becomes necessary. Look for battery cables specifically rated for outdoor power equipment, as they withstand vibration and temperature changes better. Quality replacement terminal clamps with brass or copper construction ensure reliable conductivity and resist corrosion naturally. Many garden centers now stock eco-friendly cable options with recyclable components, aligning with sustainable lawn care practices. When purchasing replacements, bring your old cables along to ensure proper length and terminal size matching for your specific mower model.
Choosing Battery-Powered Mowers with User-Friendly Designs
When shopping for your next mower, the battery connection system deserves serious consideration alongside cutting power and runtime. Modern battery-powered lawn mowers feature increasingly user-friendly designs that practically eliminate connection errors, making them perfect for both newcomers and seasoned gardeners.
Look for models with color-coded terminals and raised polarity symbols that remain visible even after years of use. Some manufacturers incorporate foolproof connector designs where the battery physically cannot be inserted incorrectly, a brilliant feature that saves time and prevents accidental damage. Tool-free battery access panels are another game-changer, allowing you to inspect connections during routine maintenance without hunting for screwdrivers.
Premium battery mower designs often include weatherproof terminal covers and corrosion-resistant materials that extend component life while reducing environmental impact through longer product lifespans. These thoughtful touches align perfectly with sustainable gardening practices by minimizing waste and replacement frequency.
During your purchase research, don’t hesitate to ask retailers about battery accessibility and terminal protection features. Many stores have display models you can examine firsthand. Check how easily you can reach the battery compartment and whether the positive and negative terminals are clearly marked. Reading verified owner reviews often reveals real-world experiences with battery connection systems that manufacturer specifications might gloss over.
Remember, investing in a well-designed battery system upfront means fewer frustrations down the road and supports your commitment to practical, sustainable lawn care solutions.
Taking care of your lawn mower battery terminals isn’t complicated, but it makes a world of difference in how your equipment performs. By simply identifying positive and negative terminals correctly, keeping them clean, and connecting them in the proper order, you’re protecting both yourself and your investment. These small habits translate into fewer frustrating mornings when your mower won’t start and significantly extend your battery’s lifespan, saving you money and reducing waste.
Remember, a well-maintained battery is also better for the environment. When your battery lasts longer, you’re keeping hazardous materials out of landfills and reducing the need for manufacturing replacements. Plus, properly functioning battery-powered equipment runs more efficiently, which aligns perfectly with sustainable lawn care practices.
Start incorporating these simple checks into your regular lawn care routine. Before each mowing season, inspect those terminals. After each use, give them a quick visual check. Your future self will thank you when your mower starts reliably year after year. These straightforward practices are truly the foundation of hassle-free, environmentally conscious lawn maintenance that anyone can master.