Proper belt tension stands as the cornerstone of your lawn mower’s performance and longevity. A correctly tensioned belt delivers optimal power from the engine to the cutting deck, preventing costly repairs and ensuring clean, even cuts across your lawn. Test your mower’s belt tension by pressing firmly in the middle of the longest belt span – it should deflect approximately 1/2 inch with moderate thumb pressure. Too loose, and you’ll experience slipping and poor cutting performance; too tight, and you risk premature wear on both the belt and pulleys. Whether you’re troubleshooting poor cutting performance or performing routine maintenance, understanding and maintaining proper belt tension will save you time, money, and frustration while extending your mower’s service life. Learn to recognize the telltale signs of incorrect tension: unusual vibrations, inconsistent cutting patterns, and squealing sounds during operation.
Signs Your Lawn Mower Belt Needs Tension Adjustment
Visual and Audio Warning Signs
Your lawn mower will often give you clear signals when belt tension needs adjustment. Watch for loose mower deck belt symptoms like visible sagging or excessive belt movement when the engine is running. A properly tensioned belt should have about 1/2 inch of play when pressed firmly in the middle.
Listen for unusual sounds while mowing. A squealing or chirping noise often indicates a slipping belt, while a loud thumping could mean the belt is too loose and slapping against components. You might also notice decreased cutting performance, with the blades spinning slower than usual or stopping altogether when encountering thick grass.
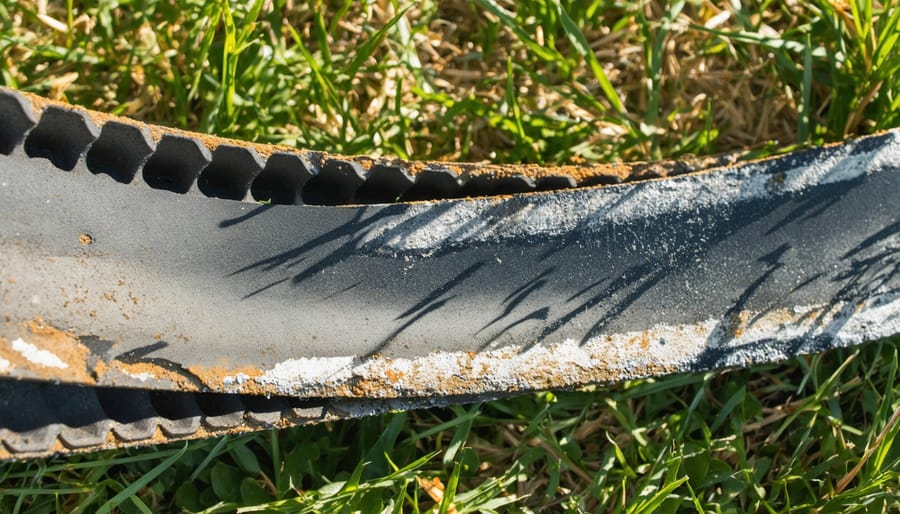
Visual inspection can reveal wear patterns like glazing (shiny spots on the belt), fraying edges, or cracks. If you spot these signs, check the tension immediately to prevent further damage and ensure optimal mowing performance.
Performance-Related Symptoms
Improper belt tension can significantly impact your mower’s performance, leading to several noticeable issues. When the belt is too loose, you might experience uneven cutting patterns or patches of unmowed grass, as the blades aren’t spinning at optimal speed. You may also notice unusual mower noises like squealing or chirping, especially when engaging the blades. A loose belt can also cause excessive vibration, which not only affects cutting quality but may also strain other mower components.
Conversely, an overly tight belt can lead to premature wear on both the belt and pulleys, potentially causing the engine to work harder than necessary. This extra strain might result in increased fuel consumption and could even cause the engine to stall under heavy loads. Watch for signs like reduced power when cutting thick grass or a burning rubber smell, which often indicates excessive belt tension that needs immediate adjustment.
Measuring and Testing Belt Tension
Using the Finger Test Method
The finger test method is a time-tested way to check if your lawn mower belt has the right tension. Place your mower on a level surface and ensure it’s turned off completely. Find the longest straight section of the belt between pulleys and press down on it with your finger, applying moderate pressure. A properly tensioned belt should deflect about ½ to ¾ inch. If it moves significantly more than this, your belt is too loose and could lead to blade spinning issues or slipping. Conversely, if the belt barely moves under pressure, it’s too tight and could cause premature wear on both the belt and pulleys.
Think of it like testing a guitar string – you want just the right amount of give. Too loose, and you’ll get poor performance; too tight, and you risk damaging components. Make this check part of your regular maintenance routine, ideally every few mowing sessions. Remember that newer belts typically need more frequent tension checks as they break in, while established belts generally maintain their tension longer once properly set.

Professional Tension Gauge Usage
For those seeking precise measurements, a professional tension gauge offers the most accurate way to set your lawn mower belt tension. These specialized tools typically feature a calibrated spring mechanism and measurement indicators, allowing you to achieve manufacturer-specified tension levels with confidence.
To use a tension gauge, first locate your belt’s mid-span point – the longest straight section between pulleys. Position the gauge perpendicular to the belt and apply gentle pressure until you feel the tool’s measuring probe make contact. Slowly increase pressure while watching the gauge’s indicator. Most lawn mower belts require between 3 and 5 pounds of deflection force for optimal tension.
Many modern tension gauges come with digital displays, making readings easier to interpret. Some even feature preset measurements for common lawn mower models. While these tools represent a larger investment than manual checking methods, they’re invaluable for maintaining multiple mowers or for those who prioritize precision maintenance.
Remember to clean your tension gauge after each use and store it in its protective case. This ensures accurate readings and extends the tool’s lifespan. While not essential for casual mower maintenance, a professional tension gauge is worth considering if you’re serious about optimal mower performance.
Adjusting Belt Tension Correctly
Safety Precautions
Before attempting any work on your lawn mower’s belt system, always prioritize safety first. Start by removing the spark plug wire to prevent accidental startup. Ensure the mower is on a flat, stable surface and has completely cooled down if recently used. Wear appropriate protective gear, including safety glasses and work gloves to protect against sharp edges and debris. Never work underneath a mower that’s only supported by a jack – use proper mower stands or blocks. Keep your workspace well-lit and free from obstacles. If your mower has a battery, disconnect it as an extra precaution. Remember that even a stationary blade can cause injury, so handle all components with care and keep fingers away from cutting edges.
Step-by-Step Adjustment Process
Begin by ensuring your mower is on a level surface and turned off, with the spark plug disconnected for safety. Remove the mower deck cover to access the belt system. Look for the adjustment mechanism, typically located near the pulleys – this might be a tension arm or adjustment bolt depending on your model.
For models with a tension arm, locate the adjustment nuts or bolts that control the arm’s position. Loosen these slightly, but don’t remove them completely. Push the tension arm toward the belt to increase tension, or away to decrease it. The correct tension should allow about ½ inch of belt deflection when pressed firmly in the middle of the longest belt span.
If your mower uses an adjustment bolt system, turn the bolt clockwise to increase tension or counterclockwise to decrease it. Make small adjustments – usually a quarter turn at a time – checking the tension after each adjustment. The belt should feel snug but not overly tight.
Test the tension by rotating the pulleys by hand. The belt should turn smoothly without slipping or squealing. Once satisfied with the adjustment, tighten all nuts and bolts securely. Replace the deck cover, reconnect the spark plug, and test the mower at low speed to ensure proper operation.
Remember to check your owner’s manual for model-specific guidance, as tension requirements can vary between manufacturers.
Post-Adjustment Testing
After adjusting your lawn mower belt tension, it’s crucial to perform a thorough test before tackling your lawn. Start by running the mower at idle speed for about 30 seconds, listening for any unusual sounds like squealing or grinding. Observe the belt’s movement – it should run smoothly without visible wobbling or vibration. Next, test the mower under normal operating conditions on a small patch of grass. Watch for signs of proper engagement when engaging the blade system. The blades should spin up quickly and maintain consistent speed. If you notice any slipping, smoking, or unusual noises, immediately shut off the mower and recheck your tension adjustments. A properly tensioned belt will provide smooth operation and consistent cutting performance without straining the engine.
Maintenance Tips for Long-Term Belt Health
Regular Inspection Schedule
To keep your lawn mower running smoothly, implement a regular inspection schedule for belt tension. Check your mower’s belt tension every 25 hours of operation or monthly during the mowing season, whichever comes first. For commercial or heavy-use mowers, increase the frequency to bi-weekly checks.
Create a simple maintenance checklist that includes:
– Visual inspection for signs of wear, fraying, or glazing
– Belt deflection test (1/2 inch is typically ideal)
– Pulley alignment check
– Belt cleaning to remove grass and debris
– Documentation of inspection date and findings
Before each mowing session, perform a quick visual check of the belt’s condition. During peak growing seasons (spring and early summer), you might need more frequent inspections, especially if you’re mowing thick or wet grass regularly. Remember to consult your owner’s manual for model-specific maintenance intervals, as requirements can vary between manufacturers and mower types.
Set calendar reminders for these checks to ensure consistent maintenance, which will extend your belt’s lifespan and maintain optimal mower performance.
Environmental Considerations
Weather conditions and storage practices play a crucial role in maintaining proper lawn mower belt tension. High temperatures can cause rubber belts to expand and become loose, while cold weather may lead to contraction and over-tightening. Humidity levels also affect belt performance, as excessive moisture can cause premature wear and deterioration.
To protect your mower’s belt tension, store your equipment in a covered, temperature-controlled space whenever possible. If outdoor storage is unavoidable, use a waterproof cover and ensure the mower is protected from direct sunlight. During seasonal transitions, particularly when moving from winter storage to spring use, always check and adjust belt tension before the first mow.
Regular inspection becomes even more important if your mower is exposed to extreme weather conditions. Look for signs of weather-related wear such as cracking, glazing, or unusual stretching. By being mindful of environmental factors and taking preventive measures, you can significantly extend your mower belt’s lifespan and maintain optimal performance throughout the seasons.
Maintaining proper lawn mower belt tension is crucial for the longevity and performance of your equipment. Regular checks and adjustments can prevent costly repairs and ensure your mower operates efficiently throughout the season. Remember to inspect your belts monthly during heavy use periods, immediately address any signs of wear or misalignment, and always consult your owner’s manual for specific tension requirements. By following proper maintenance procedures and staying proactive with belt care, you’ll extend the life of your mower while achieving better cutting results. Keep in mind that a well-maintained mower not only performs better but also consumes less fuel and creates less environmental impact. Make belt tension checks a regular part of your lawn care routine, and you’ll enjoy reliable, efficient mowing performance for years to come.