Locate your lawn mower’s model number stamped on the deck or engine housing—this identifier unlocks access to the exact parts diagram you need for accurate repairs. Understanding the exploded-view layout of these diagrams transforms confusing mechanical puzzles into straightforward identification tasks, letting you pinpoint that worn blade adapter or damaged belt pulley within seconds rather than hours of guesswork.
Download the manufacturer’s official parts diagram as your first step, whether from their website or by requesting it from authorized dealers. These technical illustrations display every component in precise relationship to surrounding parts, with corresponding part numbers that eliminate ordering errors. Generic diagrams might save time initially, but they often miss crucial details about your specific model year or engine variant, leading to frustrating returns and delayed repairs.
Cross-reference the diagram with your actual mower before ordering replacements. Physical inspection reveals whether you need the standard or heavy-duty version of components, and checking adjacent parts often uncovers hidden wear that could sabotage your repair. This thorough approach extends equipment longevity by addressing root causes rather than symptoms.
Master the numbering system each manufacturer uses—typically sequential from front to back or organized by assembly group. This knowledge speeds up future maintenance and builds confidence in tackling more complex repairs yourself. Learning to read these diagrams properly saves money on labor costs while giving you control over timing repairs during off-peak seasons when parts are more affordable and readily available.
Why Lawn Mower Parts Diagrams Are Your Best Maintenance Tool
Think of a lawn mower parts diagram as your personal maintenance roadmap. Just like you wouldn’t embark on a cross-country trip without GPS, tackling mower repairs without a diagram can leave you lost, frustrated, and potentially out of pocket.
The beauty of parts diagrams lies in their precision. When that mysterious bolt falls out during blade removal or your pull cord suddenly snaps, a diagram shows you exactly which part you need, complete with its specific part number. I’ve heard countless stories from fellow gardeners who’ve ordered the wrong carburetor or bought an incompatible air filter simply because they guessed based on photos alone. A proper diagram eliminates that guesswork, saving you return shipping costs and the disappointment of waiting for another delivery while your grass grows taller.
Beyond identification, diagrams reveal the hidden relationships between components. Understanding that your fuel line connects to both the tank and carburetor in a specific sequence, or seeing how the drive belt weaves through multiple pulleys, transforms you from someone who just fixes broken parts to someone who truly understands their machine. This knowledge is invaluable when troubleshooting because problems rarely exist in isolation. That sputtering engine might not be a carburetor issue at all, but rather a clogged fuel filter three connections back.
From a sustainability perspective, parts diagrams empower you to extend your mower’s lifespan significantly. Rather than replacing an entire assembly, you can identify and swap out just the worn gasket or damaged spring. This approach reduces waste, keeps perfectly good components out of landfills, and saves money that you can invest in other garden improvements.
Most importantly, diagrams build confidence. They demystify complex machinery and prove that with the right information, most maintenance tasks are entirely achievable. You’ll find yourself tackling repairs you previously thought required professional help, developing skills that serve you season after season.
Understanding the Anatomy of a Lawn Mower Parts Diagram

Exploded View Diagrams vs. Assembled View Diagrams
When you’re hunting for replacement parts, you’ll encounter two main types of lawn mower diagrams, and understanding the difference can save you time and frustration.
Exploded view diagrams show your mower as if someone carefully disassembled it and suspended all the parts in mid-air. Each component floats in its proper position relative to the others, with numbered callouts connecting to a parts list. Think of it like a 3D puzzle laid out before you. These diagrams are incredibly helpful when you need to identify a specific part or understand how multiple components fit together. If you’re wondering “what’s that little washer called?” or “how many screws hold this assembly together?”, an exploded view is your best friend.
Assembled view diagrams, on the other hand, show your mower as it actually looks when everything’s put together. These are perfect for getting your bearings and locating general areas. They help you understand where a component sits on the complete machine before you dive into the details.
For most repair and parts selection tasks, you’ll rely heavily on exploded views since they clearly label every individual piece. However, starting with an assembled view helps orient yourself, especially if you’re new to mower maintenance. Many manufacturers wisely provide both types, allowing you to zoom from the big picture into the specific part you need to order.
Decoding Part Numbers and Reference Keys
I know that feeling when you’re staring at a parts diagram covered in numbers and arrows, wondering if you’ll ever crack the code! The good news is that understanding these diagrams is simpler than it looks, and once you master it, you’ll order the right parts confidently every time.
Start by locating the numbered callouts on your diagram. Each number corresponds to a specific component in the exploded view. Most manufacturers provide a reference table alongside the diagram that lists these numbers with corresponding part names and official part numbers. This part number is your golden ticket—it’s the exact identifier you’ll use when ordering replacements.
Here’s where it gets practical: once you’ve identified the part number, cross-reference it with your manufacturer’s catalog or website. Most brands maintain searchable online databases where you can enter the part number to verify compatibility with your specific mower model. This extra step prevents costly mistakes and ensures you’re getting exactly what you need.
A helpful tip from experience: take a photo of your diagram’s reference table and keep it on your phone. You’ll thank yourself later when you’re at the hardware store or browsing online. Some manufacturers also offer exploded view PDFs that you can download, making it easier to zoom in on small details.
Remember, buying the correct part the first time isn’t just convenient—it’s sustainable too. You’ll avoid shipping returns, reduce packaging waste, and get your mower running efficiently sooner, which means less fuel consumption and a healthier lawn care routine overall.
Essential Lawn Mower Components on Every Diagram
Engine and Power System Components
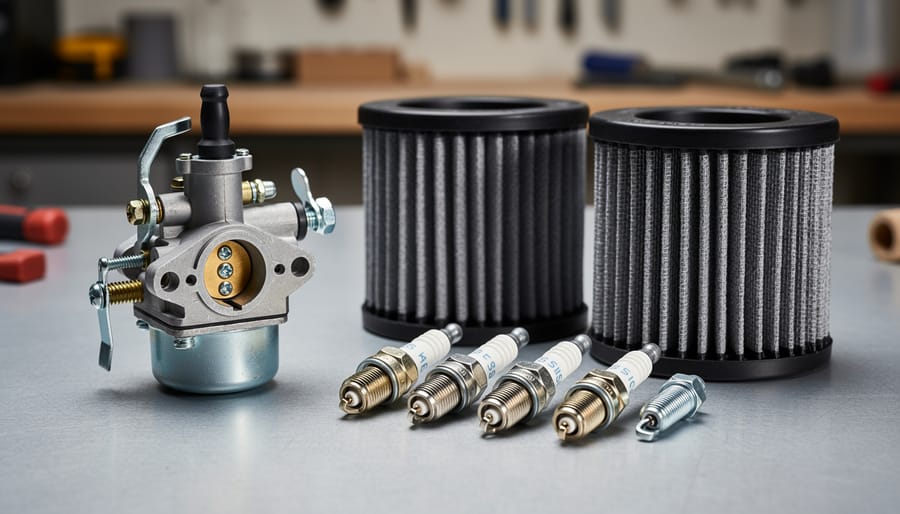
The heart of your lawn mower lies in its engine and power system, and understanding these components can save you money while extending your machine’s life. Let’s walk through the key parts you’ll find in most mower diagrams.
Air filters are your engine’s first line of defense against debris and dust. When examining your diagram, locate this component near the carburetor. A clogged or dirty filter reduces engine performance and fuel efficiency. You’ll know it’s time for attention when the filter appears darkened or when debris is visible. Learning to clean air filters regularly can prevent costly engine damage down the road.
Spark plugs ignite the fuel-air mixture in your engine. These small but mighty components wear out over time, showing signs like carbon buildup, eroded electrodes, or oil fouling. Most diagrams position them prominently on the engine block for easy identification.
The carburetor mixes air and fuel in proper proportions. Look for crusty deposits or fuel residue around its connections, which signal cleaning or replacement needs. Fuel lines, those rubber tubes carrying gasoline, become brittle and cracked with age—check for any visible deterioration.
Oil filters keep your engine running smoothly by trapping contaminants. Fresh filters appear clean and white, while used ones darken considerably. By familiarizing yourself with these components on your diagram, you’re taking an environmentally responsible approach to maintenance, reducing waste through timely repairs rather than premature replacement.
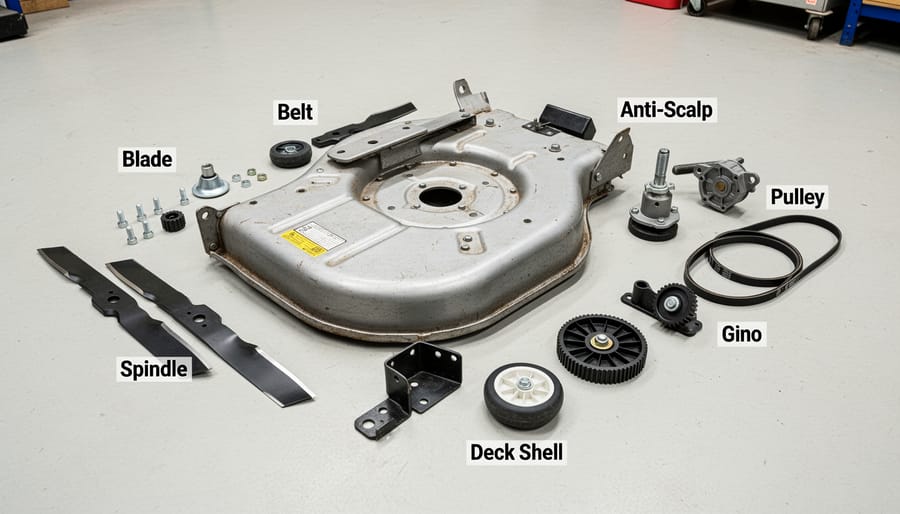
Cutting Deck and Blade Assembly
The cutting deck and blade assembly is where the magic happens—and where safety matters most! This section of your mower diagram shows the hardworking components that actually trim your grass, and understanding these parts helps you maintain a healthy lawn while keeping yourself protected.
Your mower’s blade is typically one of three types: standard, mulching, or high-lift. Standard blades work well for regular mowing, mulching blades finely chop clippings to return nutrients to your soil (a wonderfully sustainable practice!), and high-lift blades are great for bagging. Look for the blade’s thickness and lift angle in your diagram—these details matter when ordering replacements. Remember, dull or damaged blades tear grass rather than cutting cleanly, stressing your lawn and making it vulnerable to disease. Regular blade maintenance keeps your grass healthier and reduces the need for chemical treatments.
The spindle assembly connects your blade to the deck and houses bearings that allow smooth rotation. Your diagram will show how the deck belt wraps around pulleys to transfer power from the engine to the spindles. These belts wear over time, so check them regularly for cracks or fraying.
When replacing any cutting deck components, always disconnect the spark plug first—this simple step prevents accidental starts. Use the exact part numbers from your diagram to ensure proper fit, and torque blade bolts to manufacturer specifications. Loose blades are dangerous and can cause serious damage to your mower and property. Taking time to match parts correctly means safer operation and better results for your lawn.
Drive and Transmission Parts
The drive and transmission system is what transforms your mower from a static machine into a mobile lawn care partner. Think of these components as the legs and muscles that help your mower move efficiently across your yard.
For walk-behind mowers, the drive system typically includes wheels, axles, and drive belts that connect the engine to the wheels. When examining your parts diagram, you’ll notice the rear wheels are usually larger and contain the drive mechanism for self-propelled models. These wheels connect to a transmission through a drive belt system that transfers power from the engine pulley. If your mower struggles to move forward or the wheels spin freely without engaging, your drive belt may be worn or the transmission needs attention.
Riding mowers feature more complex transmission systems, often using hydrostatic transmissions that allow smooth speed control without gear shifting. Your diagram will show how the transmission connects to the rear axle and differential, which distributes power to both rear wheels. Look for components like the drive belt routing path, tension springs, and idler pulleys that maintain proper belt tension.
When identifying replacement parts, pay close attention to belt specifications including length and width. Using the correct belt ensures optimal power transfer and prevents premature wear. Consider checking your wheels for damaged bearings or worn tread patterns too, as these affect traction and overall performance.
A helpful sustainability tip: regular maintenance of drive components extends their lifespan significantly. Keeping belts properly tensioned and wheels properly inflated reduces energy waste and ensures your mower operates at peak efficiency, ultimately consuming less fuel or battery power.
Handle, Control, and Safety Components
These components are your mower’s most important safety features, and understanding them can truly be lifesaving. The handle assembly includes the control bar (often called the bail bar) that you squeeze to engage the blade, along with throttle controls and self-propel levers. When you release that bail bar, the engine should stop immediately—this dead-man switch design prevents runaway mowers if you slip or need to step away quickly.
Look for the cables connecting your controls to the engine and blade engagement system. These wear out over time, and a frayed cable can leave you without proper control. Most diagrams show the kill switch wire running from the control bar to the engine’s ignition coil—this simple but critical component grounds the spark plug when activated.
Safety switches under the deck or around the discharge chute prevent operation when guards are removed. While it might be tempting to bypass these for convenience, they exist for good reason. When ordering replacement parts, ensure you’re getting exact matches for your model—control cables come in different lengths, and an incorrect fit compromises both performance and safety. Taking a few extra minutes to verify these components now can prevent accidents and extend your mower’s reliable service life.
Electrical System Elements
If you’ve got an electric-start mower, you’re working with a whole network of electrical components that make that push-button convenience possible. Let’s demystify these parts so you can troubleshoot with confidence.
The battery is your power source, typically a 12-volt unit that needs periodic charging and replacement every few years. On your parts diagram, you’ll see how it connects to the starter motor, which physically cranks the engine to life. Between these two sits the solenoid, a small but mighty switch that handles the heavy electrical load when you turn the key or press the start button.
Your wiring harness is the nervous system of the electrical setup, routing power throughout the mower. These color-coded wires connect everything from safety switches to charging systems. When reading your diagram, pay attention to wire colors and connector types—this makes replacement much easier.
The ignition system includes spark plugs, ignition coils, and related wiring that creates the spark for combustion. A good diagram shows you exactly where each component mounts and how they interconnect.
Here’s a practical tip: electrical issues often start with corroded connections rather than failed parts. Before ordering replacements, check battery terminals and wire connections for green corrosion or loose fittings. A little preventive maintenance here saves money and extends component life.
How to Use Parts Diagrams for Smart Part Selection
Finding Your Mower’s Model and Serial Number
Before you dive into any parts diagram, you’ll need two critical pieces of information: your mower’s model number and serial number. Think of these as your mower’s fingerprint—they ensure you’re looking at the correct diagram and ordering the exact parts your machine needs.
Most manufacturers place identification plates in consistent locations, though they can vary. Start by checking the area beneath the seat on riding mowers, or along the rear deck panel on walk-behind models. You might also find it on the engine housing or near the blade engagement lever. The plate typically displays both numbers clearly, along with manufacturing details.
Why does this matter so much? Here’s a real-world example: Two seemingly identical mowers from the same manufacturer might have different blade assemblies or carburetor types depending on the year they were made. Using the wrong diagram could lead you to order incorrect parts, wasting both money and time—not exactly sustainable or practical.
Once you’ve located these numbers, snap a quick photo with your phone or jot them down. Keep this information handy whenever you’re researching parts or diagrams. Many online parts catalogs require these numbers to display accurate diagrams specific to your machine, ensuring you get exactly what you need the first time around.

Matching Symptoms to Diagram Sections
Understanding your mower’s behavior is like listening to what it’s trying to tell you. When something goes wrong, your parts diagram becomes a roadmap to the solution, but only if you know where to look.
Let’s start with the most common scenario: your mower won’t start. Before you assume the worst, check the fuel system section of your diagram. This area includes the fuel tank, fuel lines, carburetor, and fuel filter. If your mower sputters or refuses to fire up, these components are your first suspects. A clogged fuel filter or gummed-up carburetor from old gas are frequent culprits that are surprisingly easy to fix once you’ve identified them on your diagram.
Now, if your mower starts but runs roughly or loses power while cutting, shift your attention to the air intake section. The air filter housing and connecting components appear in this zone of your diagram. A dirty air filter restricts airflow, making your engine work harder than necessary, which isn’t great for performance or sustainability.
When you’re experiencing cutting issues like uneven grass height or strange noises, zero in on the deck assembly area. This section shows blade positioning, mounting hardware, and deck components. Worn blades or loose mounting bolts create problems that seem mysterious until you trace them back to specific parts.
For electrical troubles like dead batteries or failing lights, locate the electrical system section. Most diagrams clearly mark the ignition switch, battery, starter motor, and safety switches. Remember, many no-start situations actually stem from faulty safety switches rather than engine problems.
The beauty of this systematic approach is that it saves you time and money while reducing unnecessary waste. You’ll replace exactly what’s needed rather than guessing, which aligns perfectly with sustainable lawn care practices.
Where to Find Reliable Lawn Mower Parts Diagrams
Finding accurate lawn mower parts diagrams doesn’t have to be a frustrating treasure hunt. I’ve learned that knowing where to look can save you hours of searching and help you avoid ordering the wrong parts—a mistake I’ve definitely made in my earlier lawn care days!
Your first stop should always be the manufacturer’s website. Companies like Honda, Toro, John Deere, and Husqvarna typically offer free parts diagrams organized by model number. These are gold-standard resources because they come directly from the source, ensuring you’re looking at the exact specifications for your machine. Just have your model number handy—it’s usually on a plate attached to the mower deck or engine housing.
Owner’s manuals are another excellent resource that many people overlook. If you’ve misplaced your physical copy, most manufacturers now provide downloadable PDFs on their websites. These manuals often include exploded-view diagrams showing how components fit together, which is incredibly helpful for understanding the relationship between parts.
Authorized parts retailers and dealers represent your next best option. Websites like PartsTree, Jack’s Small Engines, and eReplacementParts specialize in outdoor power equipment and maintain extensive diagram libraries. These platforms are particularly valuable because they often include interactive diagrams where you can click on a part number to see pricing and availability immediately. This seamlessly bridges the gap between identifying what you need and actually ordering it.
Third-party resources like repair forums and YouTube channels can supplement official diagrams, especially when you need real-world context about how parts actually function. However, approach these with healthy skepticism—verify information against official sources before making purchases.
A practical tip: bookmark or save diagrams specific to your mower model. You’ll reference them repeatedly over your machine’s lifetime, and having quick access means faster repairs and less downtime during peak mowing season. This organized approach aligns with sustainable practices too—properly maintaining your equipment with correct parts extends its lifespan, reducing waste and the need for premature replacement.
Sustainable Part Selection: Choosing Quality Over Quick Fixes
Now that you’ve mastered reading your lawn mower parts diagram, let’s talk about making smart choices when it’s time to order those replacement parts. This is where you can make a real difference, not just for your mower’s longevity, but for the planet too.
When you’re staring at that diagram and deciding which parts to buy, resist the temptation to go for the cheapest option available. I learned this lesson the hard way after replacing a belt three times in one season with bargain-bin alternatives. Quality parts might cost a bit more upfront, but they’ll outlast their cheaper counterparts by years, not months. That means less waste in landfills and fewer frustrated afternoons spent making repeat repairs.
Look for parts made from durable materials that can withstand the rigors of regular mowing. Metal components often beat plastic ones for longevity, though modern high-grade polymers can be excellent choices too. Check product reviews carefully. Other gardeners will tell you honestly which parts hold up and which ones fail prematurely.
Here’s something many people overlook: refurbished and remanufactured parts. These are components that have been professionally restored to meet original specifications. They work just as well as new parts but keep perfectly good materials in circulation instead of demanding fresh manufacturing resources. Many reputable suppliers offer warranties on refurbished parts, giving you peace of mind alongside environmental benefits.
Original Equipment Manufacturer parts, while sometimes pricier, are designed specifically for your mower model. They fit properly, function optimally, and typically last longer than universal alternatives that promise to fit everything but excel at nothing.
Consider the entire lifecycle of each part you purchase. Can it eventually be recycled? Is the manufacturer committed to sustainable practices? Some companies now offer take-back programs for worn parts, ensuring proper recycling or disposal.
Also think about whether you really need a replacement at all. Sometimes a thorough cleaning or minor adjustment can revive a part you thought was finished. Your parts diagram can help you understand how components interact, revealing opportunities for maintenance rather than replacement.
By choosing quality, durable parts and considering refurbished options, you’re not just fixing your mower. You’re participating in a more sustainable approach to lawn care that values longevity over convenience and quality over quick fixes.
Common Mistakes When Using Parts Diagrams (And How to Avoid Them)
Even experienced gardeners sometimes stumble when using parts diagrams for the first time, so don’t worry if it feels confusing initially. The most common mistake I see is ordering parts based purely on visual similarity. You might look at a blade or belt in the diagram and think, “That looks just like mine,” but lawn mower manufacturers often use dozens of variations of similar-looking parts. What appears identical might have different dimensions, mounting holes, or specifications that make it incompatible with your specific model.
Another frequent error is ignoring the model and serial number stamped on your mower. These aren’t just random numbers—they’re critical identifiers that determine which exact parts fit your machine. Many manufacturers update designs annually or even mid-season, meaning a 2019 model might require completely different components than a 2020 version of the same mower series. Always cross-reference your mower’s identification plate with the parts diagram before ordering anything.
Beginners also tend to confuse parts that look nearly identical but serve different functions. For example, certain washers, spacers, and bushings can appear interchangeable in diagrams, but using the wrong one can affect your mower’s performance or even create safety hazards. Take time to read the part descriptions and reference numbers carefully rather than relying solely on the illustration.
Here’s a practical tip that’ll save you money and frustration: when in doubt, contact the parts supplier with your model number and a specific question. Most reputable dealers would rather help you order the correct part once than process returns for incorrect orders. It’s also worth noting that choosing quality replacement parts, even if slightly more expensive, reduces waste and supports more sustainable lawn care practices by extending your mower’s lifespan rather than encouraging premature replacement.
Remember, patience with parts diagrams pays off. Taking an extra five minutes to verify details prevents ordering mistakes that delay your repair and create unnecessary shipping waste.
You’ve now got the knowledge to tackle lawn mower repairs with confidence, and that’s genuinely empowering. By learning to read and use parts diagrams, you’re not just saving money on repair bills—though those savings can really add up over a season—you’re also taking meaningful steps toward more sustainable lawn care. Every part you replace yourself is one less complete machine heading to a landfill prematurely, and that matters.
Keep your mower’s parts diagram somewhere accessible, whether that’s tucked in your tool shed, saved on your phone, or bookmarked on your computer. The more you reference it, the more familiar you’ll become with your machine’s anatomy, and what once seemed overwhelming will start to feel like second nature. Many gardeners find that their first successful repair builds incredible confidence for future projects.
Remember, maintaining your equipment responsibly means it’ll serve you faithfully for years to come. Regular inspections, timely part replacements, and understanding what you’re working with transforms routine maintenance from a chore into a satisfying part of your gardening practice. You’re not just fixing a machine; you’re developing skills that connect you more deeply to the tools that help your lawn thrive.
Start small if you’re new to this, celebrate each successful repair, and don’t hesitate to consult your diagram whenever uncertainty creeps in. Your lawn mower—and your wallet—will thank you for the attention and care you’re investing.