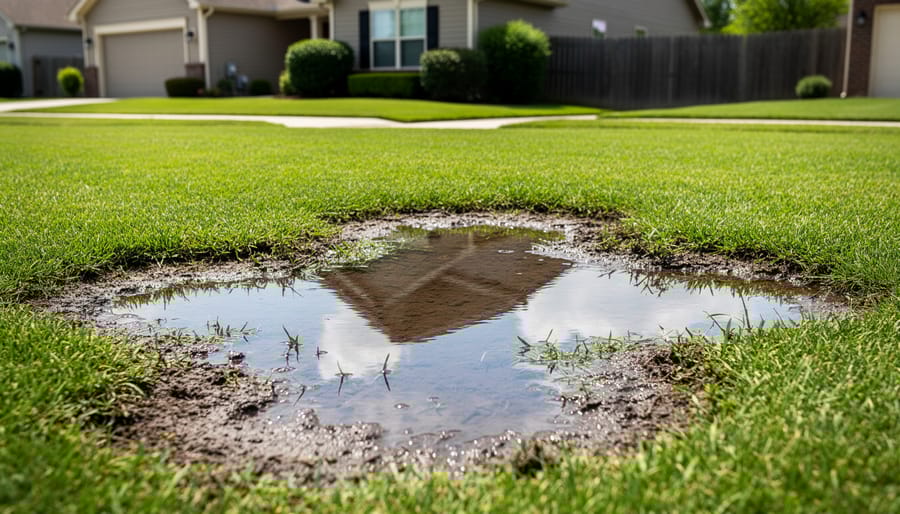
Standing water in your yard isn’t just unsightly—it’s slowly destroying your lawn, drowning plant roots, and creating the perfect breeding ground for mosquitoes. If you’ve noticed puddles that linger for days after rain or soggy patches that never seem to dry, you’re dealing with a drainage problem that won’t fix itself.
Installing landscape drainage pipe is one of the most effective ways to reclaim your yard from excess water, and the good news is that it’s a manageable project for motivated homeowners. Whether you’re redirecting runoff from downspouts, eliminating low spots where water collects, or protecting your irrigation investment from water-logged soil, a properly installed drainage system works silently underground to keep your landscape healthy and thriving.
The key to success lies in understanding how water moves through your property and choosing the right drainage solution for your specific situation. French drains, catch basins, and perforated pipe systems each serve different purposes, and combining them strategically with your existing irrigation setup creates a comprehensive water management system that addresses both too much and too little moisture.
This guide walks you through the entire installation process, from planning your drainage layout and selecting materials to digging trenches and connecting pipes. You’ll learn how to integrate drainage with irrigation, avoid common installation mistakes, and maintain your system for years of reliable performance. With the right approach, you can transform problem areas into the lush, productive garden spaces you’ve always wanted.
Understanding Your Yard’s Drainage Problems
Signs Your Lawn Needs Drainage Solutions
Your lawn will usually give you pretty clear signals when it’s struggling with drainage issues. The most obvious sign is standing water that lingers for more than 24 hours after rain or irrigation. You might notice persistent soggy patches that squelch underfoot, even during dry spells, indicating uneven water distribution across your yard.
Look for moss or algae growth in areas where grass should thrive. These water-loving organisms move in when conditions stay too damp for healthy turf. Similarly, if your grass appears yellow, thin, or patchy in certain zones while the rest of your lawn flourishes, poor drainage might be drowning the roots and preventing proper oxygen uptake.
Foundation concerns are particularly serious. Check for water pooling near your home’s perimeter, cracks in basement walls, or moisture seeping indoors. These issues can escalate quickly and damage your property’s structural integrity.
Other telltale signs include soil erosion channels, unusually lush weed growth in wet spots, and a persistent muddy smell. If you’re experiencing any combination of these symptoms, it’s time to consider a drainage solution before minor problems become costly repairs.
How Water Flow Works in Your Landscape
Think of your landscape as a living watershed in miniature. When rain falls, water naturally follows the path of least resistance, flowing downhill and seeking the lowest points in your yard. Understanding this movement is key to solving drainage problems.
Three main factors control how water behaves in your landscape. First, grading refers to the slope or angle of your soil surface. Even a gentle 2-3% grade can direct water away from problem areas. Second, soil permeability determines how quickly water soaks into the ground. Clay soils hold water like a sponge that’s already saturated, while sandy soils drain rapidly. Third, natural water movement follows gravity, creating flow patterns that can turn low spots into persistent puddles or muddy zones.
Here’s where it gets interesting for sustainable gardening: when you observe these patterns, you can work with nature rather than fighting it. Maybe that soggy area could become a rain garden, or perhaps strategic drainage pipes can redirect excess water to thirsty garden beds. By understanding how water flows naturally through your property, you’ll make smarter decisions about where to install drainage pipes and how to integrate them with your irrigation system for maximum efficiency.
Types of Landscape Drainage Pipes and When to Use Each
Perforated vs. Solid Drainage Pipes
Understanding the difference between perforated and solid drainage pipes is key to creating an effective landscape drainage system. Think of them as teammates with different roles on your drainage squad.
Perforated pipes have small holes along their length and are your water collection champions. Install these in areas where you need to gather excess water from the soil, like around your lawn or garden beds. The holes allow groundwater to seep in, making them perfect for solving soggy soil problems. I always wrap them in landscape fabric to prevent soil from clogging those precious holes.
Solid pipes, on the other hand, are your transport specialists. They move collected water from point A to point B without letting any escape along the way. Use solid pipe to carry water away from your collection areas to a final destination like a dry well, rain garden, or street drain.
Here’s where they work together beautifully: perforated pipe collects water in problem areas, then connects to solid pipe that transports it away efficiently. This tag-team approach creates a complete system that’s both effective and sustainable, preventing water waste while protecting your landscape from flooding.
Material Choices: PVC, Corrugated, and Flexible Options
Choosing the right drainage pipe material makes a significant difference in your system’s longevity and performance. PVC pipes are the most popular option for good reason – they’re affordable, resist corrosion, and last 50+ years underground. They’re ideal for straight runs and work beautifully in most residential drainage projects. I’ve installed countless PVC systems that are still going strong decades later.
Corrugated drainage pipes, typically made from HDPE plastic, offer excellent flexibility for navigating curves and obstacles in your landscape. They’re lighter and easier to handle than PVC, making them perfect for DIY installations. The corrugated design allows water to enter through perforations while maintaining structural integrity. While they may not last quite as long as PVC, they’re more forgiving during installation and cost-effective for larger projects.
For tight spaces or areas with existing plantings, flexible drain pipes are your best friend. They bend around tree roots and garden beds without requiring multiple fittings.
From an environmental standpoint, both PVC and HDPE are recyclable, though they’re petroleum-based products. Consider the lifespan when making your choice – a durable system installed once beats repeatedly replacing cheaper materials. Match your pipe selection to your specific yard conditions and budget, remembering that proper installation matters more than material alone.
Sizing Your Drainage Pipes Correctly
Getting your pipe diameter right makes all the difference between a system that works beautifully and one that leaves you frustrated. Think of it like choosing the right garden hose—too narrow and water backs up, too wide and you’ve wasted money and effort.
For most residential drainage needs, 4-inch corrugated pipe handles typical applications wonderfully. It’s perfect for managing roof runoff, foundation drainage, and general yard water issues. If you’re working with smaller areas like around planters or limited surface drainage, 3-inch pipe can do the job efficiently while being easier to maneuver in tight spaces.
Now, here’s where it gets interesting: larger drainage areas need more capacity. For every 400-600 square feet of surface drainage, or if you’re collecting water from multiple downspouts, step up to 6-inch pipe. This ensures water flows freely even during heavy downpours, preventing backups that could damage your landscape or foundation.
A practical tip from years of experience: when in doubt, size up rather than down. The cost difference is minimal, but the performance improvement is substantial. Your sustainable landscape depends on efficient water management, and proper pipe sizing is foundational to that success.
Planning Your Drainage System Layout
Mapping Water Flow and Problem Areas
Before you grab a shovel, spend some time playing detective in your yard. The best drainage solutions come from really understanding how water behaves on your property. Start by observing your landscape during and after a good rain. Where do puddles form? Where does water rush downhill? Take photos or sketch a simple map marking these problem spots.
To assess your yard’s grade, you don’t need fancy equipment. A basic line level attached to a string stretched between stakes works beautifully for checking slope over short distances. For a quick visual check, try the water bottle test: pour water on the ground and watch where it flows. Ideally, you want water moving away from your home’s foundation at a slope of about 2 percent, which means dropping 2 inches for every 10 feet of distance.
Pay special attention to areas where water sits for more than 24 hours after rain. These spots aren’t just muddy nuisances; they’re telling you exactly where drainage pipes will do the most good. Document everything, noting how existing downspouts, hardscaping, and garden beds influence water movement. This groundwork makes installation far more effective and helps you avoid the frustrating and wasteful mistake of putting pipes where they won’t solve your actual problems.
Determining Pipe Placement and Depth
Getting your pipe placement right is like laying the foundation for a house—it makes all the difference in how well your system performs. Let’s walk through the essentials so you can confidently map out your drainage network.
Start by determining the proper depth for your pipes. Generally, you’ll want to bury landscape drainage pipes at least 18 to 24 inches deep. This depth protects them from foot traffic and lawn equipment while staying below the frost line in most regions. If you live in an area with severe winters, check your local frost depth requirements—you might need to go deeper to prevent freezing issues that could crack your pipes.
Spacing between drain lines depends on your soil type and drainage needs. For heavy clay soils that hold water stubbornly, place pipes 8 to 12 feet apart. Sandy soils drain more readily, so you can space them 15 to 20 feet apart. Think of it like watering your garden—different conditions require different approaches.
When routing pipes to discharge points, always maintain a consistent downward slope of at least one-quarter inch per foot. Water won’t flow uphill, so gravity is your free labor here. Map the path from your problem areas to the lowest point on your property, whether that’s a drainage ditch, dry well, or rain garden. Avoid routing pipes under driveways or permanent structures whenever possible—future repairs will thank you. Use stakes and string to visualize your layout before digging, adjusting as needed to work around tree roots and existing utilities.
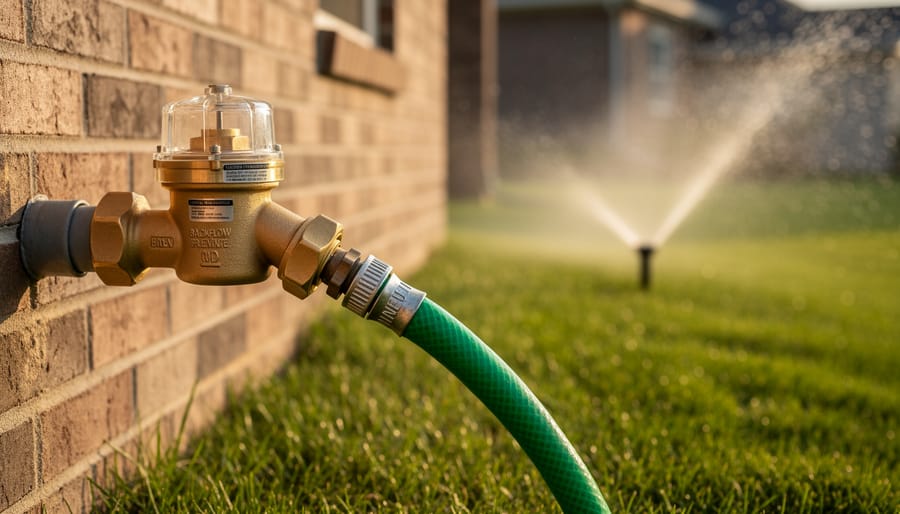
Integrating Drainage with Your Irrigation System
Why Drainage and Irrigation Must Work Together
Think of your drainage and irrigation systems as dance partners—when they’re in sync, your landscape thrives, but when they work against each other, you’re wasting water, money, and harming your plants.
Here’s the reality many homeowners discover the hard way: even the most sophisticated sprinkler system becomes counterproductive if water can’t drain properly. Poor drainage creates waterlogged soil that suffocates plant roots, promotes disease, and turns your irrigation efforts into a muddled mess. Conversely, excellent drainage without consideration for your irrigation patterns means you’re literally watching your water investment disappear underground.
The magic happens when these systems complement each other. Proper drainage pipes installed at the right depth—typically 18-24 inches—allow excess water to escape while your irrigation system (operating closer to the surface) delivers moisture exactly where roots need it. This partnership prevents the feast-or-famine cycle that stresses plants and wastes resources.
By integrating efficient irrigation practices with strategic drainage, you’re creating a sustainable water management system that responds to your landscape’s actual needs rather than guesswork. Your soil stays healthy, your plants flourish, and you’ll notice a significant reduction in water usage—a win for both your wallet and the environment.
Coordinating Pipe Placement to Avoid Conflicts
Think of your yard as a bustling underground city where drainage and irrigation pipes need to coexist peacefully. Before you dig a single trench, grab some bright spray paint or marking flags and walk your property to identify existing irrigation lines. Most systems have visible sprinkler heads or valve boxes that hint at what’s below. If you’re unsure about locations, turn on your irrigation system and watch where water emerges, which gives you a rough map of the pipe routes.
When planning your drainage installation, maintain at least 12 inches of separation between drainage and irrigation lines whenever possible. This buffer zone prevents accidental damage during future repairs and reduces the risk of contamination if an irrigation line develops a leak. Remember that drainage pipes typically run deeper than irrigation lines, so you can sometimes cross paths by going underneath existing systems.
Here’s a practical sequence that works well: install your drainage system first if you’re working on a new landscape, or carefully hand-dig near known irrigation lines when retrofitting. Mark your drainage route with stakes and string before breaking ground, adjusting the path to minimize conflicts. Consider proper pipe sizing for both systems during the planning phase to ensure everything functions optimally.
Document everything with photos and simple sketches showing depths and locations. Trust me, your future self will thank you when it’s time for maintenance or expansion. This sustainable approach prevents wasteful repairs and protects your investment in both systems.
Step-by-Step Drainage Pipe Installation Process
Tools and Materials You’ll Actually Need
You’ll need some basic tools to tackle this project successfully. Start with a good trenching shovel or spade for digging—your back will thank you for investing in an ergonomic design. A wheelbarrow makes hauling soil much easier, and I recommend choosing a metal one that’ll last years rather than disposable plastic models.
For the actual drainage system, you’ll need perforated drainage pipe (typically 4-inch diameter works well for most residential yards), landscape fabric to wrap around it, and gravel for proper water flow. Choose corrugated HDPE pipes when possible—they’re durable and recyclable. You’ll also want pipe connectors, end caps, and a hacksaw for cutting pipes to size.
Safety gear is non-negotiable: sturdy work gloves, safety glasses, and steel-toed boots protect you from common injuries. Before you dig anywhere, call 811 to locate underground utilities—this free service could save your life.
A string line and stakes help maintain proper slope, which is critical for effective drainage. Keep a level and measuring tape handy too. Finally, consider renting a trenching machine for larger projects; sometimes the investment in proper equipment makes the difference between a weekend project and a week-long ordeal.
Excavating Trenches the Smart Way
Smart excavation makes all the difference between a weekend project and a month-long headache. Start by calling 811 to mark underground utilities – trust me, hitting a gas line ruins everyone’s day. When digging, set aside your topsoil separately from the subsoil beneath. That nutrient-rich top layer is gardening gold you’ll want to return to the surface when backfilling.
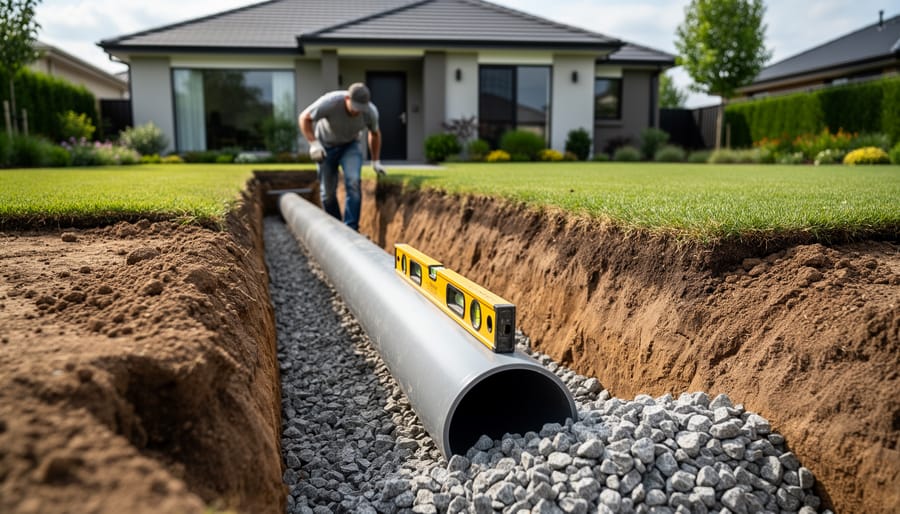
For proper drainage, maintain a minimum slope of 1-2% (roughly 1-2 inches per 10 feet). A simple string level stretched along your trench helps keep you honest. Dig trenches about 6 inches wider than your pipe to allow working room and proper bedding material placement.
Here’s a sustainability tip: lay plywood sheets or tarps along your digging path to protect existing grass. Pile excavated soil on these protective barriers rather than directly on your lawn. This minimizes compaction and makes cleanup easier.
Consider renting a trenching machine for long runs – it’s faster, creates uniform depth, and honestly saves your back. For shorter sections or tight spaces, a sharp spade works fine. Remember, taking time to excavate carefully means less restoration work later and a drainage system that actually functions as designed.
Installing Pipes with Proper Grade and Support
Getting the proper slope is absolutely essential for effective drainage—think of it as creating a gentle highway for water to travel away from problem areas. You’ll want to aim for a minimum grade of 1-2% (that’s about 1-2 inches of drop for every 10 feet of pipe). A simple trick I’ve learned over the years is to use a string level and stakes to mark your target slope before laying any pipe.
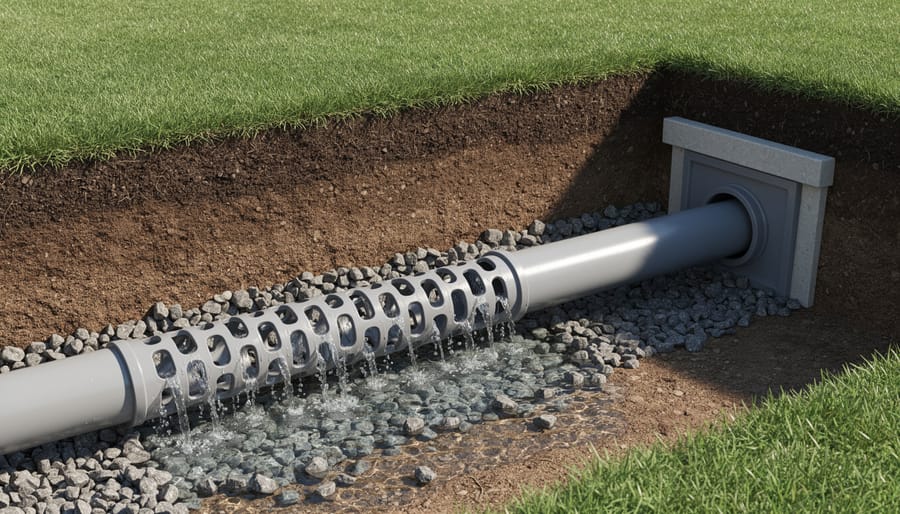
As you connect pipe sections, make sure each joint fits snugly and secure them with manufacturer-recommended couplers or adhesive. For perforated drainage pipe, position the holes facing downward—this might seem counterintuitive, but it actually prevents soil from clogging the openings while still allowing water to enter from below.
Support is crucial for longevity. Lay your pipes on a firm, even bed of gravel (typically 2-3 inches) to prevent settling and maintain that all-important grade. Every few feet, particularly around bends or transitions, compact the bedding material gently. This prevents future sagging that could create low spots where water pools instead of flowing through.
Before backfilling, test your system by running water through it to confirm proper flow. This simple step can save you from digging everything up later to fix drainage issues.
Adding Fabric, Gravel, and Backfill Correctly
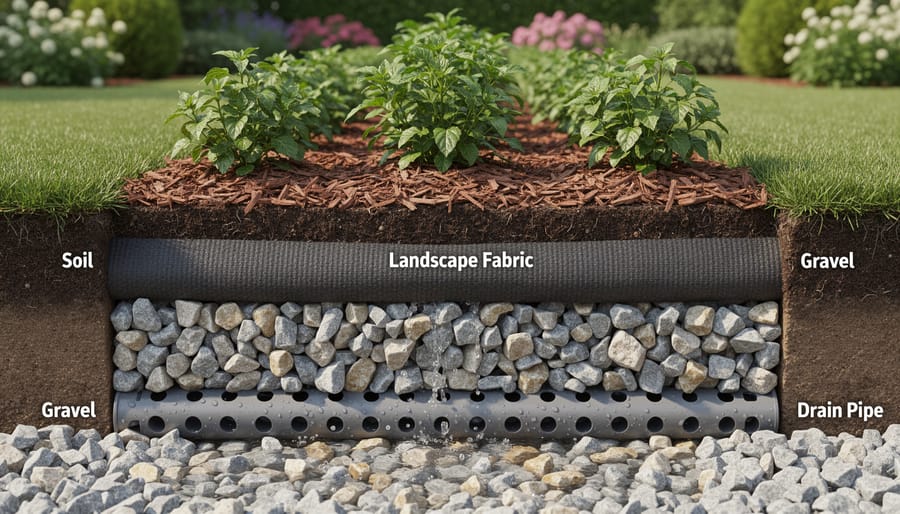
Getting your layering right makes all the difference between a drainage pipe that works for decades and one that clogs within a season. Think of it like making a lasagna, where each layer has a specific purpose and order matters.
Start by placing landscape fabric along the bottom and sides of your trench. This breathable barrier keeps soil particles out while allowing water to pass through freely. I’ve seen too many well-intentioned DIYers skip this step only to deal with clogged pipes a year later. Choose a quality, non-woven fabric designed specifically for drainage projects rather than cheaper alternatives that deteriorate quickly.
Next, add 2-3 inches of clean gravel as your foundation layer. Avoid using crushed stone with fine particles, as these can migrate into your pipe over time. Place your drainage pipe on this gravel bed with perforations facing down, despite what some old-school methods suggest. This positioning allows water to enter from below where it naturally collects.
Cover the pipe with another 3-4 inches of gravel, creating a protective cocoon that filters water before it enters the system. Wrap the fabric over the top, overlapping edges by at least 6 inches to prevent soil infiltration. Finally, backfill with native soil, compacting gently in layers. This sustainable approach uses materials already on your property while ensuring proper drainage function for years to come.
Creating Effective Outlet Points
Your drainage system needs somewhere to send that excess water, and choosing the right outlet matters for both effectiveness and environmental responsibility. Pop-up emitters are popular choices that sit flush with your lawn and only open when water flows through, keeping debris out while maintaining a clean look. They work great for areas where you can discharge onto a gentle slope or rain garden.
For yards without good surface drainage options, dry wells offer an eco-friendly solution by collecting water underground in gravel-filled pits where it slowly percolates into the soil. This recharges groundwater naturally rather than sending runoff into storm systems. If you must connect to municipal storm drains, check local codes first since many communities have specific requirements to prevent overwhelming treatment facilities during heavy rains.
Sustainable Practices for Drainage Installation
Protecting Soil Health During Installation
Soil health often takes a hit during drainage installations, but with thoughtful techniques, you can minimize damage and maintain a thriving ecosystem underground. Before digging, work only when soil is moderately moist, not waterlogged or bone-dry. Wet soil compacts easily, while overly dry soil loses structure. Lay down plywood boards as walkways to distribute your weight and equipment load across a wider area, preventing concentrated compaction.
When excavating trenches, set aside the topsoil separately from subsoil. This precious top layer contains the most beneficial organisms and organic matter, so you’ll want to return it to its rightful place. Avoid walking directly in trenches or running heavy equipment over exposed soil.
After backfilling around your drainage pipe, resist the urge to tamp down soil aggressively. Light tamping prevents major settling, but excessive compaction squeezes out air pockets that roots and soil organisms need. Instead, water gently to help soil particles settle naturally. Finish by adding a two-inch layer of compost over disturbed areas. This organic boost feeds soil microbes, improves structure, and helps your lawn recover faster, ensuring your drainage system works within a healthy, sustainable landscape.
Eco-Friendly Discharge Options and Water Reuse
Here’s where things get really exciting—you can turn your drainage system into a powerful sustainability tool! Instead of simply channeling water away to the street or storm drains, consider eco-friendly discharge options that put every drop to work in your landscape.
Rain gardens are my favorite solution. These shallow depressions planted with native, water-loving plants naturally filter and absorb drainage water while creating beautiful focal points. Direct your drainage pipe to empty into a rain garden, and you’ve created a miniature ecosystem that benefits pollinators and local wildlife.
Bioswales work similarly but along slopes or property edges, slowing water flow and allowing natural infiltration. They’re perfect for managing larger volumes while preventing erosion.
You can also strategically direct drainage to irrigate thirsty landscape areas like vegetable gardens, hedges, or young trees. This approach works wonderfully when combined with rainwater harvesting systems, where drainage feeds into collection barrels or cisterns for later use. Just ensure you’re not oversaturating these areas—proper planning prevents creating new drainage problems. These methods reduce municipal water usage, lower your water bills, and keep your landscape thriving naturally.
Maintaining Your Drainage System Long-Term
Regular Inspection and Cleaning Schedules
Keeping your drainage system running smoothly doesn’t require much effort, but a little seasonal attention goes a long way. I like to think of it as giving your underground helpers a quick health check a couple times a year.
Spring and fall are ideal times for inspection. Walk your property and check all visible inlets and outlets for debris buildup. Leaves, soil, and even ambitious plant roots love to congregate at these entry points. A simple garden trowel and gloved hands usually do the trick for clearing surface blockages.
Every six months, flush your drainage pipes by running water from a garden hose into the inlet points. This helps push out accumulated sediment and confirms water is flowing freely through the system. If water backs up or drains slowly, you’ve caught a problem early before it becomes a soggy disaster.
Pay special attention to areas where your drainage connects with irrigation systems. Mulch and grass clippings tend to migrate toward these spots, so keep a small perimeter clear around each access point. During heavy rainfall seasons, do a quick visual check after storms to ensure outlets are discharging properly and not creating erosion patterns. This proactive approach means your system will reliably manage water for years, protecting both your landscape investment and the environment by preventing runoff issues.
Troubleshooting Common Drainage Issues
Even well-installed drainage systems can run into trouble, but most issues have straightforward fixes. If you notice slow drainage, your pipes may be partially clogged with soil or debris. Try flushing them with a garden hose or use a plumber’s snake for stubborn blockages. Installing filter fabric around your pipes during installation prevents many of these problems.
Collapsed trenches often result from inadequate backfilling or heavy foot traffic too soon after installation. To repair, carefully excavate the affected area, reposition the pipe ensuring proper slope, and compact soil in layers as you refill. For future prevention, mark your drainage lines and avoid driving over them.
Watch for warning signs that repairs are needed: standing water that wasn’t there before, soggy patches in your lawn, or basement moisture. These issues can also indicate irrigation system inefficiencies working against your drainage efforts. Sometimes your sprinklers and drainage need to work in harmony rather than fighting each other.
Annual inspections help catch problems early. Walk your property after heavy rain, checking for pooling water or soil settling. This proactive approach saves time and money while keeping your yard healthy and sustainable.
When to DIY vs. Hire a Professional
Let’s be honest about when you can tackle this yourself and when it’s time to call in the pros. I’ve seen plenty of successful DIY drainage installations, but I’ve also witnessed some expensive fixes that could have been avoided with professional help from the start.
You can confidently DIY if you’re dealing with a straightforward project: installing a simple French drain in a small area, adding catch basins to redirect water away from flower beds, or extending an existing drainage system. These projects typically involve digging trenches less than 100 feet, working with standard PVC piping, and managing gentle slopes. If you’re comfortable with basic tools, following instructions, and doing some physical labor, these are absolutely within reach.
However, certain situations demand professional expertise. Call a contractor if you’re working near property lines where drainage disputes could arise, dealing with significant slopes or erosion issues, or managing water that affects your home’s foundation. Projects requiring heavy machinery, working around underground utilities, or installing systems larger than 200 feet generally need professional oversight. If your yard has complex drainage patterns or you’re unsure about local building codes and permits, that’s another red flag for DIY attempts.
Finding qualified contractors takes a bit of homework. Look for landscaping companies or drainage specialists with specific experience in residential water management. Ask for references from projects similar to yours, verify their licensing and insurance, and get at least three detailed written estimates. The right contractor should assess your entire property’s water flow, not just treat symptoms. They’ll also understand how drainage integrates with your irrigation system, ensuring you’re creating a sustainable solution that protects both your landscape investment and the environment through proper water management.
Installing landscape drainage pipes isn’t just about solving a water problem—it’s about investing in the long-term health of your lawn and the value of your entire property. When you take the time to properly plan and install a drainage system, you’re creating the foundation for a landscape that can truly thrive, rather than one that’s constantly fighting against pooling water and soggy soil.
The beautiful thing about getting your drainage right is how it works hand-in-hand with your irrigation efforts. Think of it this way: drainage removes excess water when nature provides too much, while irrigation delivers moisture when your plants need it most. Together, they create a balanced water management system that’s both sustainable and efficient. You’re not wasting water, you’re not battling waterlogged roots, and you’re not watching your hard work wash away with every heavy rain.
If you’ve been putting off addressing drainage issues in your yard, now is the time to act. Start with that planning phase we discussed—walk your property after a rain, identify problem areas, and map out your strategy. The effort you put in today will reward you with a healthier, more usable outdoor space for years to come. Whether you’re growing vegetables, nurturing a pristine lawn, or simply want a yard where your kids can play without trudging through mud, proper drainage makes it all possible. Your landscape deserves this foundation for success.