Installing your lawn mower blade upside down or backward will tear grass instead of cutting it cleanly, leaving your lawn brown-tipped and vulnerable to disease. The correct blade position features the cutting edges angled upward toward the mower deck, with any stamped markings like “This Side Down” or “Bottom” facing the ground.
Most blades have a distinctive sail or wing shape that creates lift—this curved portion must face upward toward the deck to generate the airflow that pulls grass upright for an even cut. If you’re reinstalling blades after sharpening or replacing worn ones, you’ll notice the difference immediately: correctly positioned blades produce a clean, scissor-like cut, while reversed blades create a ragged, torn appearance that stresses your grass and opens it to pests and disease.
This guide walks you through identifying the proper orientation before installation, securing blades with the correct torque specifications, and troubleshooting common installation mistakes. Whether you’re a first-time blade replacer or simply want to verify you’ve got it right, understanding these fundamentals protects both your lawn’s health and your mower’s performance. A few minutes of careful attention during installation prevents weeks of disappointing mowing results and potential damage to your mower’s engine from improper blade balance.
Understanding Lawn Mower Blade Orientation
The Cutting Edge vs. The Sail
Understanding the difference between your blade’s cutting edge and its sail portion is crucial for proper installation—and honestly, it’s easier than you might think once you know what to look for!
The **cutting edge** is the sharpened side of your blade, and it should face the grass. Run your finger carefully along the blade’s bottom edge (wear gloves!), and you’ll feel one side is noticeably sharper. This is your cutting edge. Even on well-worn blades that have seen countless mowing sessions, you can still identify it by looking for the beveled angle where the metal has been ground down to create that cutting surface.
The **sail portion**, sometimes called the wing or lift, is the angled part that curves upward from the flat blade body. This creates the airflow that lifts grass blades upright for a clean cut and helps direct clippings toward your discharge chute. You’ll notice this upward angle is on the top side of the blade—the side that should face your mower deck.
Here’s a practical tip: hold your blade at eye level and look at it from the side. The sail should curve upward like a tiny ramp, while the cutting edge below remains flat or angles downward slightly. This configuration is nature’s little vacuum system—the rotating sail creates lift while the sharp edge does the cutting work below.

Why Blade Direction Affects Your Lawn
Understanding why blade direction matters can transform your mowing results from frustrating to fantastic. The secret lies in what’s called the “sail” or curved portion of your mower blade.
When installed correctly with the sail angled upward, your blade creates an aerodynamic lift effect—similar to how an airplane wing works. As the blade spins at high speed, this upward curve generates airflow that stands grass blades vertically just before cutting them. Think of it as giving your grass a little hairbrush before the scissors come through. This ensures each blade gets cut cleanly at the same height, rather than being pushed over and cut unevenly.
The sail also creates a vacuum effect inside your mower deck that’s essential for proper cutting. This suction doesn’t just lift grass—it also propels clippings upward and outward, either into your collection bag or evenly across your lawn for natural mulching. Without this airflow, clippings clump underneath the deck, clogging your mower and leaving unsightly piles that can smother your grass and create brown patches.
When blades are installed upside-down, this entire system works against you, resulting in ragged cuts that stress your grass and create entry points for disease.
How to Identify Correct Blade Position
The Simple Visual Check
Before you even start your mower, there’s a quick visual inspection that’ll save you from scalped grass and frustrating results. Think of it like checking your shoes before a hike—you want everything facing the right direction!
First, get down at eye level with your mower deck (after disconnecting the spark plug, of course). Look at the blade from the side. You should see a gentle upward curve at the outer ends—this is called the “sail” or “wing.” This curve is crucial because it creates the airflow that lifts grass for a clean cut and helps discharge clippings efficiently. If those curved ends are pointing down toward the ground, your blade is upside down.
Next, examine the cutting edge. The sharpened, beveled edge should face the grass, angling slightly toward the ground when the blade is horizontal. Run your finger carefully along the edge from underneath (never from above)—you should feel the sharp bevel facing downward.
Finally, check from directly below. The blade should sit completely flat against the spindle mount with no gaps or wobbling. A properly positioned blade lies parallel to the ground, ready to create that picture-perfect lawn you’re after while promoting healthier grass growth through clean cuts.
What Wrong Looks Like
We’ve all been there – you finish installing your blade, fire up the mower, and something just feels… off. The most common mistake is installing the blade upside down, which happens more often than you’d think! When a blade is flipped incorrectly, you’ll notice the sharpened cutting edge faces downward toward the ground instead of upward toward the deck. The wings or sail fins will also point downward rather than angling up into the deck, which completely defeats their grass-lifting purpose.
Another frequent error is mounting the blade backward, where the curved lifting wings face the wrong direction. This creates a “pushing” effect instead of the vacuum lift you need for a clean cut. You might also notice if the blade sits loose on the spindle – perhaps you’ve forgotten a washer or haven’t tightened the bolt properly, which is both ineffective and dangerous.
The telltale signs of incorrect installation include ragged, torn grass blades instead of clean cuts, uneven cutting height, excessive vibration, and grass clumps left behind on your lawn. If you’re experiencing any of these issues, it’s worth checking if your blade is upside down before assuming your mower has bigger problems. Trust me, fixing blade position is much easier than you might fear!
Manufacturer Markings and Labels
Most lawn mower blades make your job easier by including helpful markings stamped right into the metal. Look for phrases like “this side up,” “grass side,” or “bottom” – these are your best friends during installation! Many manufacturers also include arrows pointing toward the deck or part numbers positioned to face upward when correctly installed.
Before removing your old blade, take a quick photo with your phone. This gives you a reference point showing which side faced the grass and how any text or numbers were oriented. When installing your new blade, match these markers accordingly – if the stamping is readable when you’re looking at the blade from below the mower deck, you’ve got it right.
Not all blades have clear text markings, but most feature some kind of visual cue. Some have a painted surface on one side, a slight concave curve, or even a small dimple near the center hole. These subtle indicators are there for a reason, helping you avoid the frustration of improper installation. Taking thirty seconds to check these markings saves you from remounting the blade – a sustainable approach that prevents unnecessary wear on your equipment and wasted time.
Installing Your Blade the Right Way
Safety First: Preparing Your Mower
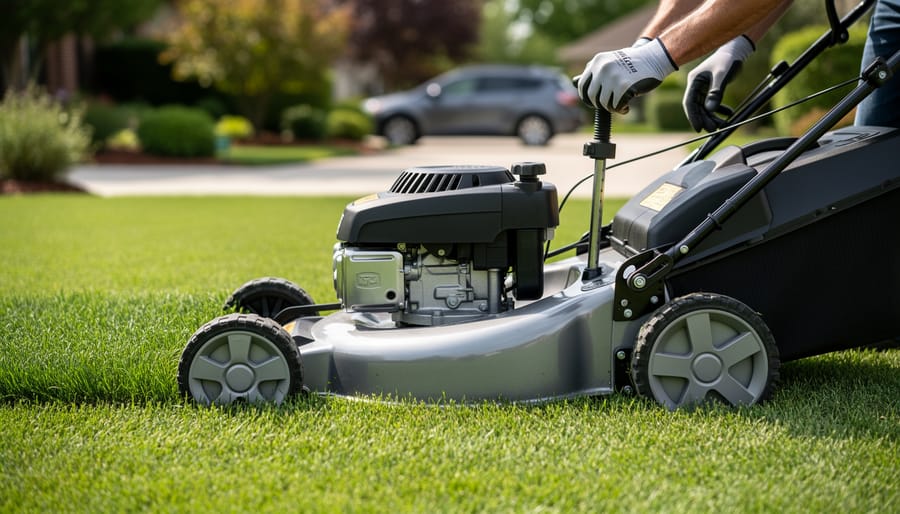
Before you start working on your mower blade, let’s talk about keeping you safe—because no lawn is worth a trip to the emergency room! First and always, **disconnect the spark plug wire**. This simple step prevents accidental starts while your hands are near the blade. Just pull that wire off the spark plug and tuck it away from the plug itself.
If you’re tilting your mower to access the blade underneath, drain or siphon out most of the fuel first, or tip it so the carburetor side faces upward to prevent gas from flooding the engine. For push mowers, I recommend tilting them toward the handle, not forward.
Stabilize your mower on a flat, level surface before you begin. Consider using a sturdy block or mower lift to keep it secure—a shifting mower is dangerous when sharp blades are involved. Wear heavy work gloves to protect your hands, though never grip the cutting edge directly.
Finally, take a breath and work methodically. Rushing through blade maintenance is how accidents happen, and getting it right the first time means better results for your lawn and peace of mind for you.
Removing the Old Blade
Before you begin, disconnect the spark plug wire—this simple step prevents accidental starts and keeps you safe. Tilt your mower on its side with the air filter and carburetor facing up to prevent oil leaks. Now you’ll see the blade bolt underneath.
Here’s a trick that’ll save you frustration: that blade wants to spin when you try to loosen it! Wedge a sturdy block of wood between the blade and the deck to hold it steady. Some folks use a blade removal tool, but a 2×4 scrap works perfectly and costs nothing—sustainability in action!
The blade bolt is typically very tight, so you’ll need a socket wrench or box-end wrench for proper leverage. Most mower blades use a 5/8-inch or 15/16-inch bolt, though sizes vary. Turn counterclockwise to loosen (remember: “lefty loosey”). Apply steady, firm pressure—sometimes these bolts are really stuck!
Once loose, remove the bolt completely and carefully slide off any washers or spacers. Keep these parts together; you’ll need them for reinstallation in the exact same order. This is also the perfect time to sharpen your mower blades for optimal cutting performance.

Installing the Blade Correctly
Now that you’ve identified which side faces down, let’s walk through the installation process together. I remember the first time I reinstalled a blade—I was so nervous about getting it wrong that I triple-checked everything! The good news is, once you know the steps, it becomes second nature.
Start by sliding the blade onto the spindle shaft with the cutting edges facing the grass and the sail (that angled wing portion) pointing upward toward the deck. The blade should sit flat against the mounting surface. Here’s where many folks go wrong: the center hole must align perfectly with the spindle. If it feels forced or doesn’t sit flush, stop and recheck your orientation.
Next, thread the blade bolt back on by hand first—this prevents cross-threading, which can damage your mower. Once hand-tight, grab your torque wrench. This is crucial for both safety and blade longevity. Most residential mowers require 35-40 foot-pounds of torque, while commercial models often need 50-80 foot-pounds. Check your owner’s manual for the exact specification—over-tightening can strip threads or crack the blade, while under-tightening risks the blade coming loose mid-mow, which is genuinely dangerous.
After torquing, give the blade a gentle spin by hand. It should rotate freely without wobbling. A little resistance from the drive belt is normal, but any grinding or catching means something’s misaligned. This final check has saved me from potential issues more times than I can count, and it takes just seconds!
Common Blade Position Mistakes and Their Consequences
Upside Down Blades
We’ve all been there—you finish mowing and step back to admire your work, only to realize the lawn looks worse than before you started. If you’ve accidentally installed your mower blade upside down, you’ll know it pretty quickly from some unmistakable warning signs.
The most obvious clue is poor cut quality. Instead of that crisp, even lawn you’re after, you’ll notice the grass looks ragged and uneven. This happens because an inverted blade doesn’t create the proper cutting angle or airflow needed for clean cuts. You might also see that you’re essentially just beating the grass down rather than trimming it neatly.
Another telltale sign is excessive vibration coming from your mower deck. The blade’s aerodynamic design works in one specific direction, and when it’s flipped, it fights against the airflow instead of working with it. This creates an uncomfortable rumbling you’ll feel through the handles.
Perhaps most damaging is the tearing effect on grass blades. Rather than making clean cuts that heal quickly, an upside-down blade tears and shreds the grass tips, leaving them brown and stressed. This not only looks unsightly but also makes your lawn more vulnerable to disease and drought stress—the opposite of the healthy, sustainable lawn we’re all working toward.
Loose or Improperly Torqued Blades
Even if you’ve positioned your blade correctly, it won’t do you much good if it’s not properly secured. I learned this lesson the hard way when I reinstalled a blade after sharpening and didn’t torque it quite enough—the resulting wobble created an uneven cut that looked like I’d mowed with my eyes closed!
When a blade isn’t tightened to the manufacturer’s specifications (typically between 38-50 foot-pounds), several problems emerge. You’ll notice excessive vibration during operation, which isn’t just annoying—it can damage your mower’s spindle assembly over time. The cut quality suffers dramatically, leaving streaks of taller grass between passes. In extreme cases, you might hear a metallic rattling or clunking sound as the blade shifts during operation.
The safety concerns are serious. A loose blade can work itself completely free during operation, becoming a dangerous projectile. It can also cause the blade to strike the deck, creating sparks or damaging both components.
Always use a torque wrench when installing blades—this isn’t overkill, it’s proper maintenance. Check blade tightness at the start of each season and after any blade removal. Remember, over-tightening can strip threads or crack the blade hub, so precision matters. This simple step protects both your lawn’s appearance and your safety.
Maintaining Proper Blade Position Throughout the Season
Regular Inspection Schedule
Think of blade inspection as a quick health check-up for your mower—it only takes a few minutes but can save you from bigger headaches down the road. For most homeowners, checking your blade position and condition every 4-6 mowing sessions is a practical sweet spot. If you’re caring for a larger lawn or mowing more frequently during peak growing season, bump that up to every 3-4 sessions.
Here’s a quick inspection routine: After each mow, take a peek underneath while the mower is off and cool. Look for any obvious damage, looseness, or debris buildup. Once a month during mowing season, do a more thorough check—ensure the blade sits flush against the mounting surface and wiggle it gently to confirm it’s properly tightened. You’ll also want to inspect the cutting edges for nicks or dullness. This regular attention helps you catch issues early, ensures consistently clean cuts that are better for your grass’s health, and ultimately supports a more sustainable lawn care approach by maximizing your equipment’s efficiency and lifespan.
When Blade Position Changes
Even with perfect initial installation, your mower blade can shift position over time. The most common culprit? Hitting obstacles like rocks, tree roots, or hidden debris in your lawn. These impacts create sudden force that can loosen the blade bolt or even bend the blade itself, throwing everything out of alignment.
You might also notice blade movement after extended use, especially if you’re mowing frequently during peak growing season. Vibration gradually works against even the tightest connections, which is why regular maintenance checks matter so much for both performance and safety.
If you suspect your blade has shifted, stop mowing immediately and disconnect the spark plug. Check for the telltale signs: uneven cutting patterns, excessive vibration, or unusual noises. Inspect the blade position using the techniques we covered earlier, and retighten or reinstall as needed. This is also the perfect opportunity to examine your blade for damage—a bent or cracked blade should be replaced rather than reused, even if you can reposition it correctly.
Think of blade positioning like checking your car’s tire pressure: it’s not a one-and-done task. Quick seasonal inspections, especially after hitting something substantial, will keep your lawn looking its best while extending your mower’s life sustainably.
Blade Balance and Position: The Connection
Even when you’ve positioned your blade correctly with the cutting edges facing down and the sail pointing up toward the deck, there’s another crucial factor at play: balance. Think of it like a ceiling fan—if one blade is heavier than the others, you’ll get that annoying wobble. The same principle applies to your mower blade, and an unbalanced blade can undo all the benefits of proper positioning.
An unbalanced blade causes excessive vibration, which strains your mower’s engine and bearings, leading to premature wear. It also results in an uneven cut because the blade doesn’t maintain consistent height as it spins. You might notice your freshly mowed lawn looks wavy rather than uniformly trimmed—that’s often a telltale sign of balance issues.
The good news? Balancing your blade is surprisingly simple and works hand-in-hand with correct positioning. After sharpening or when installing a new blade, use a blade balancer (a simple cone-shaped tool available at hardware stores) or even a nail through the center hole suspended horizontally. If one side dips, remove a bit of metal from the heavier side until it sits level.
This sustainable approach extends your equipment’s life and ensures you’re not wasting fuel due to inefficient operation. A properly positioned and balanced blade means fewer passes across your lawn, less wear on your mower, and a healthier, more evenly cut yard—exactly what environmentally conscious gardeners aim for.

Getting your mower blade positioned correctly might seem like a minor detail, but as we’ve explored, it makes a surprisingly dramatic difference in both your lawn’s health and your mower’s lifespan. A properly installed blade cuts cleanly, reducing stress on grass plants and helping them resist disease and drought. Meanwhile, your mower runs more smoothly with less vibration, fewer repairs, and better fuel efficiency—a win for both your wallet and the environment.
The good news? This is one of the easiest and most effective maintenance tasks you can master. Whether you’re just starting out or you’ve been mowing for years, taking five minutes to verify your blade position can transform your mowing results. For more ways to elevate your outdoor space, check out our comprehensive lawn care guide.
So here’s my challenge to you: next time you’re about to mow, take a quick peek at your blade. Are those wings pointing up toward the deck? If you discover it’s been wrong all along, don’t worry—you’re definitely not alone! We’d love to hear about your experience or answer any questions in the comments below. Happy mowing!